文章目录
显示
? 优质资源分享 ?
| 学习路线指引(点击解锁) | 知识定位 | 人群定位 |
|---|---|---|
| ? Python实战微信订餐小程序 ? | 进阶级 | 本课程是python flask+微信小程序的完美结合,从项目搭建到腾讯云部署上线,打造一个全栈订餐系统。 |
| ?Python量化交易实战? | 入门级 | 手把手带你打造一个易扩展、更安全、效率更高的量化交易系统 |
今日内容概要
- 登陆注册页面
- 多方式登陆功能
- 腾讯云短信发送二次封装
- 发送短信接口
内容详细
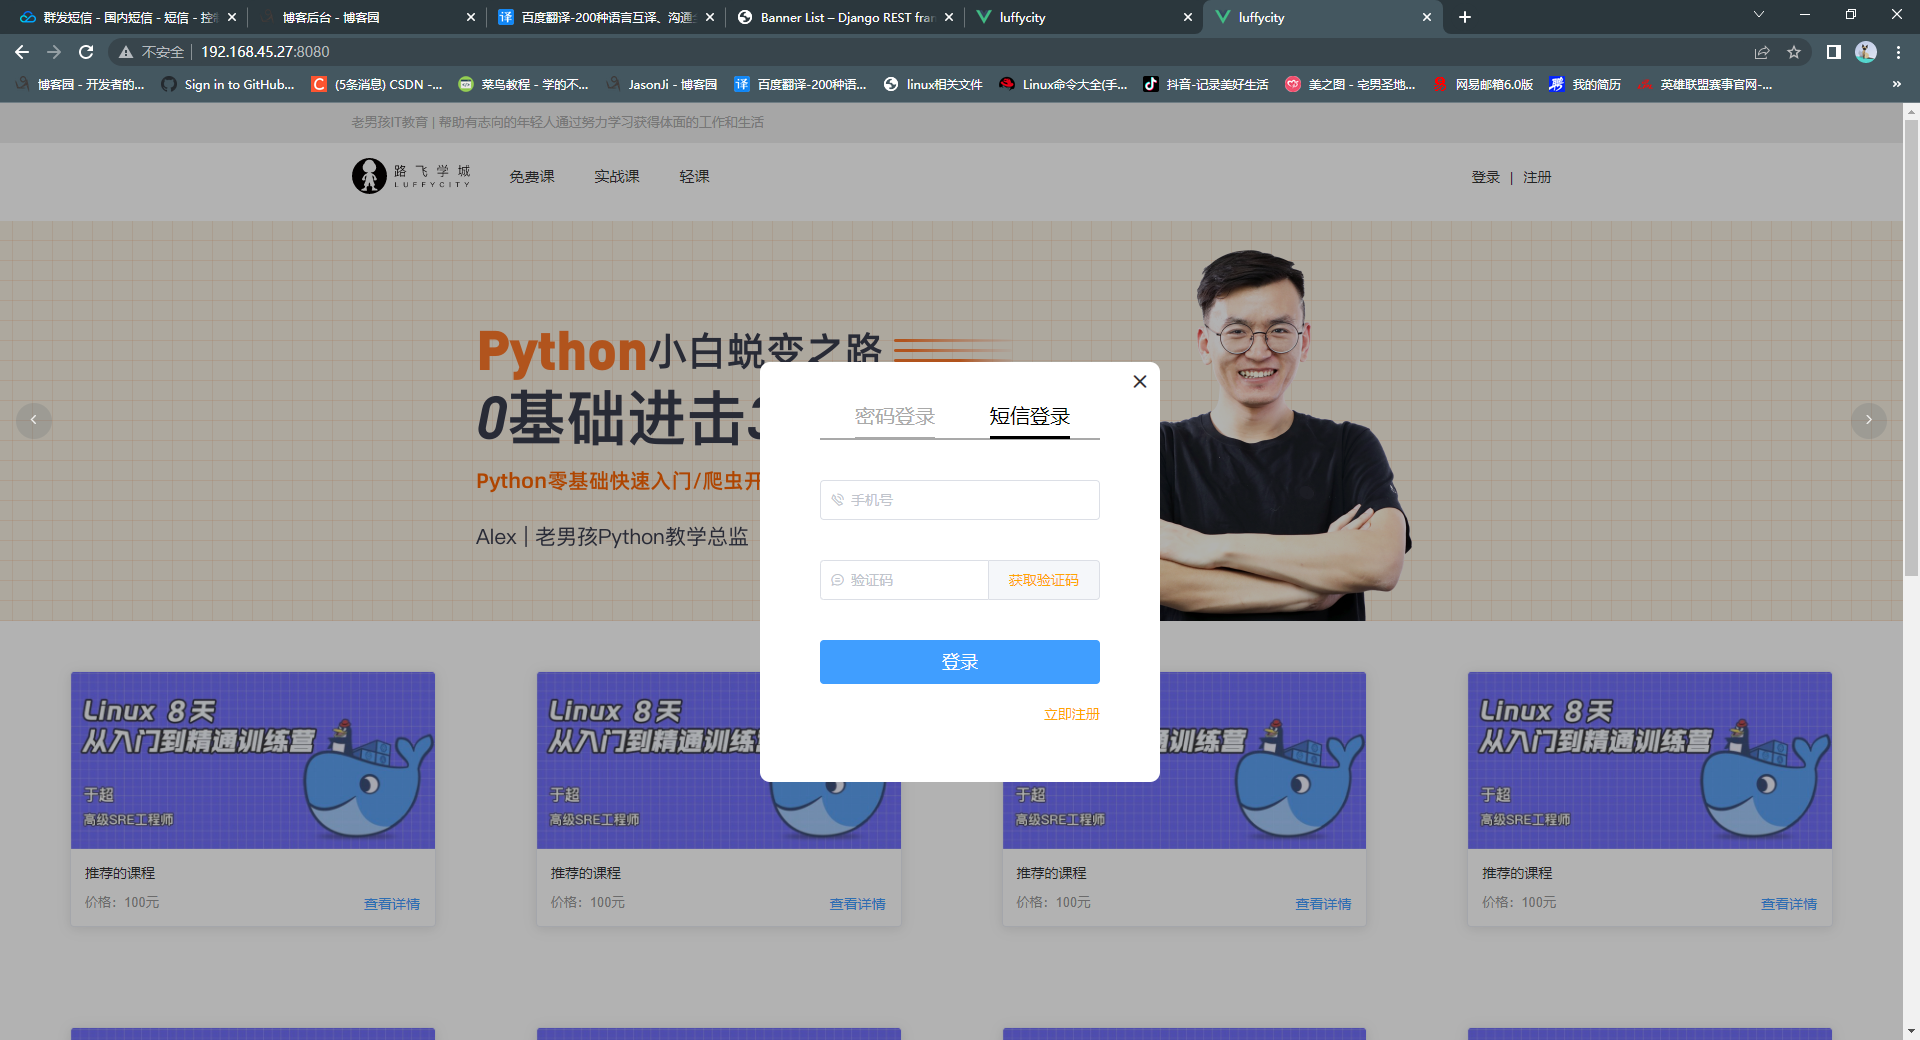
1、登陆注册页面(前端项目页面)
# 打开前端项目 luffycity:

# 如果登录注册是一个新页面,比较好写
    新建一个页面组件,跳转到这个页面即可

# 使用vue-router实现页面跳转
    第一步:需要在router文件夹的index.js中配置一条路由
    {
        path: '/login',
        name: 'login',
        component: Login
    }

    第二步:访问/login路径,就会显示Login这个页面组件

    第三步:点击按钮跳转到这个路径
    js中:this.$router.push('/login')

    第四步:在html页面中跳转-->点击该标签,就可以跳转到/login这个路径
    "/login">

# 如果登录注册是单独一个页面的话比较简单

# 现在要求登录注册是弹出模态框效果--》弹出框---》也是组件
    创建:Login,Register两个组件,普通组件---》放在components文件夹下
更改 src/router/index.js
import Vue from 'vue'
import VueRouter from 'vue-router'
import HomeView from '../views/HomeView.vue'
import Login from "@/components/Login"

Vue.use(VueRouter)

const routes = [
    {
        path: '/',
        name: 'home',
        component: HomeView
    },
    {
        path: '/home',
        name: 'home',
        component: HomeView
    },
    {
        path: '/login',
        name: 'login',
        component: Login
    },
]

const router = new VueRouter({
    mode: 'history',
    base: process.env.BASE\_URL,
    routes
})

export default router
更改 src/components/Header.vue :
老男孩IT教育 | 帮助有志向的年轻人通过努力学习获得体面的工作和生活
* 
* 免费课
* 实战课
* 轻课
登录
|
注册
import Login from "@/components/Login";
import Register from "@/components/Register";
export default {
name: "Header",
data() {
return {
url\_path: sessionStorage.url\_path || '/',
is\_login: false,
is\_register: false
}
},
methods: {
goPage(url\_path) {
// 已经是当前路由就没有必要重新跳转
if (this.url\_path !== url\_path) {
this.$router.push(url\_path);
}
sessionStorage.url\_path = url\_path;
},
close\_login() {
this.is\_login = false
},
close\_register() {
this.is\_register = false
},
put\_register() {
this.is\_register = true
this.is\_login = false
},
put\_login() {
this.is\_register = false
this.is\_login = true
}
},
created() {
sessionStorage.url\_path = this.$route.path;
this.url\_path = this.$route.path;
},
components: {
Login, Register
}
}
.header {
background-color: white;
box-shadow: 0 0 5px 0 #aaa;
}
.header:after {
content: "";
display: block;
clear: both;
}
.slogan {
background-color: #eee;
height: 40px;
}
.slogan p {
width: 1200px;
margin: 0 auto;
color: #aaa;
font-size: 13px;
line-height: 40px;
}
.nav {
background-color: white;
user-select: none;
width: 1200px;
margin: 0 auto;
}
.nav ul {
padding: 15px 0;
float: left;
}
.nav ul:after {
clear: both;
content: '';
display: block;
}
.nav ul li {
float: left;
}
.logo {
margin-right: 20px;
}
.ele {
margin: 0 20px;
}
.ele span {
display: block;
font: 15px/36px '微软雅黑';
border-bottom: 2px solid transparent;
cursor: pointer;
}
.ele span:hover {
border-bottom-color: orange;
}
.ele span.active {
color: orange;
border-bottom-color: orange;
}
.right-part {
float: right;
}
.right-part .line {
margin: 0 10px;
}
.right-part span {
line-height: 68px;
cursor: pointer;
}
更改 src/components/Banner.vue的template标签:
 ![]()

  [![]()](https://blog.csdn.net/biggbang)
新建:src/components/Register.vue
 新用户注册

 {{ sms\_interval }}

 注册

 立即登录

export default {
 name: "Register",
 data() {
 return {
 mobile: '',
 password: '',
 sms: '',
 sms\_interval: '获取验证码',
 is\_send: false,
 }
 },
 methods: {
 close\_register() {
 this.$emit('close', false)
 },
 go\_login() {
 this.$emit('go')
 },
 check\_mobile() {
 if (!this.mobile) return;
 if (!this.mobile.match(/^1[3-9][0-9]{9}$/)) {
 this.$message({
 message: '手机号有误',
 type: 'warning',
 duration: 1000,
 onClose: () => {
 this.mobile = '';
 }
 });
 return false;
 }
 this.is\_send = true;
 },
 send\_sms() {
 if (!this.is\_send) return;
 this.is\_send = false;
 let sms\_interval\_time = 60;
 this.sms\_interval = "发送中...";
 let timer = setInterval(() => {
 if (sms\_interval\_time <= 1) {
 clearInterval(timer);
 this.sms\_interval = "获取验证码";
 this.is\_send = true; // 重新回复点击发送功能的条件
 } else {
 sms\_interval\_time -= 1;
 this.sms\_interval = `${sms\_interval\_time}秒后再发`;
 }
 }, 1000);
 }
 }
}

.register {
 width: 100vw;
 height: 100vh;
 position: fixed;
 top: 0;
 left: 0;
 z-index: 10;
 background-color: rgba(0, 0, 0, 0.3);
}

.box {
 width: 400px;
 height: 480px;
 background-color: white;
 border-radius: 10px;
 position: relative;
 top: calc(50vh - 240px);
 left: calc(50vw - 200px);
}

.el-icon-close {
 position: absolute;
 font-weight: bold;
 font-size: 20px;
 top: 10px;
 right: 10px;
 cursor: pointer;
}

.el-icon-close:hover {
 color: darkred;
}

.content {
 position: absolute;
 top: 40px;
 width: 280px;
 left: 60px;
}

.nav {
 font-size: 20px;
 height: 38px;
 border-bottom: 2px solid darkgrey;
}

.nav > span {
 margin-left: 90px;
 color: darkgrey;
 user-select: none;
 cursor: pointer;
 padding-bottom: 10px;
 border-bottom: 2px solid darkgrey;
}

.nav > span.active {
 color: black;
 border-bottom: 3px solid black;
 padding-bottom: 9px;
}

.el-input, .el-button {
 margin-top: 40px;
}

.el-button {
 width: 100%;
 font-size: 18px;
}

.foot > span {
 float: right;
 margin-top: 20px;
 color: orange;
 cursor: pointer;
}

.sms {
 color: orange;
 cursor: pointer;
 display: inline-block;
 width: 70px;
 text-align: center;
 user-select: none;
}
新建:src/components/Login.vue
 密码登录
 短信登录

 登录

 {{ sms\_interval }}

 登录

 立即注册

export default {
 name: "Login",
 data() {
 return {
 username: '',
 password: '',
 mobile: '',
 sms: '',
 login\_method: 'is\_pwd',
 sms\_interval: '获取验证码',
 is\_send: false,
 }
 },

 methods: {
 close\_login() {
 this.$emit('close')
 },
 go\_register() {
 this.$emit('go')
 },
 change\_login\_method(method) {
 this.login\_method = method;
 },

 check\_mobile() {
 if (!this.mobile) return;
 if (!this.mobile.match(/^1[3-9][0-9]{9}$/)) {
 this.$message({
 message: '手机号有误',
 type: 'warning',
 duration: 1000,
 onClose: () => {
 this.mobile = '';
 }
 });
 return false;
 }
 this.is\_send = true;
 },

 send\_sms() {
 if (!this.is\_send) return;
 this.is\_send = false;
 let sms\_interval\_time = 60;
 this.sms\_interval = "发送中...";
 let timer = setInterval(() => {
 if (sms\_interval\_time <= 1) {
 clearInterval(timer);
 this.sms\_interval = "获取验证码";
 this.is\_send = true; // 重新回复点击发送功能的条件
 } else {
 sms\_interval\_time -= 1;
 this.sms\_interval = `${sms\_interval\_time}秒后再发`;
 }
 }, 1000);
 }

 }
}

.login {
 width: 100vw;
 height: 100vh;
 position: fixed;
 top: 0;
 left: 0;
 z-index: 10;
 background-color: rgba(0, 0, 0, 0.3);
}

.box {
 width: 400px;
 height: 420px;
 background-color: white;
 border-radius: 10px;
 position: relative;
 top: calc(50vh - 210px);
 left: calc(50vw - 200px);
}

.el-icon-close {
 position: absolute;
 font-weight: bold;
 font-size: 20px;
 top: 10px;
 right: 10px;
 cursor: pointer;
}

.el-icon-close:hover {
 color: darkred;
}

.content {
 position: absolute;
 top: 40px;
 width: 280px;
 left: 60px;
}

.nav {
 font-size: 20px;
 height: 38px;
 border-bottom: 2px solid darkgrey;
}

.nav > span {
 margin: 0 20px 0 35px;
 color: darkgrey;
 user-select: none;
 cursor: pointer;
 padding-bottom: 10px;
 border-bottom: 2px solid darkgrey;
}

.nav > span.active {
 color: black;
 border-bottom: 3px solid black;
 padding-bottom: 9px;
}

.el-input, .el-button {
 margin-top: 40px;
}

.el-button {
 width: 100%;
 font-size: 18px;
}

.foot > span {
 float: right;
 margin-top: 20px;
 color: orange;
 cursor: pointer;
}

.sms {
 color: orange;
 cursor: pointer;
 display: inline-block;
 width: 70px;
 text-align: center;
 user-select: none;
}
2、多方式登陆功能(后端项目接口)
# 打开后端 luffy\_api项目

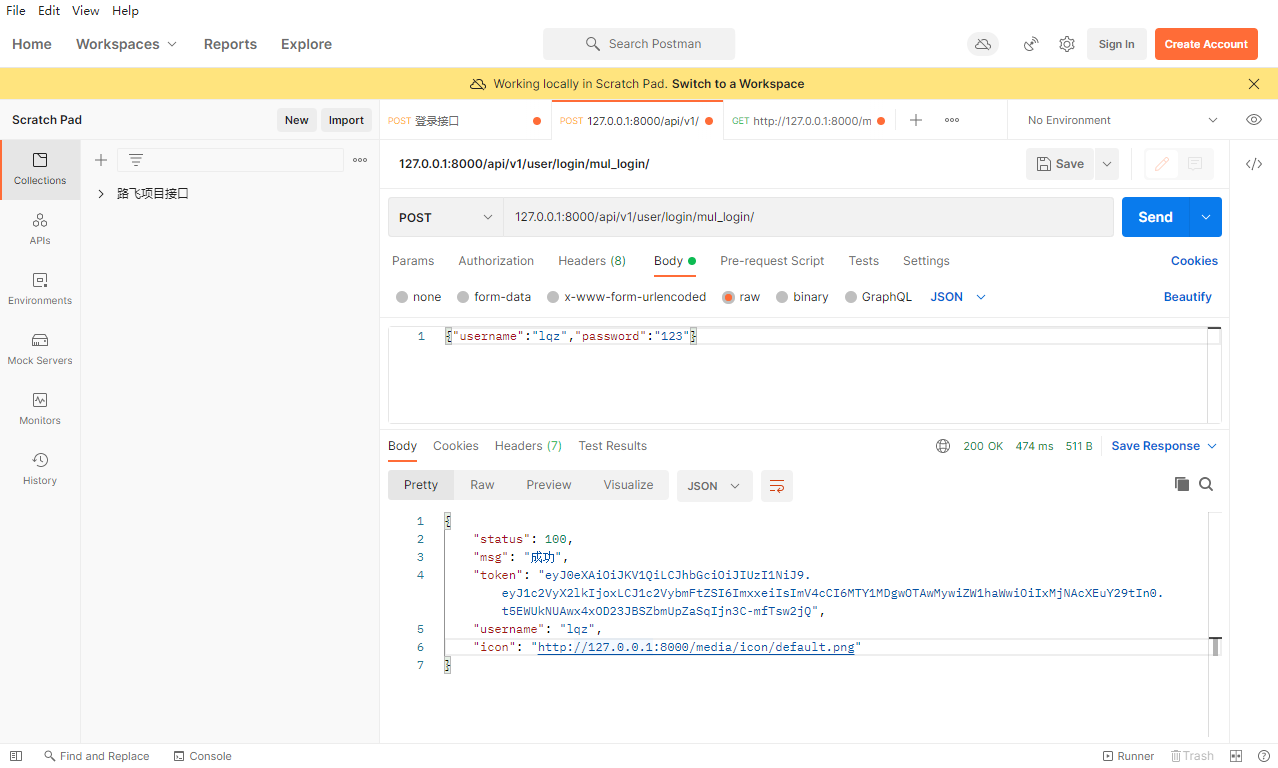
# 输入用户名(手机号,邮箱),密码,都能登陆成功,签发token

# {username:lqz/1829348883775/3@qq.com,password:lqz123}--->到后端---》去数据库查用户,如果用户名密码正确,签发token,如果不正确,返回错误
    pip install restframework-jwt
修改视图类 user/views.py:
from utils.common import add  # pycharm提示红,但是没有错
from rest_framework.views import APIView
from rest_framework.response import Response
from utils.my_logging import logger

class TestView(APIView):
    def get(self, requeste):
        res = add(8, 9)
        # 记录日志
        logger.info("我执行了一下")
        print(res)
        return Response('ok')

from rest_framework.viewsets import ViewSet, GenericViewSet
from rest_framework.decorators import action
from .models import User
from rest_framework.exceptions import APIException
from utils.response import APIResponse

class MobileView(ViewSet):
    # get 请求携带手机号,就能校验手机号
 @action(methods=["GET"], detail=False)
    def check\_mobile(self, request):
        try:
            mobile = request.query_params.get('mobile')
            User.objects.get(mobile=mobile)
            return APIResponse()  # {code:100,msg:成功}-->前端判断,100就是手机号存在,非100,手机号步骤
        except Exception as e:
            raise APIException(str(e))  # 处理了全局异常,这里没问题

from .serializer import MulLoginSerializer

class LoginView(GenericViewSet):
    serializer_class = MulLoginSerializer
    queryset = User

    # 两个登陆方式都写在这里面(多方式,一个是验证码登陆)
    # login不是保存,但是用post,咱们的想法是把验证逻辑写到序列化类中
 @action(methods=["post"], detail=False)
    def mul\_login(self, request):
        try:
            ser = MulLoginSerializer(data=request.data, context={'request': request})
            ser.is_valid(raise_exception=True)  # 如果校验失败,直接抛异常,不需要加if判断了
            token = ser.context.get('token')
            username = ser.context.get('username')
            icon = ser.context.get('icon')
            return APIResponse(token=token, username=username, icon=icon)  # {code:100,msg:成功,token:dsadsf,username:lqz}
        except Exception as e:
            raise APIException(str(e))
新建序列化类 user/serializer.py:
from .models import User
from rest_framework import serializers
from rest_framework.exceptions import ValidationError

# 这个序列化类,只用来做反序列化,数据校验,最后不保存,不用来做序列化
class MulLoginSerializer(serializers.ModelSerializer):
    # 一定要重写username这个字段,因为username这个字段校验规则是从User表映射过来的,
    # username是唯一,假设数据库中存在lqz这个用户,传入lqz,字段自己的校验规则就会校验失败,失败原因是数据库存在一个lqz用户了
    # 所以需要重写这个字段,取消 掉它的unique
    username = serializers.CharField(max_length=18, min_length=3)  # 一定要重写,不重写,字段自己的校验过不去,就到不了全局钩子

    class Meta:
        model = User
        fields = ['username', 'password']

    def validate(self, attrs):
        # 在这里面完成校验,如果校验失败,直接抛异常
        # 1 多方式得到user
        user = self._get_user(attrs)
        # 2 user签发token
        token = self._get_token(user)
        # 3 把token,username,icon放到context中
        self.context['token'] = token
        self.context['username'] = user.username
        # self.context['icon'] = 'http://127.0.0.1:8000/media/'+str(user.icon) # 对象ImageField的对象
        # self.context['icon'] = 'http://127.0.0.1:8000/media/'+str(user.icon) # 对象ImageField的对象
        request = self.context['request']
        # request.META['HTTP\_HOST']取出服务端的ip地址
        icon = 'http://%s/media/%s' % (request.META['HTTP\_HOST'], str(user.icon))
        self.context['icon'] = icon
        return attrs

    # 意思是该方法只在类内部用,但是外部也可以用,如果写成\_\_就只能再内部用了
    def \_get\_user(self, attrs):
        import re
        username = attrs.get('username')
        if re.match(r'^1[3-9][0-9]{9}$', username):
            user = User.objects.filter(mobile=username).first()
        elif re.match(r'^.+@.+$', username):
            user = User.objects.filter(email=username).first()
        else:
            user = User.objects.filter(username=username).first()

        if not user:
            # raise ValidationError('用户不存在')
            raise ValidationError('用户名或密码错误')

        # 取出前端传入的密码
        password = attrs.get('password')
        if not user.check_password(password):  # 学auth时讲的,通过明文校验密码
            raise ValidationError("用户名或密码错误")

        return user

    def \_get\_token(self, user):
        # jwt模块中提供的
        from rest_framework_jwt.serializers import jwt_payload_handler, jwt_encode_handler
        payload = jwt_payload_handler(user)
        token = jwt_encode_handler(payload)
        return token
修改 user/urls.py:
from django.urls import path, include
from rest_framework.routers import SimpleRouter
from .views import MobileView, LoginView, SendSmsView

router = SimpleRouter()
# 127.0.0.1:8000/api/v1/user/mobile/check\_mobile
router.register('mobile', UserView, 'mobile')

# # 127.0.0.1:8000/api/v1/user/login/mul\_login--->post
router.register('login', LoginView, 'login')

urlpatterns = [
    path('', include(router.urls)),
]
3、腾讯云短信发送二次封装
# 短信文档地址:
    https://cloud.tencent.com/document/product/382/43196

# 安装sdk模块:
    pip install tencentcloud-sdk-python

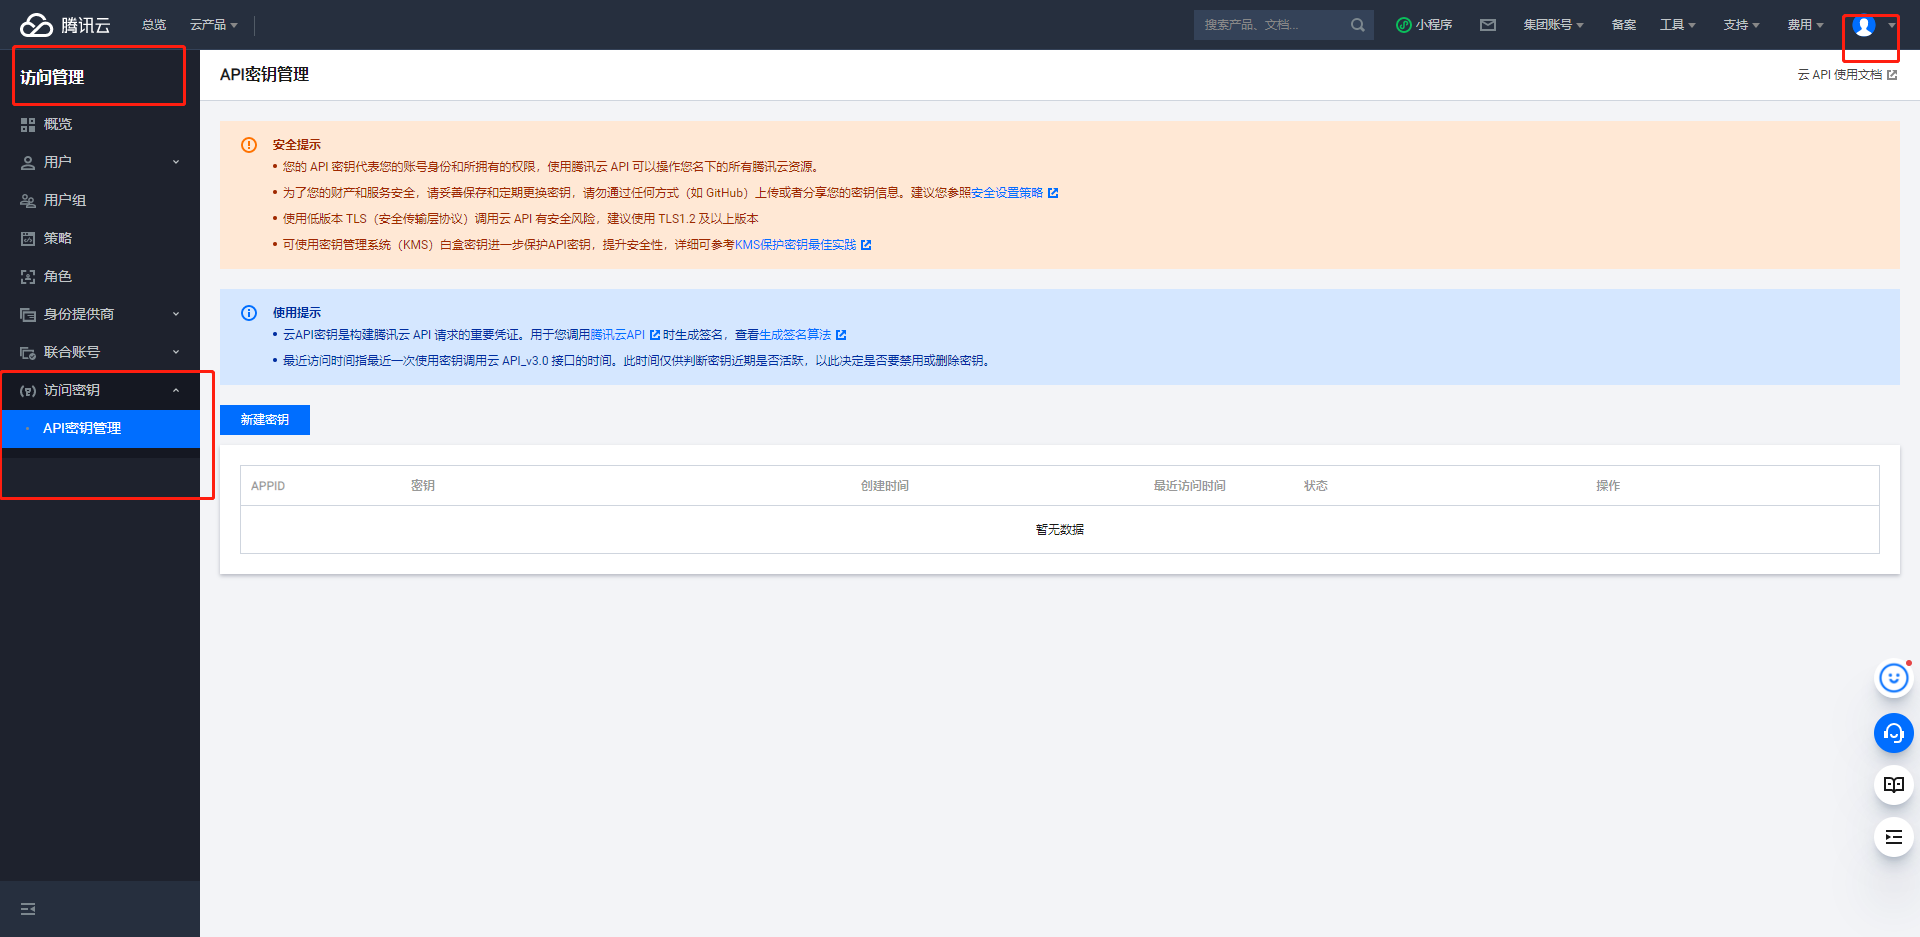
# 进入腾讯云创建密钥

# 单独文本测试短信能否正常接收

# 封装成包,以后,无论什么框架,只要把包copy过去,导入直接用即可

# 将 libs做成包 创建:
    __init__.py
    tencent_sms_v3 目录下继续创建:
        __init__.py
        settings.py
        sms.py
在 libs/tencent_sms_v3/init.py中写:
from .sms import get_code, send_sms
在 libs/tencent_sms_v3/settings.py中写:
# 按照自己的腾讯云短信配置填写
SECRETID = 'AKIDWlmZ7RWLvFI5cv0pOhx1rTr0vhEVVGl1'
SECRETKEY = '3qNddNq30g6JH1WnrhJgpjPr67uUrztY'
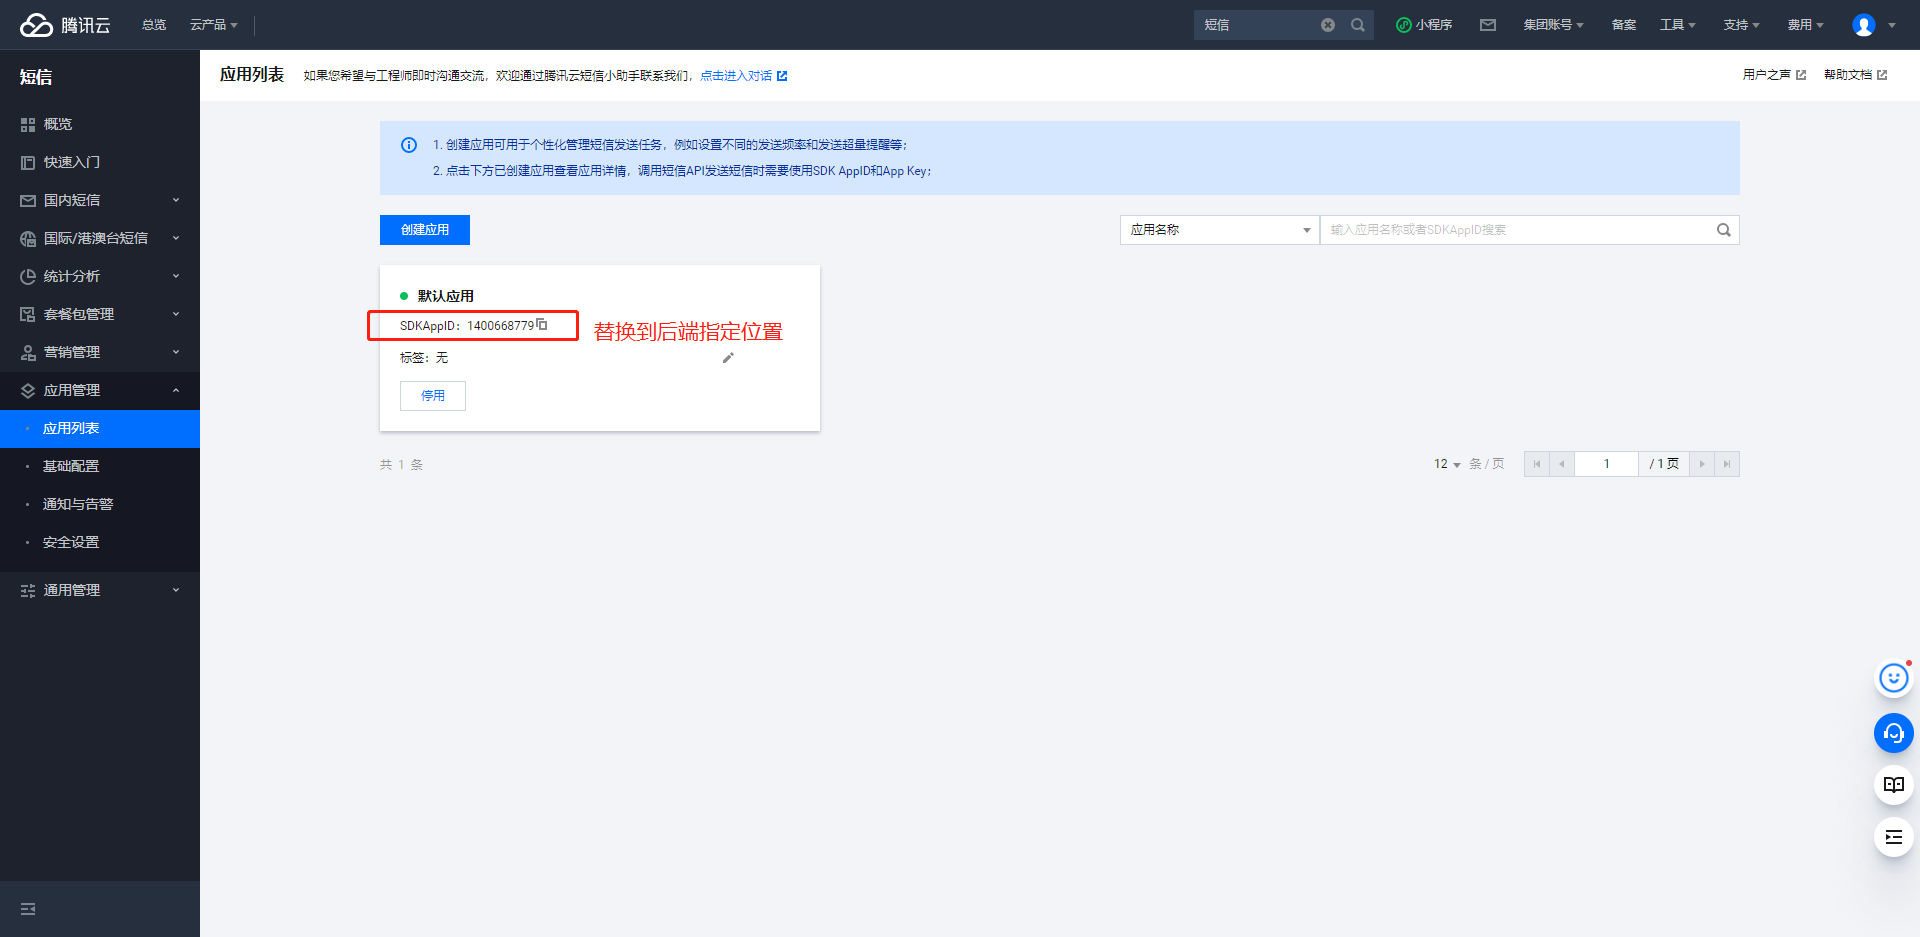
APPID = "1400668779"
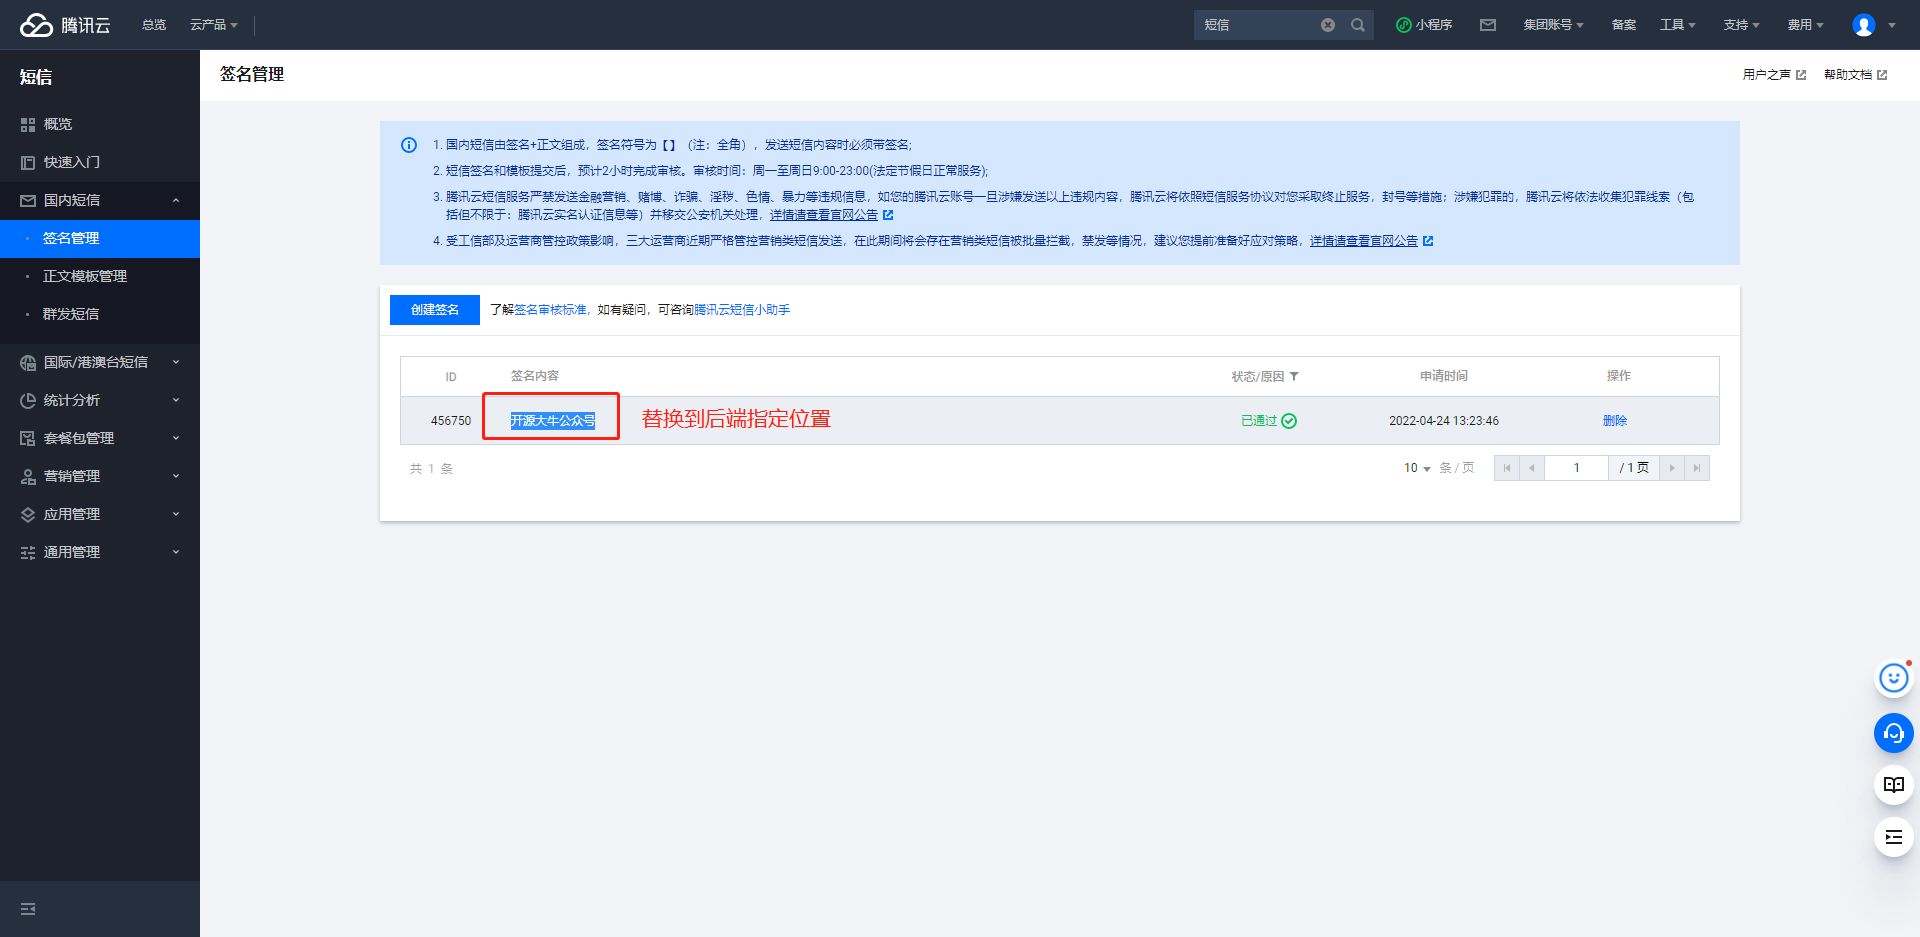
SIGNAME = '开源大牛公众号'
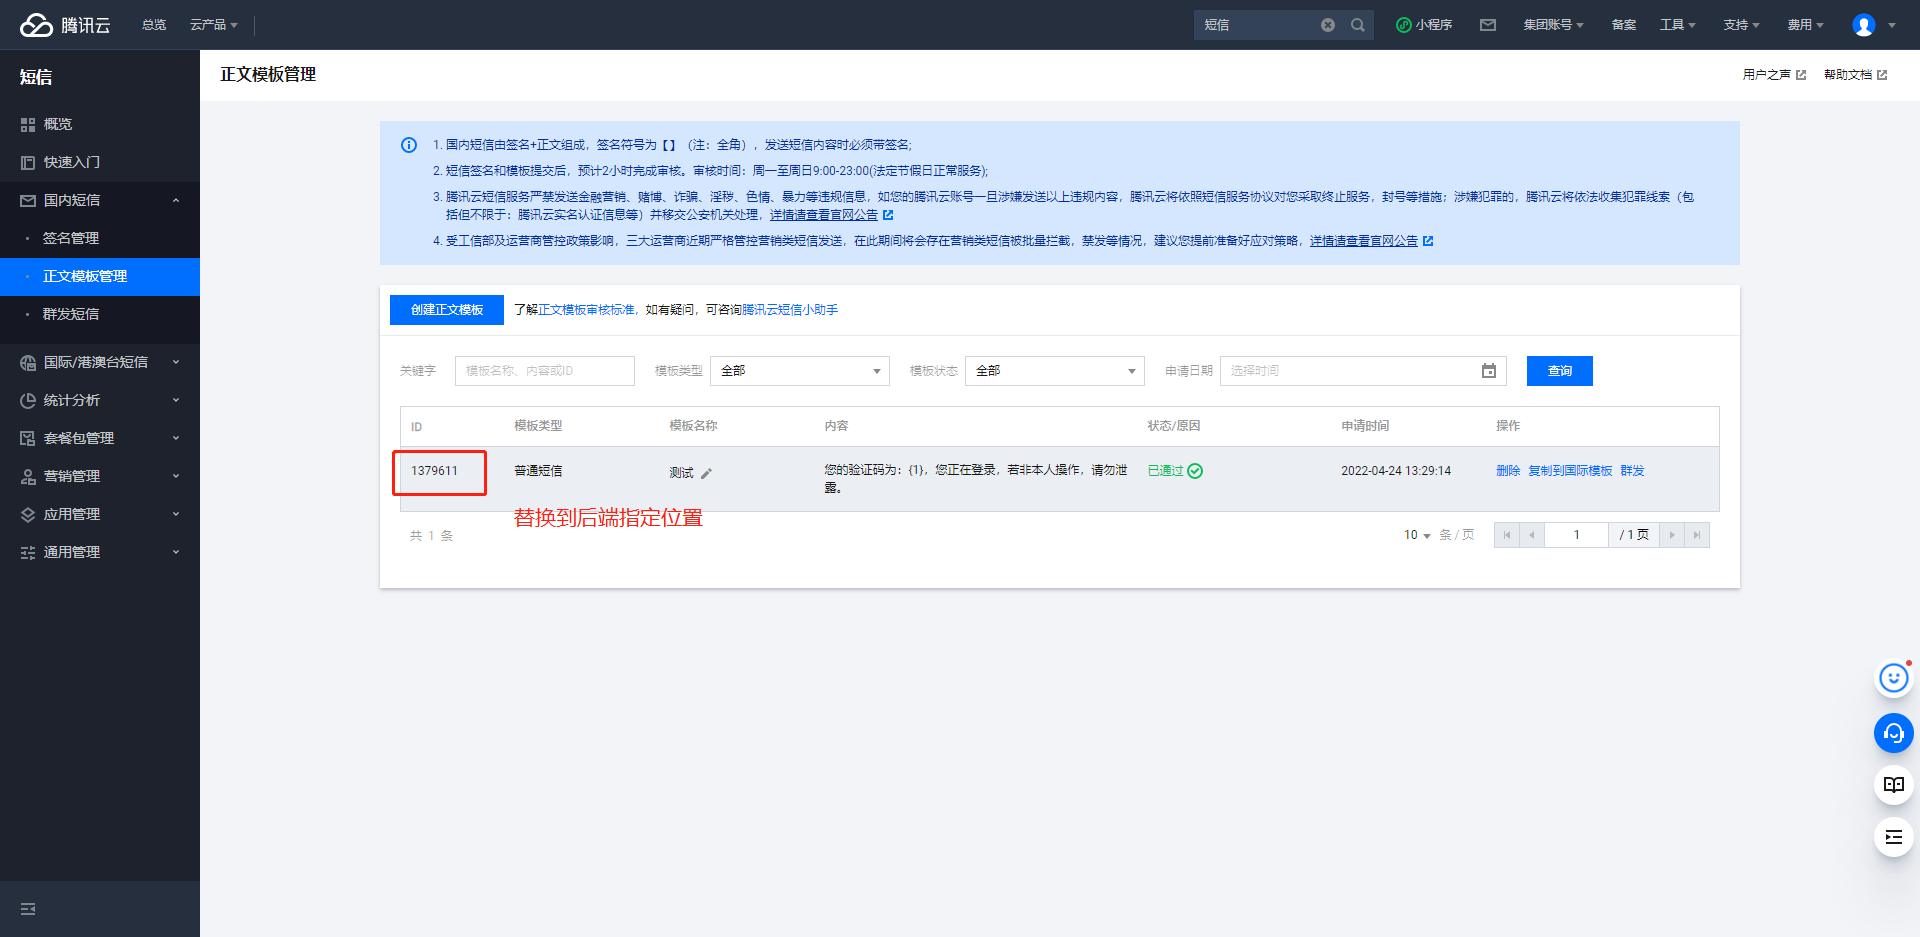
TemplateId = "1379611"
在在 libs/tencent_sms_v3/sms.py中写:
import random
from . import settings
from utils.my_logging import logger
from tencentcloud.common import credential
from tencentcloud.common.exception.tencent_cloud_sdk_exception import TencentCloudSDKException
# 导入对应产品模块的client models
from tencentcloud.sms.v20210111 import sms_client, models

# 导入可选配置类
from tencentcloud.common.profile.client_profile import ClientProfile
from tencentcloud.common.profile.http_profile import HttpProfile

# 写两个函数,
# 获取验证码的函数
def get\_code(count=4):
    code_str = ''
    for i in range(count):
        num = random.randint(0, 9)
        code_str += str(num)
    return code_str

# 发送短信的函数
def send\_sms(phone, code):
    try:
        cred = credential.Credential(settings.SECRETID, settings.SECRETKEY)
        # 实例化一个http选项,可选的,没有特殊需求可以跳过。
        httpProfile = HttpProfile()
        httpProfile.reqMethod = "POST"  # post请求(默认为post请求)
        httpProfile.reqTimeout = 30  # 请求超时时间,单位为秒(默认60秒)
        httpProfile.endpoint = "sms.tencentcloudapi.com"  # 指定接入地域域名(默认就近接入)
        clientProfile = ClientProfile()
        clientProfile.signMethod = "TC3-HMAC-SHA256"  # 指定签名算法
        clientProfile.language = "en-US"
        clientProfile.httpProfile = httpProfile
        client = sms_client.SmsClient(cred, "ap-guangzhou", clientProfile)
        req = models.SendSmsRequest()
        req.SmsSdkAppId = settings.APPID
        req.SignName = settings.SIGNAME
        req.TemplateId = settings.TemplateId
        req.TemplateParamSet = [code, ]
        req.PhoneNumberSet = ["+86%s" % phone, ]
        req.SessionContext = ""
        req.ExtendCode = ""
        req.SenderId = ""
        client.SendSms(req)
        # print(resp.to\_json\_string(indent=2))
        return True
    except TencentCloudSDKException as err:
        # 如果短信发送失败,记录一下日志--》一旦使用了记录日志,使用的是django 的日志,以后这个包,给别的框架用,要改日志
        logger.error('手机号为:%s发送短信失败,失败原因:%s' % phone, str(err))
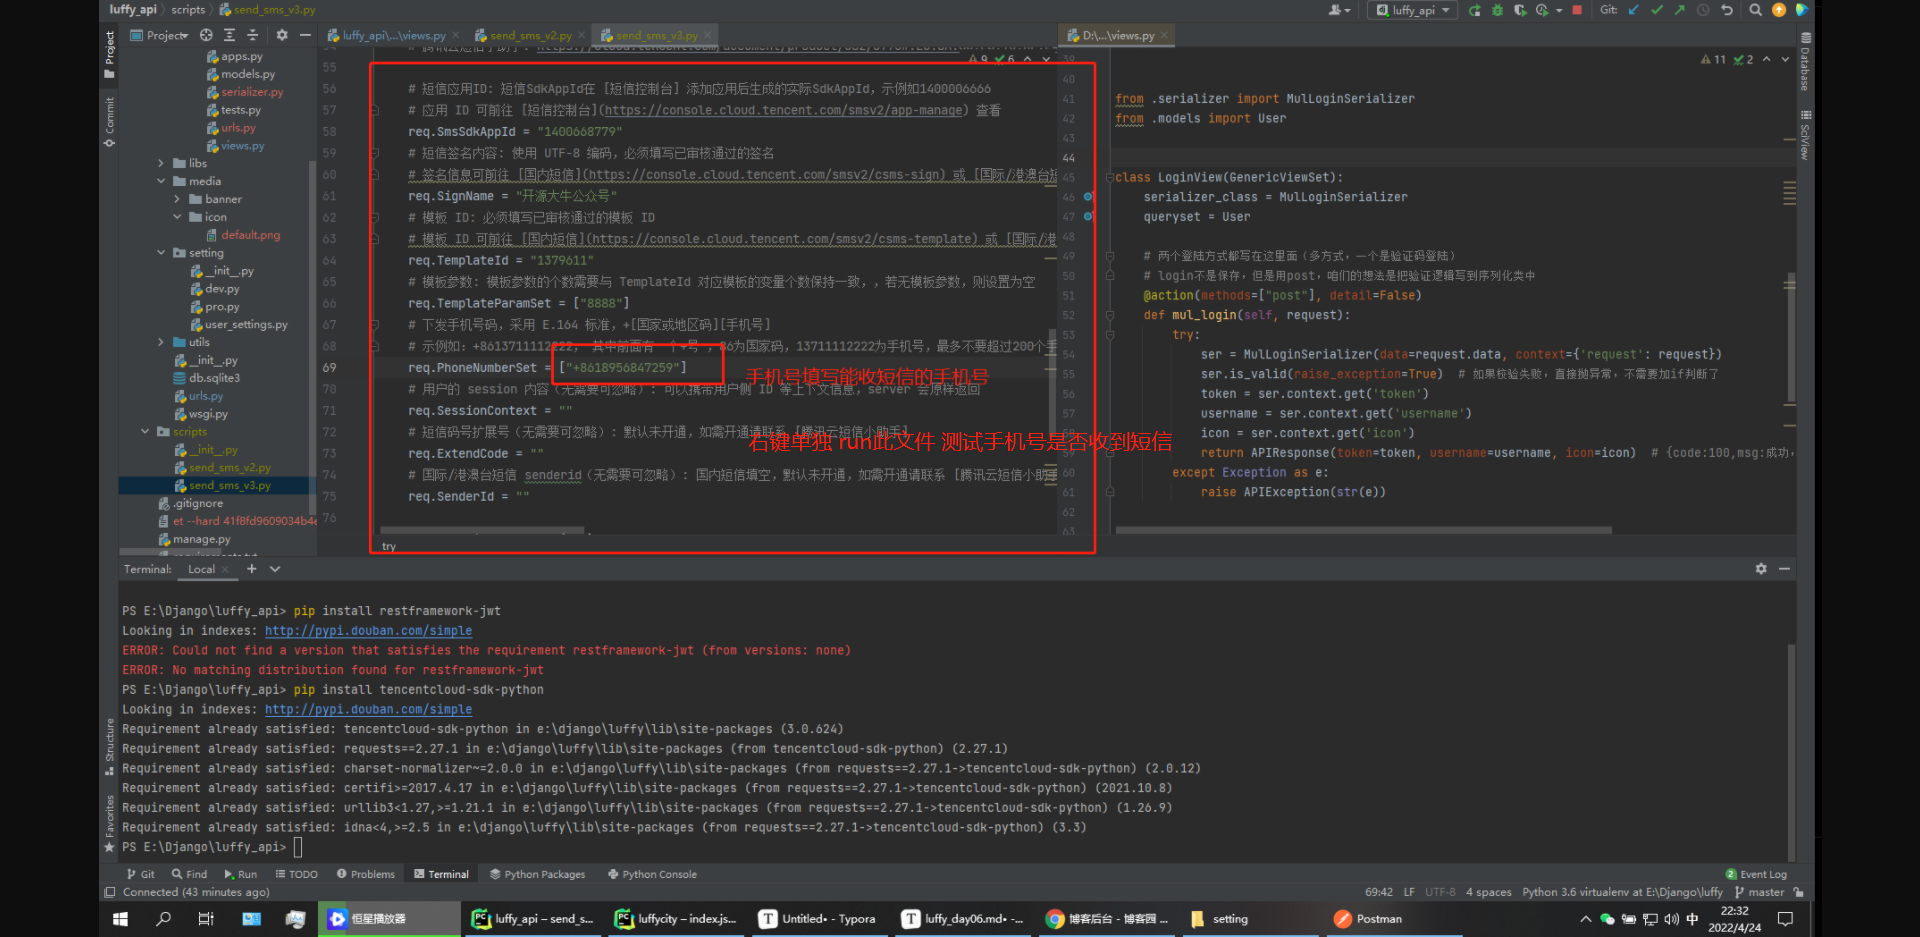
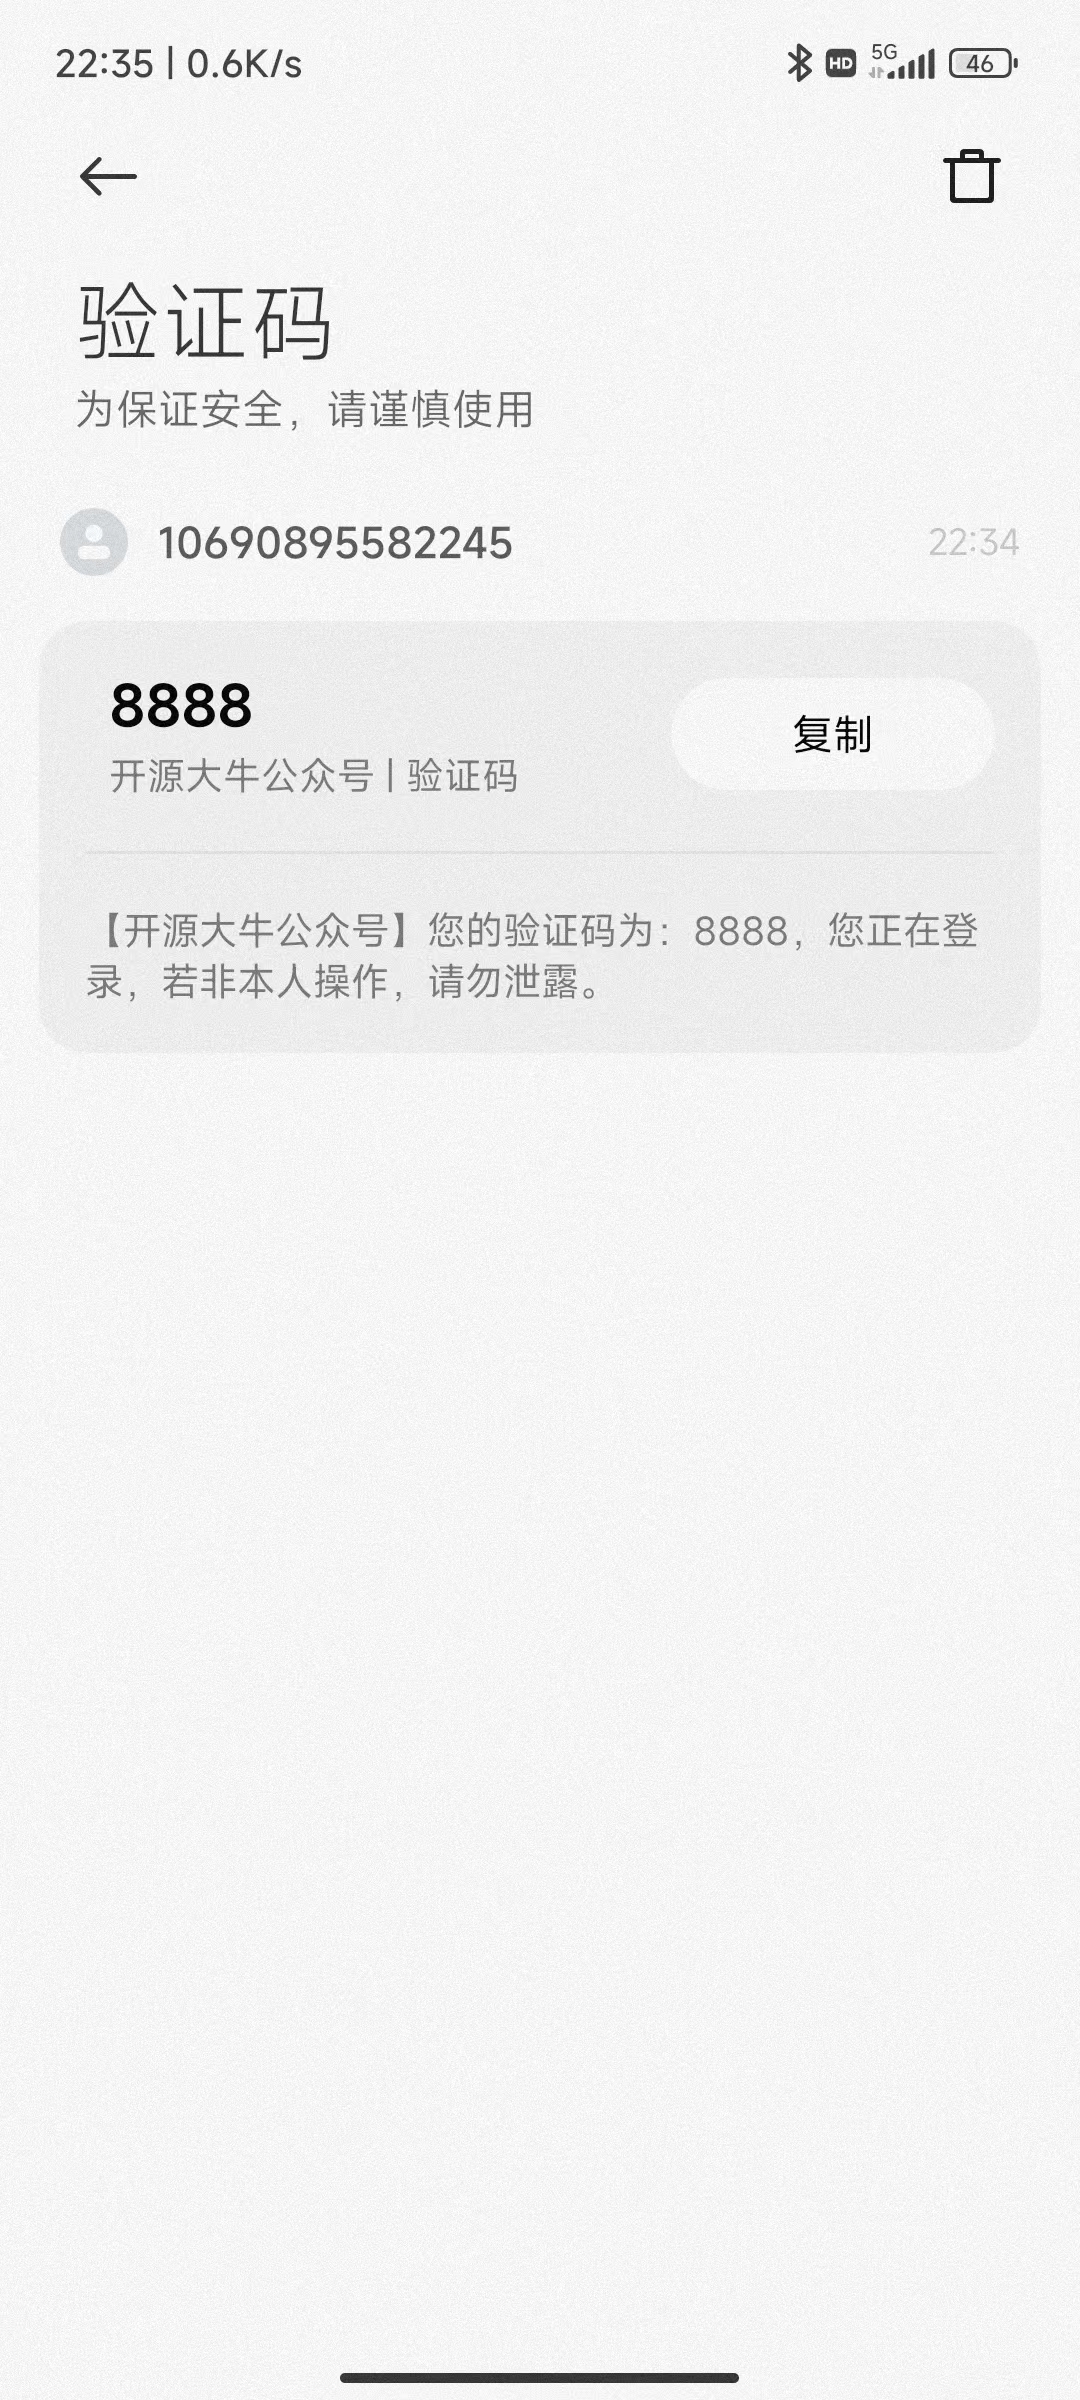
sdk发送短信v3版本:创建send_sms_v3.py:
# -*- coding: utf-8 -*-
from tencentcloud.common import credential
from tencentcloud.common.exception.tencent_cloud_sdk_exception import TencentCloudSDKException
# 导入对应产品模块的client models。
from tencentcloud.sms.v20210111 import sms_client, models

# 导入可选配置类
from tencentcloud.common.profile.client_profile import ClientProfile
from tencentcloud.common.profile.http_profile import HttpProfile

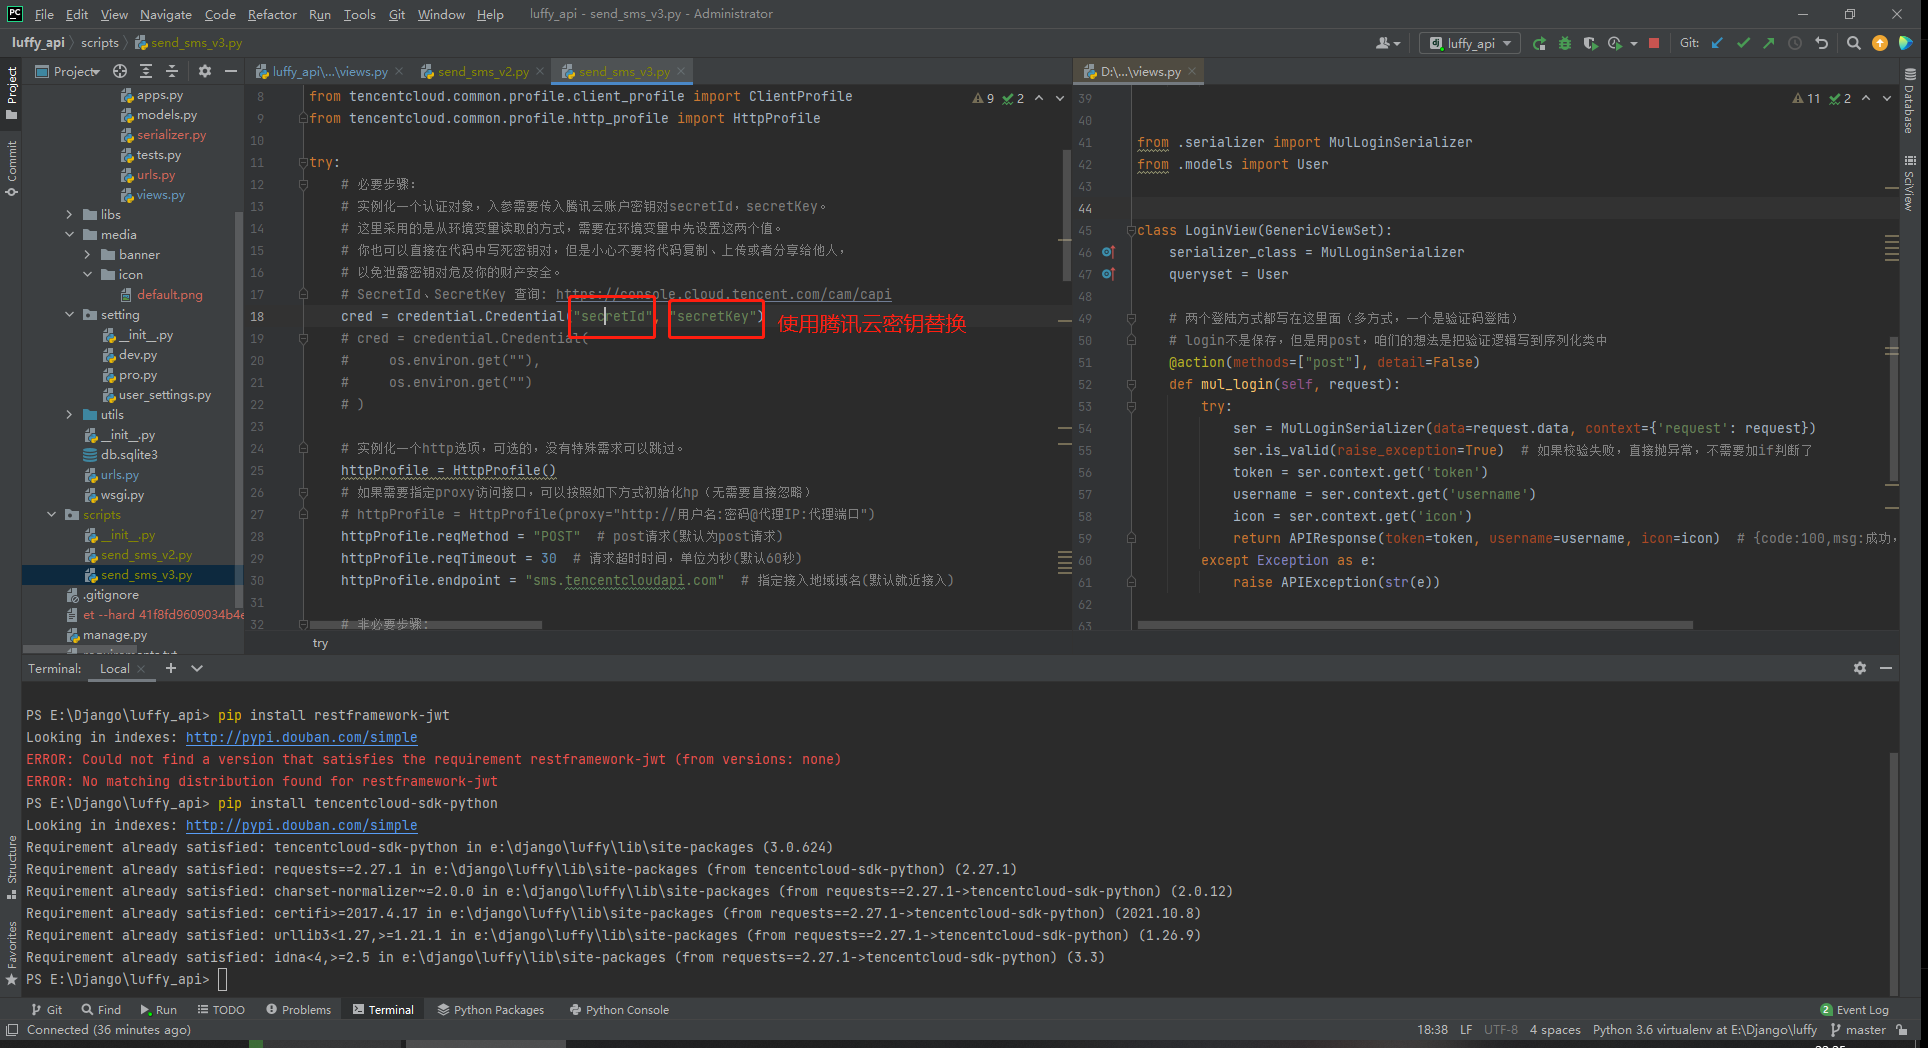
try:
    # 必要步骤:
    # 实例化一个认证对象,入参需要传入腾讯云账户密钥对secretId,secretKey。
    # 这里采用的是从环境变量读取的方式,需要在环境变量中先设置这两个值。
    # 你也可以直接在代码中写死密钥对,但是小心不要将代码复制、上传或者分享给他人,
    # 以免泄露密钥对危及你的财产安全。
    # SecretId、SecretKey 查询: https://console.cloud.tencent.com/cam/capi
    cred = credential.Credential("AKIDWlmZ7RWLvFI5cv0pOhx1rTr0vhEVVGl1", "3qNddNq30g6JH1WnrhJgpjPr67uUrztY")
    # cred = credential.Credential(
    # os.environ.get(""),
    # os.environ.get("")
    # )

    # 实例化一个http选项,可选的,没有特殊需求可以跳过。
    httpProfile = HttpProfile()
    # 如果需要指定proxy访问接口,可以按照如下方式初始化hp(无需要直接忽略)
    # httpProfile = HttpProfile(proxy="http://用户名:密码@代理IP:代理端口")
    httpProfile.reqMethod = "POST"  # post请求(默认为post请求)
    httpProfile.reqTimeout = 30  # 请求超时时间,单位为秒(默认60秒)
    httpProfile.endpoint = "sms.tencentcloudapi.com"  # 指定接入地域域名(默认就近接入)

    # 非必要步骤:
    # 实例化一个客户端配置对象,可以指定超时时间等配置
    clientProfile = ClientProfile()
    clientProfile.signMethod = "TC3-HMAC-SHA256"  # 指定签名算法
    clientProfile.language = "en-US"
    clientProfile.httpProfile = httpProfile

    # 实例化要请求产品(以sms为例)的client对象
    # 第二个参数是地域信息,可以直接填写字符串ap-guangzhou,支持的地域列表参考 https://cloud.tencent.com/document/api/382/52071#.E5.9C.B0.E5.9F.9F.E5.88.97.E8.A1.A8
    client = sms_client.SmsClient(cred, "ap-guangzhou", clientProfile)

    # 实例化一个请求对象,根据调用的接口和实际情况,可以进一步设置请求参数
    # 你可以直接查询SDK源码确定SendSmsRequest有哪些属性可以设置
    # 属性可能是基本类型,也可能引用了另一个数据结构
    # 推荐使用IDE进行开发,可以方便的跳转查阅各个接口和数据结构的文档说明
    req = models.SendSmsRequest()

    # 基本类型的设置:
    # SDK采用的是指针风格指定参数,即使对于基本类型你也需要用指针来对参数赋值。
    # SDK提供对基本类型的指针引用封装函数
    # 帮助链接:
    # 短信控制台: https://console.cloud.tencent.com/smsv2
    # 腾讯云短信小助手: https://cloud.tencent.com/document/product/382/3773#.E6.8A.80.E6.9C.AF.E4.BA.A4.E6.B5.81

    # 短信应用ID: 短信SdkAppId在 [短信控制台] 添加应用后生成的实际SdkAppId,示例如1400006666
    # 应用 ID 可前往 [短信控制台](https://console.cloud.tencent.com/smsv2/app-manage) 查看
    req.SmsSdkAppId = "1400668779"
    # 短信签名内容: 使用 UTF-8 编码,必须填写已审核通过的签名
    # 签名信息可前往 [国内短信](https://console.cloud.tencent.com/smsv2/csms-sign) 或 [国际/港澳台短信](https://console.cloud.tencent.com/smsv2/isms-sign) 的签名管理查看
    req.SignName = "开源大牛公众号"
    # 模板 ID: 必须填写已审核通过的模板 ID
    # 模板 ID 可前往 [国内短信](https://console.cloud.tencent.com/smsv2/csms-template) 或 [国际/港澳台短信](https://console.cloud.tencent.com/smsv2/isms-template) 的正文模板管理查看
    req.TemplateId = "1379611"
    # 模板参数: 模板参数的个数需要与 TemplateId 对应模板的变量个数保持一致,,若无模板参数,则设置为空
    req.TemplateParamSet = ["8888"]
    # 下发手机号码,采用 E.164 标准,+[国家或地区码][手机号]
    # 示例如:+8613711112222, 其中前面有一个+号 ,86为国家码,13711112222为手机号,最多不要超过200个手机号
    req.PhoneNumberSet = ["+8618956847259"]
    # 用户的 session 内容(无需要可忽略): 可以携带用户侧 ID 等上下文信息,server 会原样返回
    req.SessionContext = ""
    # 短信码号扩展号(无需要可忽略): 默认未开通,如需开通请联系 [腾讯云短信小助手]
    req.ExtendCode = ""
    # 国际/港澳台短信 senderid(无需要可忽略): 国内短信填空,默认未开通,如需开通请联系 [腾讯云短信小助手]
    req.SenderId = ""

    resp = client.SendSms(req)

    # 输出json格式的字符串回包
    print(resp.to_json_string(indent=2))

    # 当出现以下错误码时,快速解决方案参考
    # - [FailedOperation.SignatureIncorrectOrUnapproved](https://cloud.tencent.com/document/product/382/9558#.E7.9F.AD.E4.BF.A1.E5.8F.91.E9.80.81.E6.8F.90.E7.A4.BA.EF.BC.9Afailedoperation.signatureincorrectorunapproved-.E5.A6.82.E4.BD.95.E5.A4.84.E7.90.86.EF.BC.9F)
    # - [FailedOperation.TemplateIncorrectOrUnapproved](https://cloud.tencent.com/document/product/382/9558#.E7.9F.AD.E4.BF.A1.E5.8F.91.E9.80.81.E6.8F.90.E7.A4.BA.EF.BC.9Afailedoperation.templateincorrectorunapproved-.E5.A6.82.E4.BD.95.E5.A4.84.E7.90.86.EF.BC.9F)
    # - [UnauthorizedOperation.SmsSdkAppIdVerifyFail](https://cloud.tencent.com/document/product/382/9558#.E7.9F.AD.E4.BF.A1.E5.8F.91.E9.80.81.E6.8F.90.E7.A4.BA.EF.BC.9Aunauthorizedoperation.smssdkappidverifyfail-.E5.A6.82.E4.BD.95.E5.A4.84.E7.90.86.EF.BC.9F)
    # - [UnsupportedOperation.ContainDomesticAndInternationalPhoneNumber](https://cloud.tencent.com/document/product/382/9558#.E7.9F.AD.E4.BF.A1.E5.8F.91.E9.80.81.E6.8F.90.E7.A4.BA.EF.BC.9Aunsupportedoperation.containdomesticandinternationalphonenumber-.E5.A6.82.E4.BD.95.E5.A4.84.E7.90.86.EF.BC.9F)
    # - 更多错误,可咨询[腾讯云助手](https://tccc.qcloud.com/web/im/index.html#/chat?webAppId=8fa15978f85cb41f7e2ea36920cb3ae1&title=Sms)

except TencentCloudSDKException as err:
    print(err)

4、发送短信接口
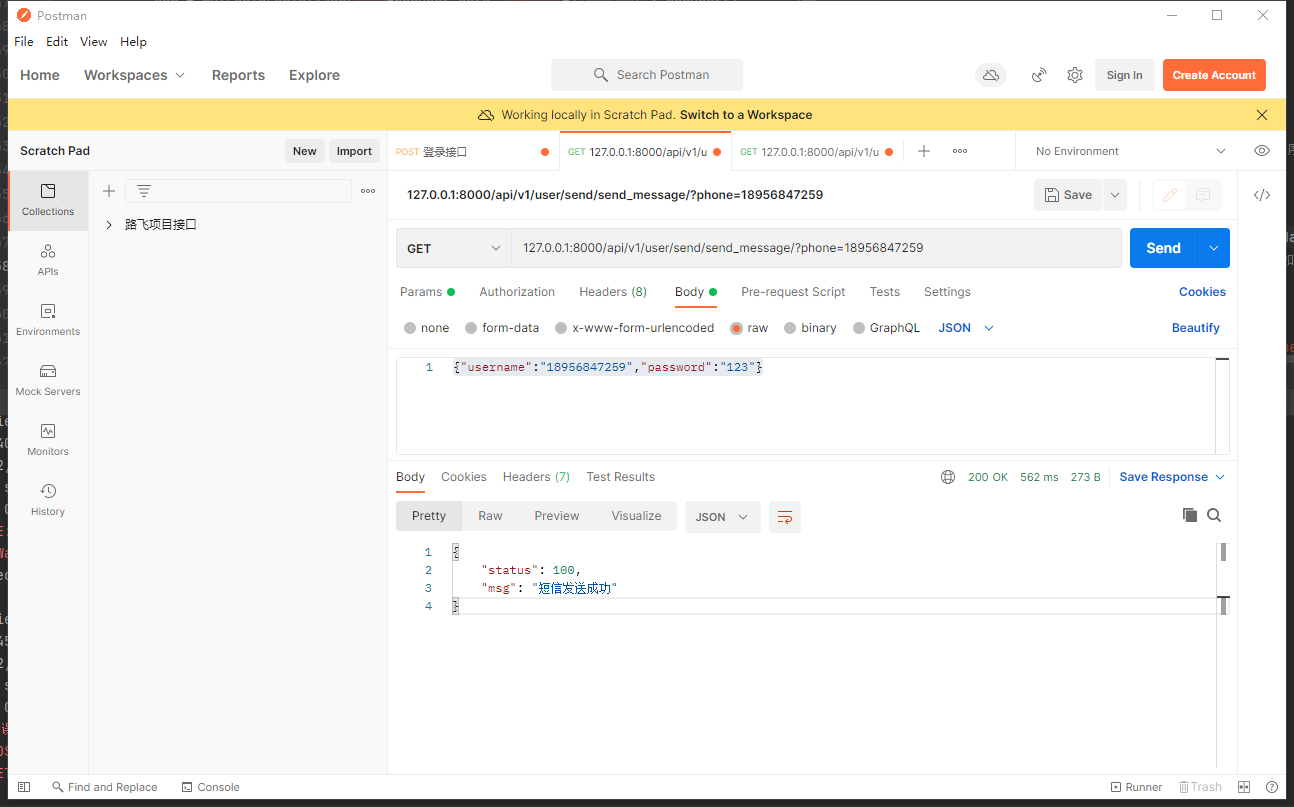
# 效果:
    get  携带手机号,就发送短信 ---》?phone=1828939944
添加路由 user/urls.py:
# 127.0.0.1:8000/api/v1/user/send/send\_message/--->get
router.register('send', SendSmsView, 'send')
视图类添加 user/views.py::
from libs import tencent_sms_v3

class SendSmsView(ViewSet):
 @action(methods=['GET'], detail=False)
    def send\_message(self, request):
        try:
            phone = request.query_params.get('phone')
            # 生成验证码
            code = tencent_sms_v3.get_code()
            # code要保存,否则后面没法验证
            res = tencent_sms_v3.send_sms(phone, code)
            if res:
                return APIResponse(msg='短信发送成功')
            else:
                raise APIException("短信发送失败")
        except Exception as e:
            raise APIException(str(e))
