? 优质资源分享 ?
| 学习路线指引(点击解锁) | 知识定位 | 人群定位 |
|---|---|---|
| ? Python实战微信订餐小程序 ? | 进阶级 | 本课程是python flask+微信小程序的完美结合,从项目搭建到腾讯云部署上线,打造一个全栈订餐系统。 |
| ?Python量化交易实战? | 入门级 | 手把手带你打造一个易扩展、更安全、效率更高的量化交易系统 |
测试 ProductAppService 类
启动模板附带测试基础架构,包括xUnit、Shouldly和NSubstitute库。它使用SQLite 内存数据库来模拟数据库,并为每个测试创建一个单独的数据库。它会自动初始化数据并在测试结束时销毁测试数据。通过这种方式,测试不会相互影响,并且您的真实数据库保持不变。
下面展示在 UI 上使用应用服务之前,如何为ProductAppService类的GetListAsync方法写单元测试代码(构建自动化测试细节后续再议)。
在.Application.Tests项目中创建Products文件夹,并在其中创建一个ProductAppService\_Tests类:
using Shouldly;
using System.Threading.Tasks;
using Volo.Abp.Application.Dtos;
using Xunit;
namespace ProductManagement.Products
{
 public class ProductAppService\_Tests : ProductManagementApplicationTestBase
 {
 private readonly IProductAppService \_productAppService;
 public ProductAppService\_Tests()
 {
 \_productAppService =
 GetRequiredService();
 }
 /* TODO: Test methods */
 }
}该类继承自ProductManagementApplicationTestBase,它默认集成 ABP 框架和其他基础设施库,这样我们就可以直接使用内置的测试能力。另外,我们使用方法GetRequiredService来解决测试代码中的依赖关系,而不是构造函数注入(这在测试中是不可能的)。
现在,我们可以编写第一个测试方法。在ProductAppService\_Tests类中添加如下代码:
[Fact]
public async Task Should\_Get\_Product\_List()
{
 //Act
    var output = await \_productAppService.GetListAsync(
 new PagedAndSortedResultRequestDto()
 );
 //Assert
    output.TotalCount.ShouldBe(3);
 output.Items.ShouldContain(
 x => x.Name.Contains("Acme Monochrome Laser Printer")
 );
}该方法调用该GetListAsync方法并检查结果是否正确。如果您打开测试资源管理器窗口(在 Visual Studio 中的查看|测试资源管理器菜单下),您可以看到我们添加的测试方法。测试资源管理器用于显示和运行解决方案中的测试:
 运行测试到检查它是否按预期工作。如果方法正常工作,将在测试方法名称的左侧看到一个绿色图标。
自动 API 控制器和 Swagger UI
Swagger一款服务于开发和测试HTTP API 的的流行工具。它启动模板中已经预先装了。
设置.Web项目为启动项目,然后按 Ctrl+F5运行该项目,启动后,输入/swagger URL,如图所示: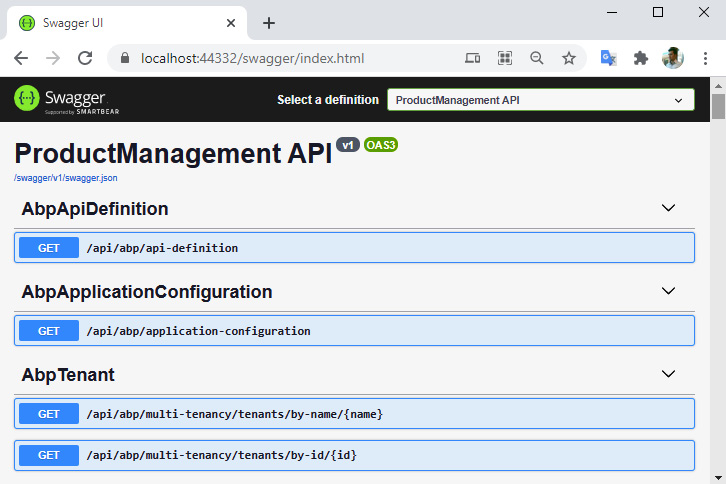
你会看到内置的很多 API。如果向下滚动,也会看到一个Product接口。您可以对其进行测试以获取产品列表:
我们没有创建ProductController接口。这个接口是如何出现的?
这里运用的是ABP 框架的自动 API 控制器功能。它会根据命名约定和配置自动将您的应用服务公开为 HTTP API(通常,我们不会手动编写控制器)。
自动 API 控制器功能将在[第 14 章] 构建 HTTP API 和实时服务 中详细介绍。
有了 HTTP API 来获取产品列表。下一步是在客户端代码中使用此 API。
动态 JavaScript 代理
通常,您通过 JavaScript 调用 HTTP API 接口。ABP 会为所有 HTTP API 动态创建客户端代理。然后,就可以使用这些动态 JavaScript 函数从客户端调用我们的 API。
再次运行ProductManagement.Web项目,并在登录页面上使用F12快捷键打开浏览器的开发者控制台,然后输入以下 JavaScript 代码:
productManagement.products.product.getList({}).then(function(result) {
 console.log(result);
});执行此代码后,将向服务器发出请求,并将返回结果记录在Console选项卡中,如图所示:
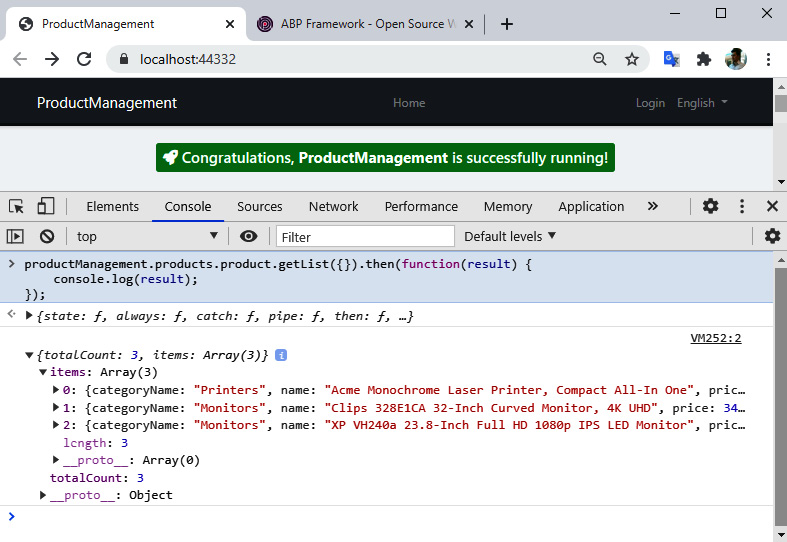
我们可以看到返回的产品列表数据显示在控制台选项卡中。这意味着我们可以轻松地运用 JavaScript 调用服务器端 API,而无需处理低级细节。
如果您想知道JavaScript 是在哪里定义getList的,您可以定位到/Abp/ServiceProxyScript地址,查看由 ABP 框架动态创建的 JavaScript 代理函数。
产品列表
推荐使用 Razor Pages在 ASP.NET Core MVC 框架中创建 UI。
首先,在ProductManagement.Web项目的Pages文件夹下创建一个Products文件夹。然后,右键单击Products文件夹,然后选择Add|Razor Page。选择Razor 页面 - 空选项,命名为Index.cshtml。下图显示了我们添加的页面的位置: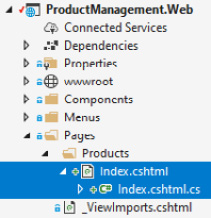
编辑内容,Index.cshtml如下代码块所示:
@page
@using ProductManagement.Web.Pages.Products
@model IndexModel
# Products Page
在这里,我放置一个h1元素作为页眉。接下来我们在主菜单中添加一个菜单来打开这个页面。
添加菜单项
ABP 提供了一个动态、模块化的菜单系统。每个模块都可以添加到主菜单。
打开*ProductManagement.Web项目的*Menus文件夹中的ProductManagementMenuContributor类,并在ConfigureMainMenuAsync方法末尾添加以下代码:
context.Menu.AddItem(
 new ApplicationMenuItem(
 "ProductManagement",
 l["Menu:ProductManagement"],
 icon: "fas fa-shopping-cart"
 ).AddItem(
 new ApplicationMenuItem(
 "ProductManagement.Products",
 l["Menu:Products"],
 url: "/Products"
 )
 )
);此代码添加了一个产品管理主菜单,其中包含产品菜单项。里面的l["…"]语法是用来获取本地化的值。
打开ProductManagement.Domain.Shared 项目的Localization/ProductManagement文件夹中的en.json文件,并将以下代码添加到该texts部分的末尾:
"Menu:ProductManagement": "Product Management",
"Menu:Products": "Products"我们可以使用任意字符串值作为本地化键。在本例中,我们使用Menu:作为菜单的本地化键的前缀,例如Menu:Products 。我们将在[第 8 章] 使用 ABP 的功能和服务中探讨本地化主题。
现在,重新运行,使用新的产品管理菜单打开产品页面,如图所示:
创建产品数据表
接下来我们将创建一个数据表显示带有分页和排序的产品列表。ABP 启动模板带有预安装和配置的JS 库 Datatables.net,用于显示表格数据。
打开Index.cshtml页面(在Pages/Products文件夹),并将其内容更改为以下内容:
@page
@using ProductManagement.Web.Pages.Products
@using Microsoft.Extensions.Localization
@using ProductManagement.Localization
@model IndexModel
@inject IStringLocalizer L
@section scripts
{
 "/Pages/Products/Index.cshtml.js" />
}

 ## @L["Menu:Products"]

 "ProductsTable" striped-rows="true" />
abp-script是一个 ABP 标签助手,用于将脚本文件添加到页面,并具有自动捆绑、压缩和版本控制功能。abp-card是另一个标签助手,以一种类型安全且简单的方式渲染 Card 组件。
我们可以使用标准的 HTML 标签。但是,ABP 标签助手极大地简化了 MVC/Razor 页面中的 UI 创建。此外,它们支持智能感知和编译时错误类型检查。我们将在[第 12 章] 使用 MVC/Razor 页面中研究标签助手。
在Pages/Products文件夹下创建一个新的 JavaScript 文件,命名为Index.cshtml.js,内容如下:
$(function () {
 var l = abp.localization.getResource('ProductManagement');
 var dataTable = $('#ProductsTable').DataTable(
 abp.libs.datatables.normalizeConfiguration({
 serverSide: true,
 paging: true,
 order: [[0, "asc"]],
 searching: false,
 scrollX: true,
 ajax: abp.libs.datatables.createAjax(
 productManagement.products.product.getList),
 columnDefs: [
 /* TODO: Column definitions */
 ]
 })
 );
});
ABP 简化了数据表配置并提供了内置集成:
abp.localization.getResource返回一个本地化对象,ABP 允许您在 JS中重用服务器端定义的本地化。abp.libs.datatables.normalizeConfiguration是 ABP 框架定义的辅助函数。它通过为缺失选项提供常规默认值来简化数据表的配置。abp.libs.datatables.createAjax使 ABP 的动态 JS 客户端代理来适配数据表的参数格式。productManagement.products.product.getList是动态JS代理方法。
columnDefs数组用于定义数据表中的列:
{
 title: l('Name'),
 data: "name"
},
{
 title: l('CategoryName'),
 data: "categoryName",
 orderable: false
},
{
 title: l('Price'),
 data: "price"
},
{
 title: l('StockState'),
 data: "stockState",
 render: function (data) {
 return l('Enum:StockState:' + data);
 }
},
{
 title: l('CreationTime'),
 data: "creationTime",
 dataFormat: 'date'
}通常,列有一个title字段和一个data字段。data字段匹配ProductDto类中的属性名称,格式为驼峰式(一种命名风格,其中每个单词的第一个字母大写,第一个单词除外;它是JavaScript 语言中常用的命名风格)。
该render选项用于精细控制如何显示列数据。
在此页面上,我们使用了一些本地化键。我们应该先在本地化资源中定义它们。打开ProductManagement.Domain.Shared项目的Localization/ProductManagement 文件夹中的en.json文件,并在该部分的末尾添加以下条目texts:
"Name": "Name",
"CategoryName": "Category name",
"Price": "Price",
"StockState": "Stock state",
"Enum:StockState:0": "Pre-order",
"Enum:StockState:1": "In stock",
"Enum:StockState:2": "Not available",
"Enum:StockState:3": "Stopped",
"CreationTime": "Creation time"
看一下实际的产品数据表:
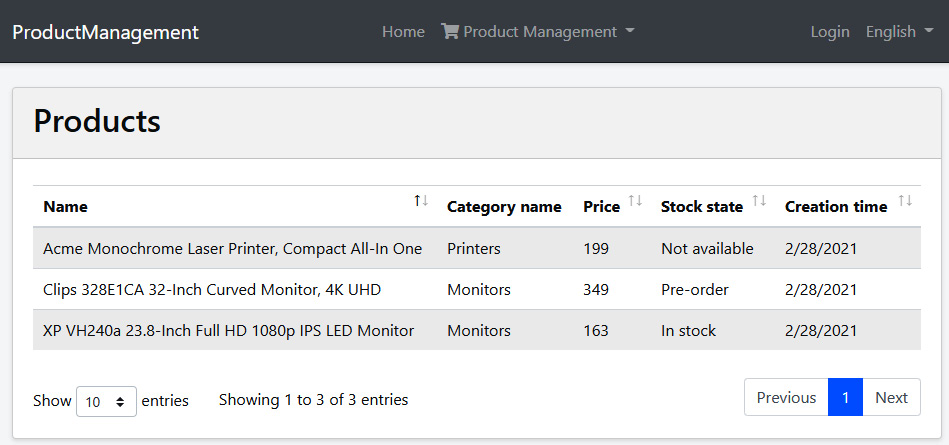
至此,我们创建了一个完整的工作页面,列出了支持分页和排序的产品。在接下来的部分中,我们将添加创建、编辑和删除产品的功能。
创建产品
在本节中,我们将开发新增产品所需的功能。我们的大致思路如下:定义新的应用服务方法来获取类别和创建产品。
- 定义应用服务的获取类别和创建产品方法。
- 在 UI 部分,使用 ABP 的动态表单功能,基于 C# 类自动生成产品创建表单。
定义应用接口
让我们从给IProductAppService接口添加两个新方法开始:
Task CreateAsync(CreateUpdateProductDto input);
Task> GetCategoriesAsync();
在创建产品时,我们使用GetCategoriesAsync方法获取产品类别的下拉数据。我们定义了两个新的 DTO。CreateUpdateProductDto用于创建和更新产品(我们将在编辑产品时候重复使用它)。我们在ProductManagement.Application.Contracts项目的Products文件夹中定义它:
using System;
using System.ComponentModel.DataAnnotations;
namespace ProductManagement.Products
{
 public class CreateUpdateProductDto
 {
 public Guid CategoryId { get; set; }
 [Required]
 [StringLength(ProductConsts.MaxNameLength)]
 public string Name { get; set; }
 public float Price { get; set; }
 public bool IsFreeCargo { get; set; }
 public DateTime ReleaseDate { get; set; }
 public ProductStockState StockState { get; set; }
 }
}接下来,在ProductManagement.Application.Contracts项目的Categories文件夹中定义一个CategoryLookupDto类:
using System;
namespace ProductManagement.Categories
{
 public class CategoryLookupDto
 {
 public Guid Id { get; set; }
 public string Name { get; set; }
 }
}
定了接口相关类,现在我们可以在应用层实现接口了。
实现应用服务
在ProductAppService中实现CreateAsync和GetCategoriesAsync方法(ProductManagement.Application项目中),如下代码块:
public async Task CreateAsync(CreateUpdateProductDto input)
{
 await \_productRepository.InsertAsync(
 ObjectMapper.Map(input)
 );
}
public async Task> GetCategoriesAsync()
{
 var categories = await \_categoryRepository.GetListAsync();
 return new ListResultDto(
 ObjectMapper.Map, List>(categories)
 );
}这里,\_categoryRepository属于IRepository服务类型,通过构造函数注入,方法实现很简单,无需解释。
我们已经在上面的两个地方使用了对象映射,现在我们必须配置映射。打开ProductManagementApplicationAutoMapperProfile.cs文件(在ProductManagement.Application项目中),添加以下代码:
CreateMap();
CreateMap();
用户界面
在ProductManagement.Web项目的Pages/Products文件夹下创建一个CreateProductModal.cshtmlRazor 页面。打开CreateProductModal.cshtml.cs文件,更改CreateProductModalModel代码:
using System.Linq;
using System.Threading.Tasks;
using Microsoft.AspNetCore.Mvc;
using Microsoft.AspNetCore.Mvc.Rendering;
using ProductManagement.Products;
namespace ProductManagement.Web.Pages.Products
{
 Public class CreateProductModalModel:ProductManagementPageModel
 {
 [BindProperty]
 public CreateEditProductViewModel Product { get; set; }
 public SelectListItem[] Categories { get; set; }
 private readonly IProductAppService \_productAppService;

 public CreateProductModalModel(IProductAppService productAppService)
 {
 \_productAppService = productAppService;
 }
 public async Task OnGetAsync()
 {
 // TODO
 }
 public async Task OnPostAsync()
 {
 // TODO
 }
 }
}这里的ProductManagementPageModel是基类。你可以继承它来创建PageModel类。[BindProperty]是一个标准的 ASP.NET Core 属性,在HTTP Post 请求时,会将数据绑定到Product属性。Categories将用于显示下拉列表中的类别。我们通过注入IProductAppService接口以使用之前定义的方法。
目前使用到的CreateEditProductViewModel还没定义,我们将其定义在与CreateProductModal.cshtml相同的文件夹下:
| 12345678910111213141516171819202122 | using ProductManagement.Products;using System;using System.ComponentModel;using System.ComponentModel.DataAnnotations;using Volo.Abp.AspNetCore.Mvc.UI.Bootstrap.TagHelpers.Form;namespace ProductManagement.Web.Pages.Products{public class CreateEditProductViewModel{[SelectItems("Categories")][DisplayName("Category")]public Guid CategoryId { get; set; }[Required][StringLength(ProductConsts.MaxNameLength)]public string Name { get; set; }public float Price { get; set; }public bool IsFreeCargo { get; set; }[DataType(DataType.Date)]public DateTime ReleaseDate { get; set; }public ProductStockState StockState { get; set; }}} |
SelectItems告诉我们CategoryId属性将从Categories列表中选择。我们将在编辑模式对话框中重用此类。这就是我为什么命名它为CreateEditProductViewModel。
DTO 与 ViewModel
定义视图模型CreateEditProductViewModel似乎没有必要,因为它与 CreateUpdateProductDtoDTO非常相似。当然你也可以在视图里复用DTO。但是,考虑到这些类具有不同的用途,并且随着时间的推移会向不同的方向发展,所更推荐的办法是将每个关注点分开。例如,[SelectItems("Categories")]属性指向 Razor Page 模型,它在应用层没有任何意义。
现在,我们可以在CreateProductModalModel类中实现OnGetAsync方法:
public async Task OnGetAsync()
{
 Product = new CreateEditProductViewModel
 {
 ReleaseDate = Clock.Now,
 StockState = ProductStockState.PreOrder
 };

 var categoryLookup = await \_productAppService.GetCategoriesAsync();
 Categories = categoryLookup.Items.Select(x => new SelectListItem(x.Name, x.Id.ToString())).ToArray();
}我们使用默认值创建Product类,然后使用产品应用服务填充Categories列表。Clock是 ABP 框架提供的服务,用于获取当前时间(在不处理时区和本地/UTC 时间的情况下),这里我们不再使用DateTime.Now。具体内容这将在[第 8 章] 使用 ABP 的功能和服务中进行解释。
我们接着实现OnPostAsync代码块:
public async Task OnPostAsync()
{
 await \_productAppService.CreateAsync(
 ObjectMapper.Map (Product)
 );
 return NoContent();
}由于我们要映射CreateEditProductViewModel到CreateProductDto,所以需要定义映射配置。我们在ProductManagement.Web项目中打开ProductManagementWebAutoMapperProfile类,并更改以下代码块内容:
public class ProductManagementWebAutoMapperProfile : Profile
{
 public ProductManagementWebAutoMapperProfile()
 {
 CreateMap();
 }
}
我们已经完成了产品创建 UI 的 C# 端,接下来可以开始构建 UI 和 JavaScript 代码。打开CreateProductModal.cshtml文件,并将内容更改如下:
@page
@using Microsoft.AspNetCore.Mvc.Localization
@using ProductManagement.Localization
@using Volo.Abp.AspNetCore.Mvc.UI.Bootstrap.TagHelpers.Modal
@model ProductManagement.Web.Pages.Products.CreateProductModalModel
@inject IHtmlLocalizer L
@{
 Layout = null;
}
dynamic-form abp-model="Product" asp-page="/Products/CreateProductModal">

 "@L["NewProduct"].Value">

 "@(AbpModalButtons.Cancel|AbpModalButtons.Save)">

dynamic-form>在这里,abp-dynamic-form会根据 C# 模型类自动创建表单元素。abp-form-content是呈现表单元素的地方。abp-modal用于创建模态对话框。
您也可以使用标准的 Bootstrap HTML 元素和 ASP.NET Core 的绑定来创建表单元素。但是,ABP 的 Bootstrap 和动态表单标签助手大大简化了 UI 代码。我们将在[第 12 章] 使用 MVC/Razor 页面中介绍 ABP 标签助手。
我们已经完成创建产品的模态窗口代码。现在,我们将在产品页面添加一个新产品按钮以打开该窗口。打开Pages/Products文件夹中的Index.cshtml文件,然后将abp-card-header部分更改如下:
 "\_6">
 @L["Menu:Products"]

 "\_6" class="text-end">
 "NewProductButton"
 text="@L["NewProduct"].Value"
 icon="plus"
 button-type="Primary"/>
我添加了 2 列,其中每列都有一个size-md="\_6"属性(即 12 列 Bootstrap 网格的一半)。左侧设置卡片标题,右侧放置了一个按钮。
之后,我添加以下代码到Index.cshtml.js文件末尾(在})之前):
var createModal = new abp.ModalManager(abp.appPath + 'Products/CreateProductModal');
createModal.onResult(function () {
 dataTable.ajax.reload();
});
$('#NewProductButton').click(function (e) {
 e.preventDefault();
 createModal.open();
});
abp.ModalManager用于在客户端管理模式对话框。在内部,它使用 Twitter Bootstrap 的标准模态组件,封装了很多细节,并提供了一个简单的 API。当模型触发保存时会返回一个回调函数createModal.onResult()。createModal.open()用于打开模态对话框。
最后,我们需要在en.json文件中定义一些本地化文本(.Domain.Shared项目的Localization/ProductManagement 文件夹下):
"NewProduct": "New Product",
"Category": "Category",
"IsFreeCargo": "Free Cargo",
"ReleaseDate": "Release Date"
再次运行 Web 尝试创建新产品
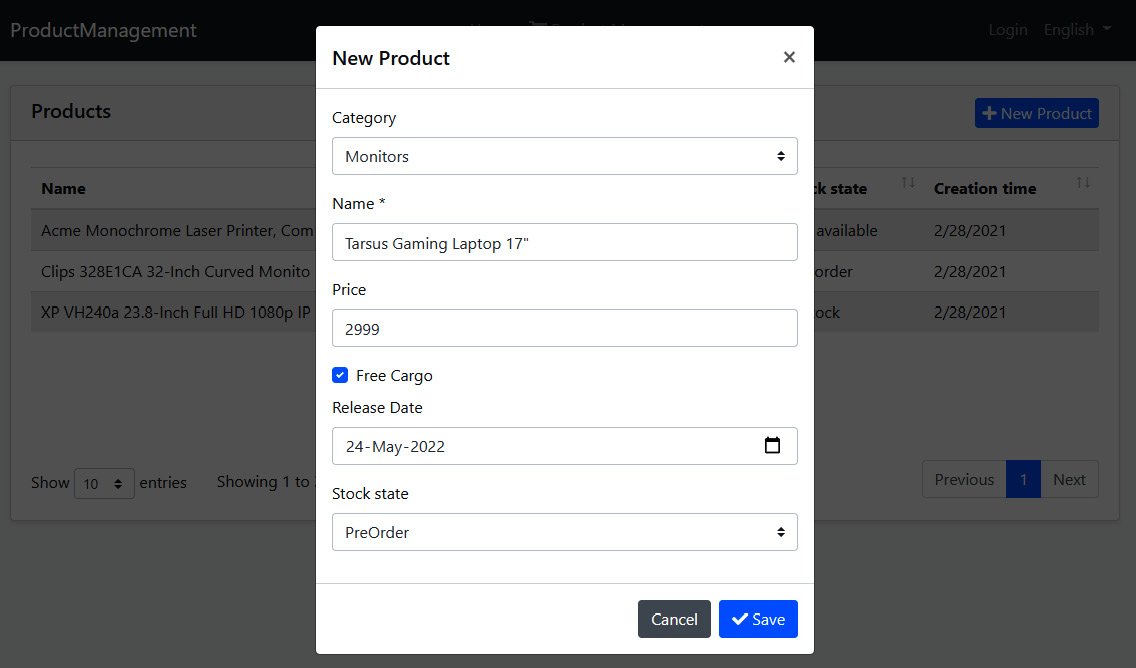
ABP基于 C# 类模型自动创建表单字段。本地化和验证也可以通过读取属性和使用约定来自动工作。我们将在[第 12 章] 使用 MVC/Razor 页面 中更详细地介绍验证和本地化主题。
我们现在可以在 UI 上创建产品了。
编辑产品
编辑产品类似于添加新产品,现在让我们看看如何编辑产品:
定义应用接口
让我们从为IProductAppService接口定义两个新方法:
Task GetAsync(Guid id);
Task UpdateAsync(Guid id, CreateUpdateProductDto input);第一种方法用于通过ID获取产品。我们在UpdateAsync方法中重用之前定义的CreateUpdateProductDto。
实现应用接口
实现这些新方法非常简单。将以下方法添加到ProductAppService类中:
public async Task GetAsync(Guid id)
{
 return ObjectMapper.Map(
 await \_productRepository.GetAsync(id)
 );
}
public async Task UpdateAsync(Guid id, CreateUpdateProductDto input)
{
 var product = await \_productRepository.GetAsync(id);
 ObjectMapper.Map(input, product);
}GetAsync方法用于从数据库中获取产品,并将其映射到ProductDto对象后进行返回。UpdateAsync方法获取到一个产品后,将给定的DTO输入映射到产品。通过这种方式,我们用新值覆盖产品。
对于这个例子,我们不需要调用\_productRepository.UpdateAsync,因为 EF Core有一个变更跟踪系统。ABP 的工作单元如果没有抛出异常,则在请求结束时会自动保存更改。我们将在[第 6 章] 使用数据访问基础架构”中介绍工作单元系统。
应用层已完成。接下来,我们将创建一个产品编辑 UI。
用户界面
创建一个EditProductModal.cshtmlRazor 页面(ProductManagement.Web项目的 Pages/Products文件夹下)。打开EditProductModal.cshtml.cs,代码更改如下:
using System;
using System.Linq;
using System.Threading.Tasks;
using Microsoft.AspNetCore.Mvc;
using Microsoft.AspNetCore.Mvc.Rendering;
using ProductManagement.Products;
namespace ProductManagement.Web.Pages.Products
{
 public class EditProductModalModel : ProductManagementPageModel
 {
 [HiddenInput]
 [BindProperty(SupportsGet = true)]
 public Guid Id { get; set; }
 [BindProperty]
 public CreateEditProductViewModel Product { get; set; }
 public SelectListItem[] Categories { get; set; }
 private readonly IProductAppService \_productAppService;

 public EditProductModalModel(IProductAppService productAppService)
 {
 \_productAppService = productAppService;
 }
 public async Task OnGetAsync()
 {
 // TODO
 }
 public async Task OnPostAsync()
 {
 // TODO
 }
 }
}表单中Id字段将被隐藏。
它还应该支持 HTTP GET 请求,因为 GET 请求会打开此模型,并且我们需要产品 ID 来编辑表单。Product和Categories属性类似于创建产品。我们还将IProductAppService接口注入到构造函数。
我们实现OnGetAsync方法,如下代码块所示:
public async Task OnGetAsync()
{
 var productDto = await \_productAppService.GetAsync(Id);
 Product = ObjectMapper.Map(productDto);

 var categoryLookup = await \_productAppService.GetCategoriesAsync();
 Categories = categoryLookup.Items
 .Select(x => new SelectListItem(x.Name, x.Id.ToString()))
 .ToArray();
}
首先,我们要先获取一个产品 ( ProductDto),再将其转换为CreateEditProductViewModel,使用它在 UI 上来创建编辑表单。然后,我们在表单上选择产品类别。
因为这里映射了ProductDto到CreateEditProductViewModel,所以我们需要在ProductManagementWebAutoMapperProfile类中定义配置映射(ProductManagement.Web项目中),这和我们之前操作是一样的:
CreateMap();我们再看下OnPostAsync()方法:
public async Task OnPostAsync()
{
 await \_productAppService.UpdateAsync(Id,
 ObjectMapper.Map(Product)
 );
 return NoContent();
}OnPostAsync方法很简单,把CreateEditProductViewModel转换为CreateUpdateProductDto。
接着,我们切换到EditProductModal.cshtml,内容更改如下:
@page
@using Microsoft.AspNetCore.Mvc.Localization
@using ProductManagement.Localization
@using Volo.Abp.AspNetCore.Mvc.UI.Bootstrap.TagHelpers.Modal
@model ProductManagement.Web.Pages.Products.EditProductModalModel
@inject IHtmlLocalizer L
@{
 Layout = null;
}
dynamic-form abp-model="Product" asp-page="/Products/EditProductModal">

 "@Model.Product.Name">

 for="Id" />

 "@(AbpModalButtons.Cancel|AbpModalButtons.Save)">

dynamic-form>页面与CreateProductModal.cshtml非常相似。我刚刚将Id字段作为隐藏字段添加到表单,用来存储Id编辑的产品的属性。
最后,我们可以添加一个编辑按钮以从产品列表中打开编辑模态窗口。打开Index.cshtml.js文件,并在dataTable代码的头部添加一个ModalManager对象:
var editModal = new abp.ModalManager(abp.appPath + 'Products/EditProductModal');然后,在dataTable内部的columnDefs数组中定义一个列(第一项):
{
 title: l('Actions'),
 rowAction: {
 items:
 [
 {
 text: l('Edit'),
 action: function (data) {
 editModal.open({ id: data.record.id });
 }
 }
 ]
 }
},此代码向数据表添加了一个新的Actions列,并添加了一个Edit操作按钮,单击即可打开编辑窗口。rowAction是 ABP Framework 提供的一个特殊选项。它用于在表中的一行添加一个或多个操作按钮。
最后,在dataTable初始化代码后添加如下:
editModal.onResult(function () {
 dataTable.ajax.reload();
});
在保存产品编辑对话框后刷新数据表,确保我们可以看到表上的最新数据。最终的 UI 类似于下图:
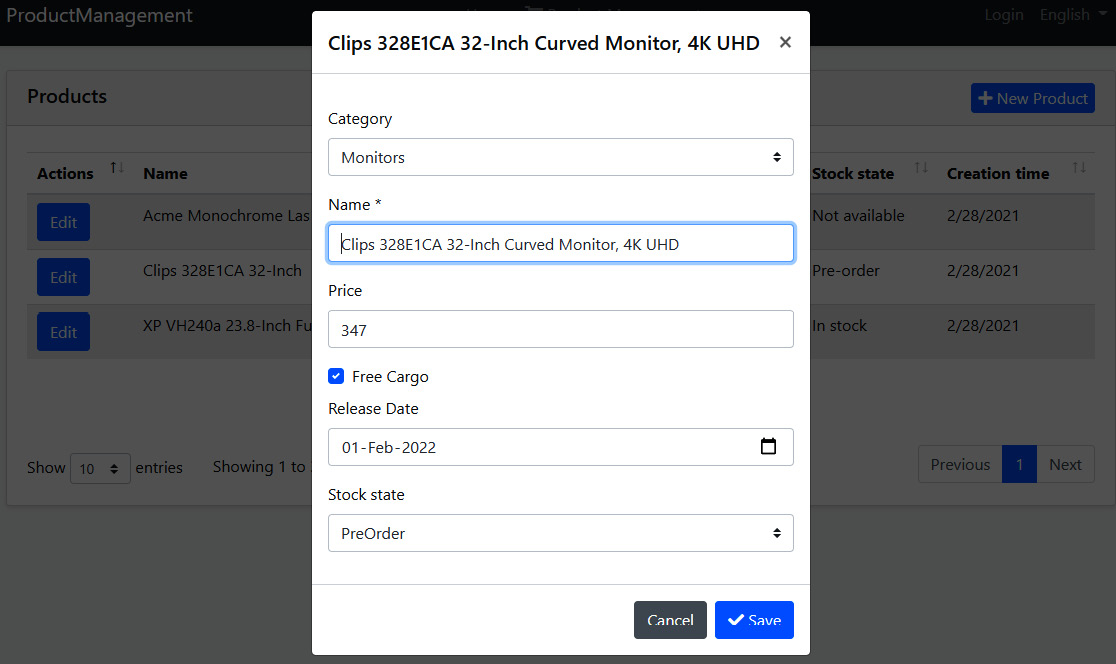
我们现在可以查看、创建和编辑产品了。最后一部分将实现删除产品。
删除产品
删除产品与创建或编辑操作相比,非常简单,因为删除我们不需要构建表单。
首先,在IProductAppService接口中添加一个新方法:
Task DeleteAsync(Guid id);然后,在ProductAppService类中实现它:
public async Task DeleteAsync(Guid id)
{
 await \_productRepository.DeleteAsync(id);
}现在向产品列表添加一个新删除按钮。打开Index.cshtml.js,并在Edit操作之后添加以下定义(在rowAction.items数组中):
{
 text: l('Delete'),
 confirmMessage: function (data) {
 return l('ProductDeletionConfirmationMessage',data.record.name);
 },
 action: function (data) {
 productManagement.products.product
 .delete(data.record.id)
 .then(function() {
 abp.notify.info(l('SuccessfullyDeleted'));
 dataTable.ajax.reload();
 });
 }
}confirmMessage用于在删除之前获得用户确认。productManagement.products.product.delete函数由 ABP 框架动态创建。通过这种方式,可以直接在 JS 代码中调用服务器端方法。我们只需传递当前记录的 ID。then函数传递一个回调函数,用于删除之后的操作。最后,我们使用abp.notify.info通知用户,最后刷新数据表。
我们使用了一些本地化文本,因此我们需要在本地化en.json文件中添加以下代码:
"ProductDeletionConfirmationMessage": "Are you sure to delete this book: {0}",
"SuccessfullyDeleted": "Successfully deleted!"
再次访问 web 查看结果: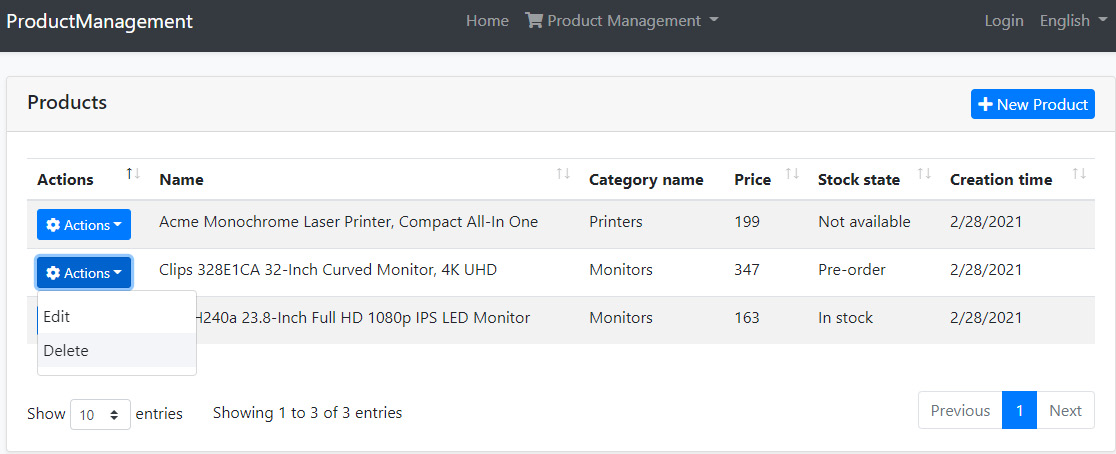
因为现在有两个操作按钮,所以编辑按钮会自动变成一个下拉选项。当您单击删除操作时,您会收到一条确认消息:
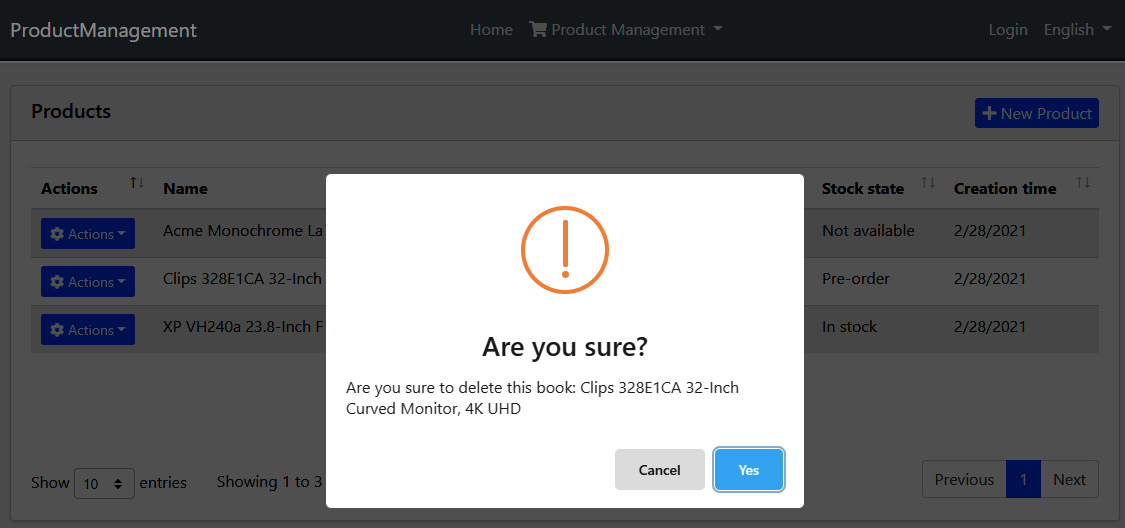
如果你点击在是按钮上,您将在页面上看到一条通知,并且数据表将被刷新。
实施产品删除非常简单。ABP 的内置功能帮助我们实现了常见的模式,例如客户端到服务器的通信、确认对话框和 UI 通知。
请注意,Product实体派生于FullAuditedAggregateRoot,所以它使用了软删除。删除产品后检查数据库,您会看到它并没有真正删除,但是IsDeleted字段已经设置为true(逻辑删除不是物理删除)。下次查询商品时,已删除的商品会自动过滤掉,不包含在查询结果中。这是由 ABP 框架的数据过滤系统完成的。
概括
至此上下篇章全部完成了,在本篇中,我们创建了一个完整的 CRUD 页面。我们介绍了解决方案中的所有层,并了解了ABP 的程序开发的基本方法。
同时,也向您介绍了许多不同的概念,例如实体、存储库、数据库映射和迁移、自动化测试、API 控制器、动态 JavaScript 代理、对象映射、软删除等。ABP 是一个全栈应用程序框架,可帮助您通过最佳实践来实现这些概念。它提供了必要的基础设施,使您的日常开发更容易。
此时您可能不了解所有细节。其余篇幅会深入研究这些概念并展示它们的细节和不同的用例。
以上的示例相对简单,它不包含任何重要的业务逻辑,因为我引入了许多概念目的是想让大家对这些基础概念有个初步的理解而不是业务复杂性。
+## (^_^)打个赏喝个咖啡(^_^)

转载请注明:xuhss » ABP应用开发(Step by Step)-下篇