文章目录
显示
作者:虚坏叔叔
博客:https://xuhss.com
早餐店不会开到晚上,想吃的人早就来了!?
一、QT项目设置文件MyPlayer.Pro的讲解
MyPlayer.Pro项目文件定义整个项目的设置。我们来看下这个文件的具体含义。
这个项目首先使用了QT的模板app:
# Project Type
TEMPLATE = app下面确定了QT要引用的模块,
# Qt modules that are used by your project
QT += qml quick gui widgets multimedia opengl openglextensions工程编译选项需要定义QT以及C++11、STL等一系列标准,
# Project configuration and compiler options
CONFIG += qt warn_on c++11 rtti stl thread exceptions设置moc文件的路径:moc文件是由 系统中的QT开发环境根据头文件中的宏来生成的。我们编译之后,就能看到moc文件。
# Directory where all intermediate objects and moc files should be placed
CONFIG(debug, debug|release) {
    OBJECTS_DIR = ./tmp/debug
    MOC_DIR = ./tmp/debug
} else {
    OBJECTS_DIR = ./tmp/release
    MOC_DIR = ./tmp/release
}
临时文件以及资源的配置文件
# Directory where all intermediate files from uic should be placed
CONFIG(debug, debug|release) {
    UI_DIR = ./tmp/debug
} else {
    UI_DIR = ./tmp/release
}

# Directory for Qt Resource Compiler output files
CONFIG(debug, debug|release) {
    RCC_DIR = ./tmp/debug
} else {
    RCC_DIR = ./tmp/release
}指定Debug和Release生成文件的目录。
# Specifies where to put the target file
CONFIG(debug, debug|release) {
    contains(QMAKE_TARGET.arch, x86_64) {
        DESTDIR = $$_PRO_FILE_/../../../bin/debug/x64
    } else {
        DESTDIR = $$_PRO_FILE_/../../../bin/debug/x86
    }
} else {
    contains(QMAKE_TARGET.arch, x86_64) {
        DESTDIR = $$_PRO_FILE_/../../../bin/release/x64
    } else {
        DESTDIR = $$_PRO_FILE_/../../../bin/release/x86
    }
}工程的名称叫做MyPlayer
# Name of the target file
TARGET = MYPlayer
定义了资源文件的名称以及编码方式
# Name of the resource collection files (qrc) for the target
RESOURCES += resource/MYPlayer.qrc
#RESOURCES += qml.qrc

# Codec configuration
CODECFORTR = UTF-8
CODECFORSRC = UTF-8资源文件还包含了qml和js文件
# Source files which contains strings for i18n
lupdate_only {
    SOURCES += resource/ui/qml/*.qml \
              resource/ui/qml/*.js
}
定义了翻译文件,支持中文翻译,帮助开发多语言的软件。
# Translation file path
TRANSLATIONS += ./resource/ui/translation/MYPlayer_zh_CN.ts
这里是我们需要添加的源文件:
# Source files in the project
SOURCES += \
        MYAudioPlay.cpp \
        MYAudioThread.cpp \
        MYDecode.cpp \
        MYDecodeThread.cpp \
        MYDemux.cpp \
        MYDemuxThread.cpp \
        MYResample.cpp \
        MYVideoThread.cpp \
        MYVideoOutput.cpp \
        MYPlay.cpp \
        main.cpp \
        MainApp.cpp \
        MYSubTitle.cpp \
以及头文件:
# Header files for the project
HEADERS += MainApp.h \
    IVideoCall.h \
    MYAudioPlay.h \
    MYAudioThread.h \
    MYDecode.h \
    MYDecodeThread.h \
    MYDemux.h \
    MYDemuxThread.h \
    MYResample.h \
    MYVideoThread.h \
    MYVideoOutput.h \
    MYPlay.h \
    MYSubTitle.h \
项目中使用到的头文件包含路径:
# Include path
INCLUDEPATH += ../../include
项目中需要使用到的库文件包含路径:
# Libaray path and libaray
CONFIG(debug, debug|release) {
    contains(QMAKE_TARGET.arch, x86_64) {
        LIBS += -L"$$PWD/../../lib/debug/x64/"
    } else {
        LIBS += -L"$$PWD/../../lib/debug/x86/"
    }
#    win32:LIBS += libqrencode.lib\
#                  libzint.lib
#    unix:LIBS += -lqrencode\
#                 -lzint
} else {
    contains(QMAKE_TARGET.arch, x86_64) {
        LIBS += -L"$$PWD/../../lib/release/x64/"
    } else {
        LIBS += -L"$$PWD/../../lib/release/x86/"
    }
#    win32:LIBS += libqrencode.lib\
#                  libzint.lib
#    unix:LIBS += -lqrencode\
#                 -lzint
}
win32:LIBS += avformat.lib\
              avcodec.lib\
              avutil.lib\
              swresample.lib\
swscale.libWin32平台下还需要rc的资源文件:
# Windows platform
win32 {
    RC_FILE = win32/MYPlayer.rc
    HEADERS += win32/targetver.h \
               win32/resource.h
    OTHER_FILES += win32/MYPlayer.rc
}
其他平台我们并没有维护:
################################################################################
# Linux platform
linux {
}

################################################################################
# Mac OS X platform
macx {
}
我们保证是默认的就可以。
二 、在Visual Studio环境下程序启动源代码
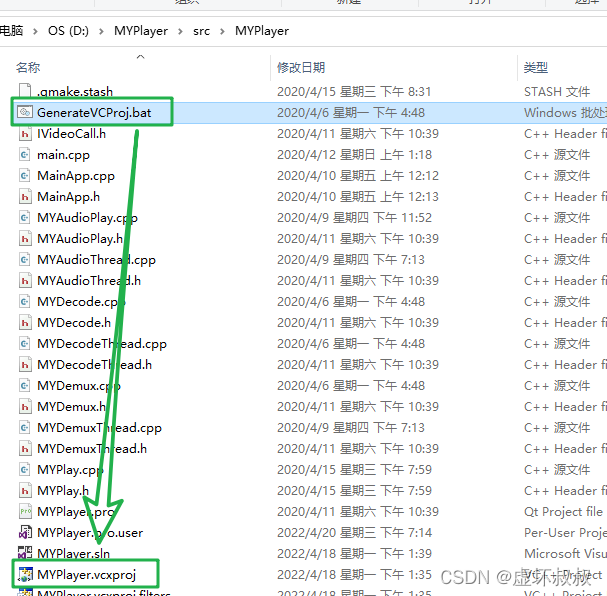
双击GenerateVCProj.bat文件,会自动生成MYPlayer.vcxproj:


查看MainApp.h,为什么要继承QApplication,因为我们希望在MainApp这个类中完成程序初始化的工作,这部分初始化的工作的目的是为了建立界面管理的机制。

可以先看下这个类的成员变量

类的方法:
[
Q_PROPERTY实现界面层和复杂的逻辑处理绑定
绑定了demoNum变量读、写、更改方法:
// For QML property(-ies)
// e.g.
Q_PROPERTY(int demoNum READ demoNum WRITE setDemoNum NOTIFY demoNumChanged)

// For QML property(-ies)
// e.g.
// demoNum
int demoNum() const;
void setDemoNum(int newValue);

QString language() const;
void setLanguage(QString newValue);
三、总结
- 本文讲解了整体的项目配置和项目app启动类。
- 如果觉得文章对你有用处,记得
点赞收藏转发一波哦~
? 往期优质文章分享
- C++ QT结合FFmpeg实战开发视频播放器-01环境的安装和项目部署
- 解决QT问题:运行qmake:Project ERROR: Cannot run compiler ‘cl‘. Output:
- 解决安装QT后MSVC2015 64bit配置无编译器和调试器问题
- Qt中的套件提示no complier set in kit和no debugger,出现黄色感叹号问题解决(MSVC2017)
- Python+selenium 自动化 - 实现自动导入、上传外部文件(不弹出windows窗口)
? 优质教程分享 ?
- ?如果感觉文章看完了不过瘾,可以来我的其他 专栏 看一下哦~
- ?比如以下几个专栏:Python实战微信订餐小程序、Python量化交易实战、C++ QT实战类项目 和 算法学习专栏
- ?可以学习更多的关于C++/Python的相关内容哦!直接点击下面颜色字体就可以跳转啦!
| 学习路线指引(点击解锁) | 知识定位 | 人群定位 |
|---|---|---|
| ? Python实战微信订餐小程序 ? | 进阶级 | 本课程是python flask+微信小程序的完美结合,从项目搭建到腾讯云部署上线,打造一个全栈订餐系统。 |
| ?Python量化交易实战? | 入门级 | 手把手带你打造一个易扩展、更安全、效率更高的量化交易系统 |
| ❤️ C++ QT结合FFmpeg实战开发视频播放器❤️ | 难度偏高 | 分享学习QT成品的视频播放器源码,需要有扎实的C++知识! |
| ? 游戏爱好者九万人社区? | 互助/吹水 | 九万人游戏爱好者社区,聊天互助,白嫖奖品 |
| ? Python零基础到入门 ? | Python初学者 | 针对没有经过系统学习的小伙伴,核心目的就是让我们能够快速学习Python的知识以达到入门 |
? 资料白嫖,温馨提示 ?
关注下面卡片即刻获取更多编程知识,包括各种语言学习资料,上千套PPT模板和各种小程序、Web、客户端项目源码等等资料。更多内容可自行查看哦!
