文章目录
显示
? 优质资源分享 ?
| 学习路线指引(点击解锁) | 知识定位 | 人群定位 |
|---|---|---|
| ? Python实战微信订餐小程序 ? | 进阶级 | 本课程是python flask+微信小程序的完美结合,从项目搭建到腾讯云部署上线,打造一个全栈订餐系统。 |
| ?Python量化交易实战? | 入门级 | 手把手带你打造一个易扩展、更安全、效率更高的量化交易系统 |
目录
前言
3.9、延迟队列 - 重要
3.9.1、延迟队列概念
-
这个玩意儿要表达的意思其实已经见过了,就是死信队列中说的TTL消息过期,但是文字表达得换一下
-
所谓的延迟队列:就是用来存放需要在指定时间内被处理的元素的队列,其内部是有序的
-
使用场景:
- 1、支付时,订单在30分钟以内未支付则自动取消支付
- 2、退款,用户发起退款,在3天以后商家还未处理,那官方便介入其中进行处理
- ..........
-
玩延迟队列需要具备的条件:
- 1、具备死信队列知识
- 2、具备TTL知识
- 然后将这二者结合,加一些东西,上好的烹饪就做好了
-
实现如下的逻辑

- P:生产者
- X:正常交换机
- Y:死信交换机
- QA、QB:正常队列
- QD:死信队列
- XA、XB:正常交换机、正常队列的routing key
- YD:死信交换机、死信队列的routing key
3.9.2、集成SpringBoot
3.9.2.1、依赖
|  | <dependencies> |
|  |  |
|  | <dependency> |
|  | <groupId>org.springframework.bootgroupId> |
|  | <artifactId>spring-boot-starter-amqpartifactId> |
|  | dependency> |
|  | <dependency> |
|  | <groupId>org.springframework.amqpgroupId> |
|  | <artifactId>spring-rabbit-testartifactId> |
|  | <scope>testscope> |
|  | dependency> |
|  | <dependency> |
|  | <groupId>org.springframework.bootgroupId> |
|  | <artifactId>spring-boot-starter-webartifactId> |
|  | dependency> |
|  | <dependency> |
|  | <groupId>org.springframework.bootgroupId> |
|  | <artifactId>spring-boot-starter-testartifactId> |
|  | <scope>testscope> |
|  | dependency> |
|  | dependencies> |
|  |  |
3.9.2.2、yml文件配置
|  | # RabbitMQ的配置 |
|  | spring: |
|  | rabbitmq: |
|  | host: 自己服务器ip |
|  | port: 5672 |
|  | username: admin |
|  | password: admin |
|  | # 要是有Vhost也可以进行配置 |
|  |  |
3.9.2.4、RabbitMQ配置

|  | package cn.zixieqing.config; |
|  |  |
|  | import org.springframework.amqp.core.*; |
|  | import org.springframework.beans.factory.annotation.Qualifier; |
|  | import org.springframework.context.annotation.Bean; |
|  | import org.springframework.context.annotation.Configuration; |
|  |  |
|  | import java.util.HashMap; |
|  |  |
|  |  |
|  | @Configuration |
|  | public class MqConfig { |
|  |  |
|  | /** |
|  |  * 正常交换机名称 |
|  |  */ |
|  | private static final String TTL\_NORMAL\_EXCHANGE = "X"; |
|  |  |
|  | /** |
|  |  * 死信交换机名称 |
|  |  */ |
|  | private static final String TTL\_DEAD\_LETTER\_EXCHANGE = "Y"; |
|  |  |
|  | /** |
|  |  * 正常队列名称 |
|  |  */ |
|  | private static final String TTL\_NORMAL\_QUEUE\_A = "QA"; |
|  | private static final String TTL\_NORMAL\_QUEUE\_B = "QB"; |
|  |  |
|  | /** |
|  |  * 死信队列名称 |
|  |  */ |
|  | private static final String TTL\_DEAD\_LETTER\_QUEUE\_D = "QD"; |
|  |  |
|  | /** |
|  |  * 正常交换机 和 正常队列A的routing key |
|  |  */ |
|  | private static final String TTL\_NORMAL\_EXCHANGE\_BIND\_QUEUE\_A = "XA"; |
|  |  |
|  | /** |
|  |  * 正常交换机 和 正常队列B的routing key |
|  |  */ |
|  | private static final String TTL\_NORMAL\_EXCHANGE\_BIND\_QUEUE\_B = "XB"; |
|  |  |
|  | /** |
|  |  * 正常队列 和 死信交换机 及 死信交换机 与 死信队列的routing key |
|  |  */ |
|  | private static final String TTL\_NORMAL\_QUEUE\_AND\_DEAD\_LETTER\_EXCHANGE\_AND\_DEAD\_LETTER\_QUEUE\_BIND = "YD"; |
|  |  |
|  |  |
|  | /** |
|  |  * 声明正常交换机 |
|  |  */ |
|  | @Bean("xExchange") |
|  | public DirectExchange xExchange() { |
|  | // 直接创建是什么类型的交换机 加上 交换机名字就可以了 |
|  | return new DirectExchange(TTL\_NORMAL\_EXCHANGE); |
|  |  } |
|  |  |
|  | /** |
|  |  * 声明死信交换机 |
|  |  */ |
|  | @Bean("yExchange") |
|  | public DirectExchange yExchange() { |
|  | return new DirectExchange(TTL\_DEAD\_LETTER\_EXCHANGE); |
|  |  } |
|  |  |
|  | /** |
|  |  * 声明正常队列QA 并 绑定死信交互机Y |
|  |  */ |
|  | @Bean("queueA") |
|  | public Queue queueA() { |
|  |  |
|  | // initialCapacity 这里的map大小值:(存的元素个数 / 负载因子0.75) + 1 |
|  |  HashMap params = new HashMap<>(5); |
|  |  params.put("x-dead-letter-exchange", TTL\_DEAD\_LETTER\_EXCHANGE); |
|  |  params.put("x-dead-letter-routing-key", TTL\_NORMAL\_QUEUE\_AND\_DEAD\_LETTER\_EXCHANGE\_AND\_DEAD\_LETTER\_QUEUE\_BIND); |
|  |  params.put("x-message-ttl", 10 * 1000); |
|  |  |
|  | // 构建队列 并 传入相应的参数 |
|  | return QueueBuilder.durable(TTL\_NORMAL\_QUEUE\_A) |
|  |  .withArguments(params) |
|  |  .build(); |
|  |  } |
|  |  |
|  | /** |
|  |  * X正常交换机 和 QA正常队列绑定 |
|  |  */ |
|  | @Bean |
|  | public Binding xChangeBindingQueueA(@Qualifier("queueA") Queue queueA, |
|  | @Qualifier("xExchange") DirectExchange xExchange) { |
|  | return BindingBuilder.bind(queueA) |
|  |  .to(xExchange) |
|  |  .with(TTL\_NORMAL\_EXCHANGE\_BIND\_QUEUE\_A); |
|  |  } |
|  |  |
|  | /** |
|  |  * 声明正常队列QB 并 绑定死信交换机Y |
|  |  */ |
|  | @Bean("queueB") |
|  | public Queue queueB() { |
|  | /* |
|  |  initialCapacity map初始值:(存的元素个数 / 负载因子0.75) + 1 |
|  |  */ |
|  |  HashMap params = new HashMap<>(5); |
|  |  params.put("x-dead-letter-exchange", TTL\_DEAD\_LETTER\_EXCHANGE); |
|  |  params.put("x-dead-letter-routing-key", TTL\_NORMAL\_QUEUE\_AND\_DEAD\_LETTER\_EXCHANGE\_AND\_DEAD\_LETTER\_QUEUE\_BIND); |
|  |  params.put("x-message-ttl", 40 * 1000); |
|  |  |
|  | // 构建队列 并 传入相应的参数 |
|  | return QueueBuilder.durable(TTL\_NORMAL\_QUEUE\_B) |
|  |  .withArguments(params) |
|  |  .build(); |
|  |  } |
|  |  |
|  | /** |
|  |  * X正常交换机 和 QB正常队列绑定 |
|  |  */ |
|  | @Bean |
|  | public Binding xChangeBindingQueueB(@Qualifier("queueB") Queue queueB, |
|  | @Qualifier("xExchange") DirectExchange xExchange) { |
|  | return BindingBuilder.bind(queueB) |
|  |  .to(xExchange) |
|  |  .with(TTL\_NORMAL\_EXCHANGE\_BIND\_QUEUE\_B); |
|  |  } |
|  |  |
|  | /** |
|  |  * 声明死信队列D |
|  |  */ |
|  | @Bean("queueD") |
|  | public Queue queueD() { |
|  | return new Queue(TTL\_DEAD\_LETTER\_QUEUE\_D); |
|  |  } |
|  |  |
|  | /** |
|  |  * 死信交换机 和 私信队列进行绑定 |
|  |  */ |
|  | @Bean |
|  | public Binding yExchangeBindingQueueD(@Qualifier("queueD") Queue queueD, |
|  | @Qualifier("yExchange") DirectExchange yExchange) { |
|  | return BindingBuilder.bind(queueD) |
|  |  .to(yExchange) |
|  |  .with(TTL\_NORMAL\_QUEUE\_AND\_DEAD\_LETTER\_EXCHANGE\_AND\_DEAD\_LETTER\_QUEUE\_BIND); |
|  |  } |
|  |  |
|  | } |
|  |  |
3.9.2.5、生产者
新加一个依赖
|  | <dependency> |
|  | <groupId>com.alibabagroupId> |
|  | <artifactId>fastjsonartifactId> |
|  | <version>1.2.75version> |
|  | dependency> |
|  |  |
生产者伪代码
|  | package cn.zixieqing.controller; |
|  |  |
|  | import org.springframework.amqp.rabbit.core.RabbitTemplate; |
|  | import org.springframework.beans.factory.annotation.Autowired; |
|  | import org.springframework.web.bind.annotation.GetMapping; |
|  | import org.springframework.web.bind.annotation.PathVariable; |
|  | import org.springframework.web.bind.annotation.RequestMapping; |
|  | import org.springframework.web.bind.annotation.RestController; |
|  |  |
|  | import java.util.Date; |
|  |  |
|  |  |
|  | @RestController |
|  | @RequestMapping("sendMsg") |
|  | public class MqProducerController { |
|  |  |
|  | /** |
|  |  * 这个玩意儿是Spring提供的 |
|  |  */ |
|  | @Autowired |
|  | private RabbitTemplate rabbitTemplate; |
|  |  |
|  | @GetMapping("{message}") |
|  | public void sendMsg(@PathVariable String message) { |
|  |  |
|  |  System.out.println( new Date() + ":接收到了消息===>" + message); |
|  |  |
|  | // 发送消息 |
|  |  rabbitTemplate.convertAndSend("X","XA","这条消息是来着TTL为10s的===>" + message); |
|  |  |
|  |  rabbitTemplate.convertAndSend("X","XB","这条消息是来着TTL为40s的===>" + message); |
|  |  } |
|  | } |
|  |  |
3.9.2.6、消费者
|  | package cn.zixieqing.consumer; |
|  |  |
|  |  |
|  | import com.rabbitmq.client.Channel; |
|  | import org.springframework.amqp.core.Message; |
|  | import org.springframework.amqp.rabbit.annotation.RabbitListener; |
|  | import org.springframework.stereotype.Component; |
|  |  |
|  | import java.nio.charset.StandardCharsets; |
|  | import java.util.Date; |
|  |  |
|  | @Component |
|  | public class DeadLetterQueueConsumer { |
|  |  |
|  | @RabbitListener(queues = "QD") |
|  | public void receiveMsg(Message message,Channel Channel) { |
|  |  System.out.println( new Date() + "接收到了消息===>" + |
|  | new String( message.getBody(), StandardCharsets.UTF\_8)); |
|  |  } |
|  | } |
|  |  |
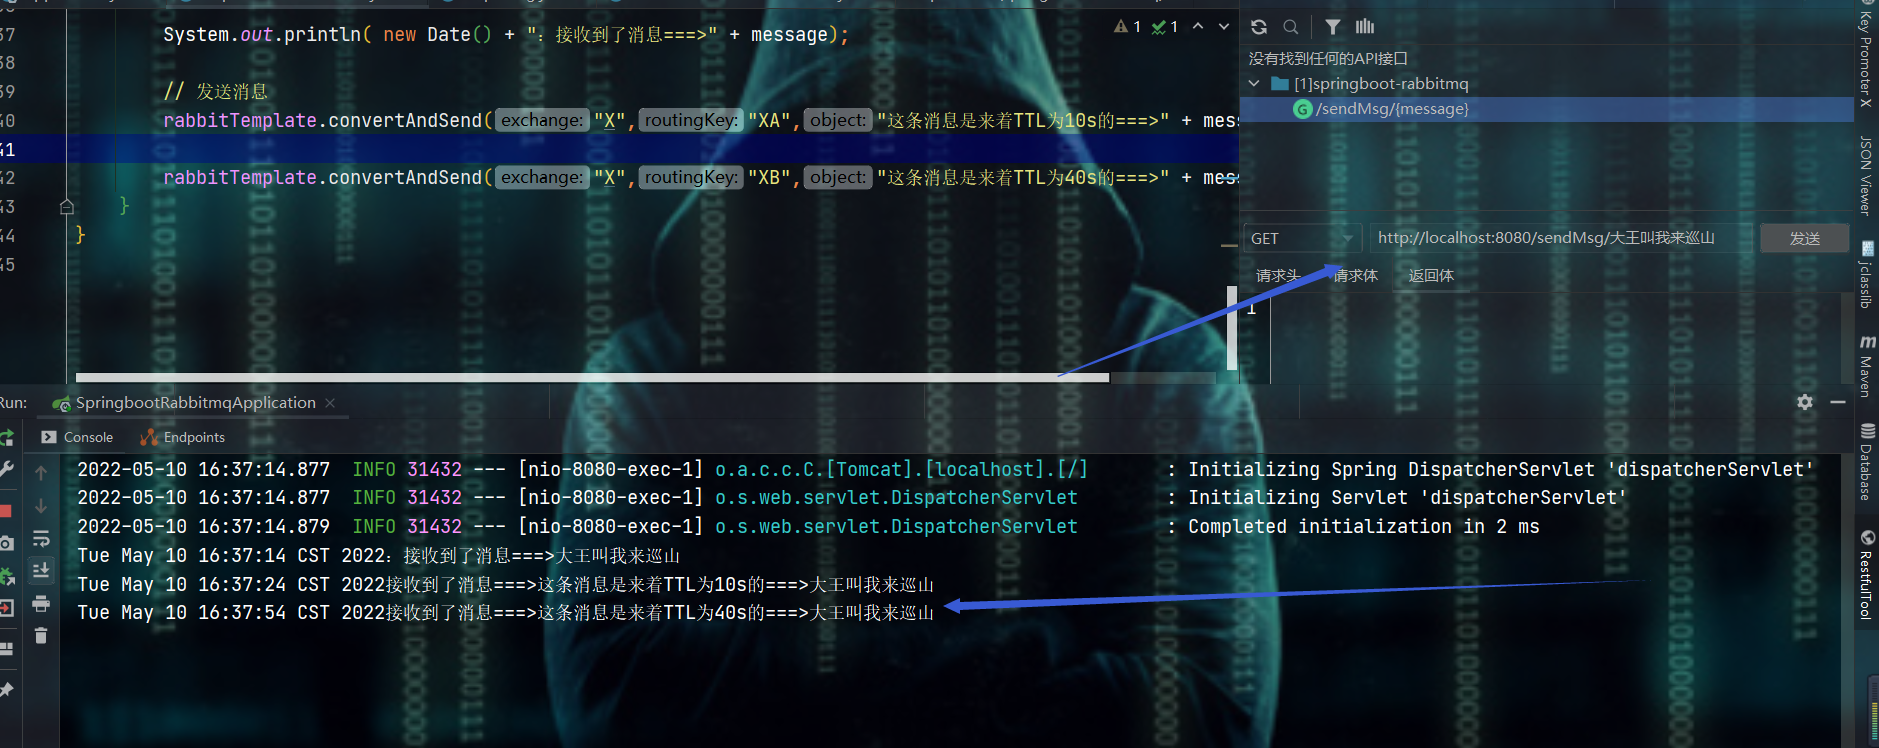
- 但是:这种延迟队列有缺点
- 当有很多请求,而延迟时间也都不一样时,那么就要写N多的这种代码了
3.9.3、RabbitMQ插件实现延迟队列
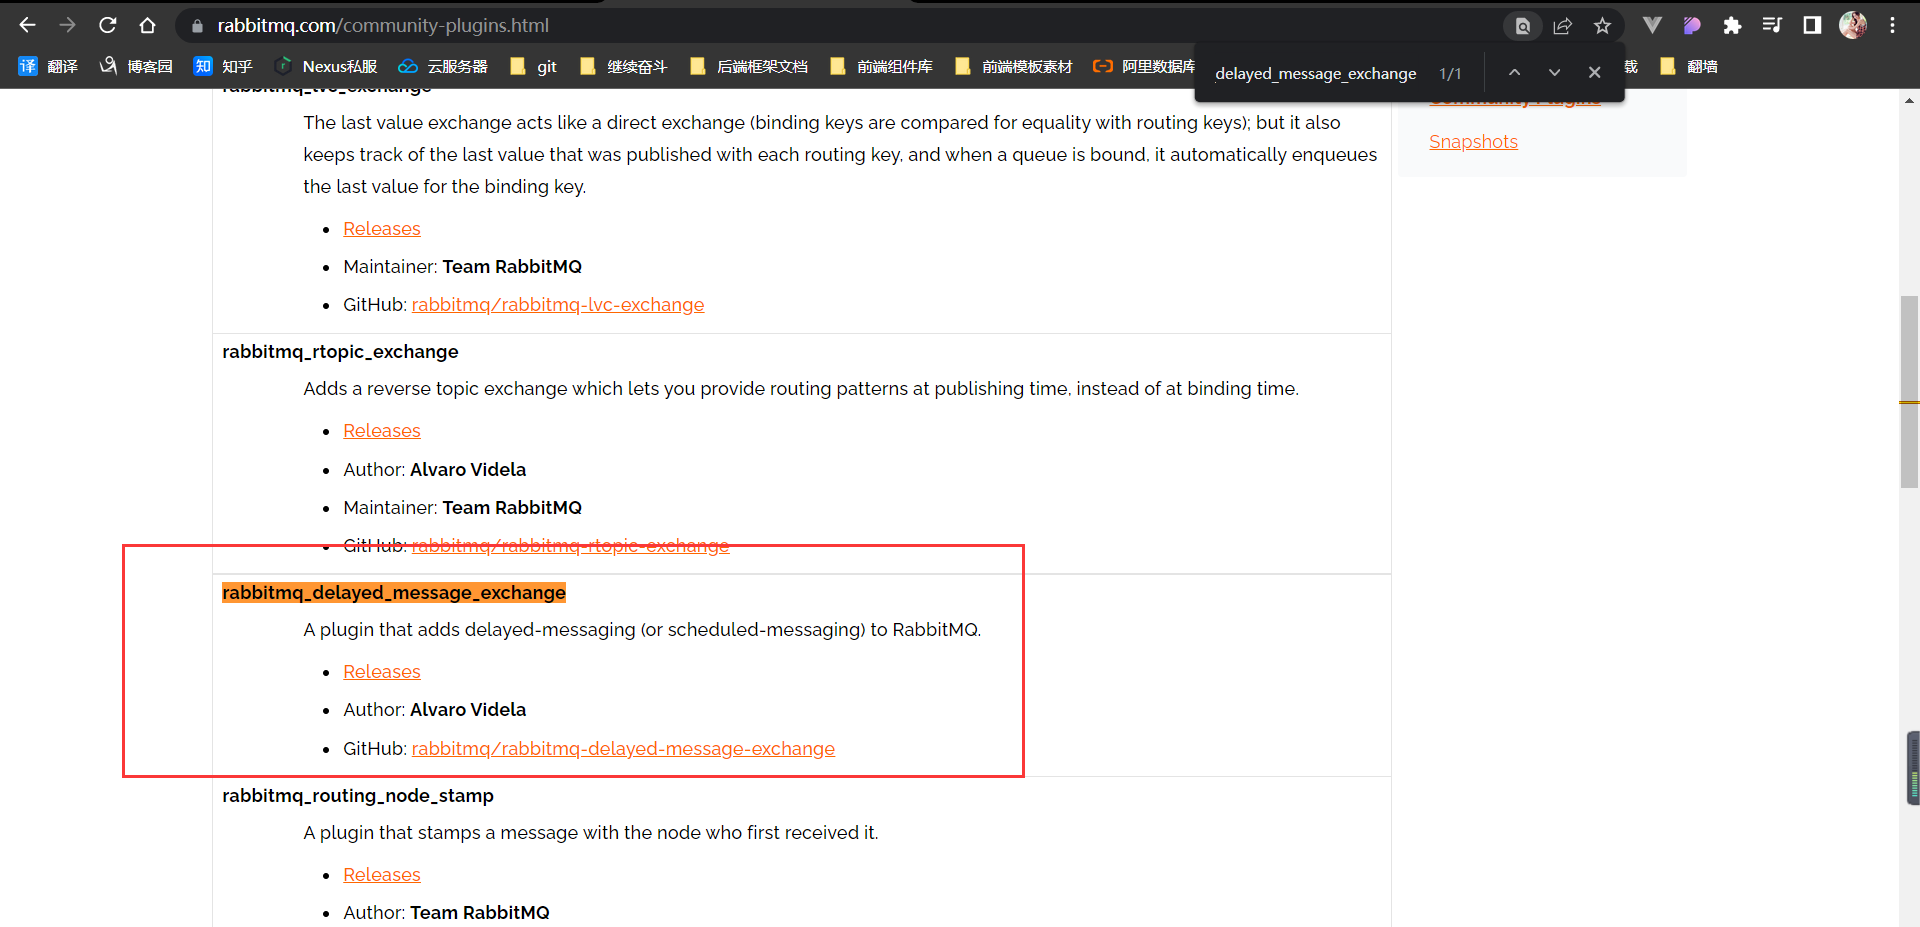
- 插件下载地址:https://www.rabbitmq.com/community-plugins.html
- github地址:https://github.com/rabbitmq/rabbitmq-delayed-message-exchange
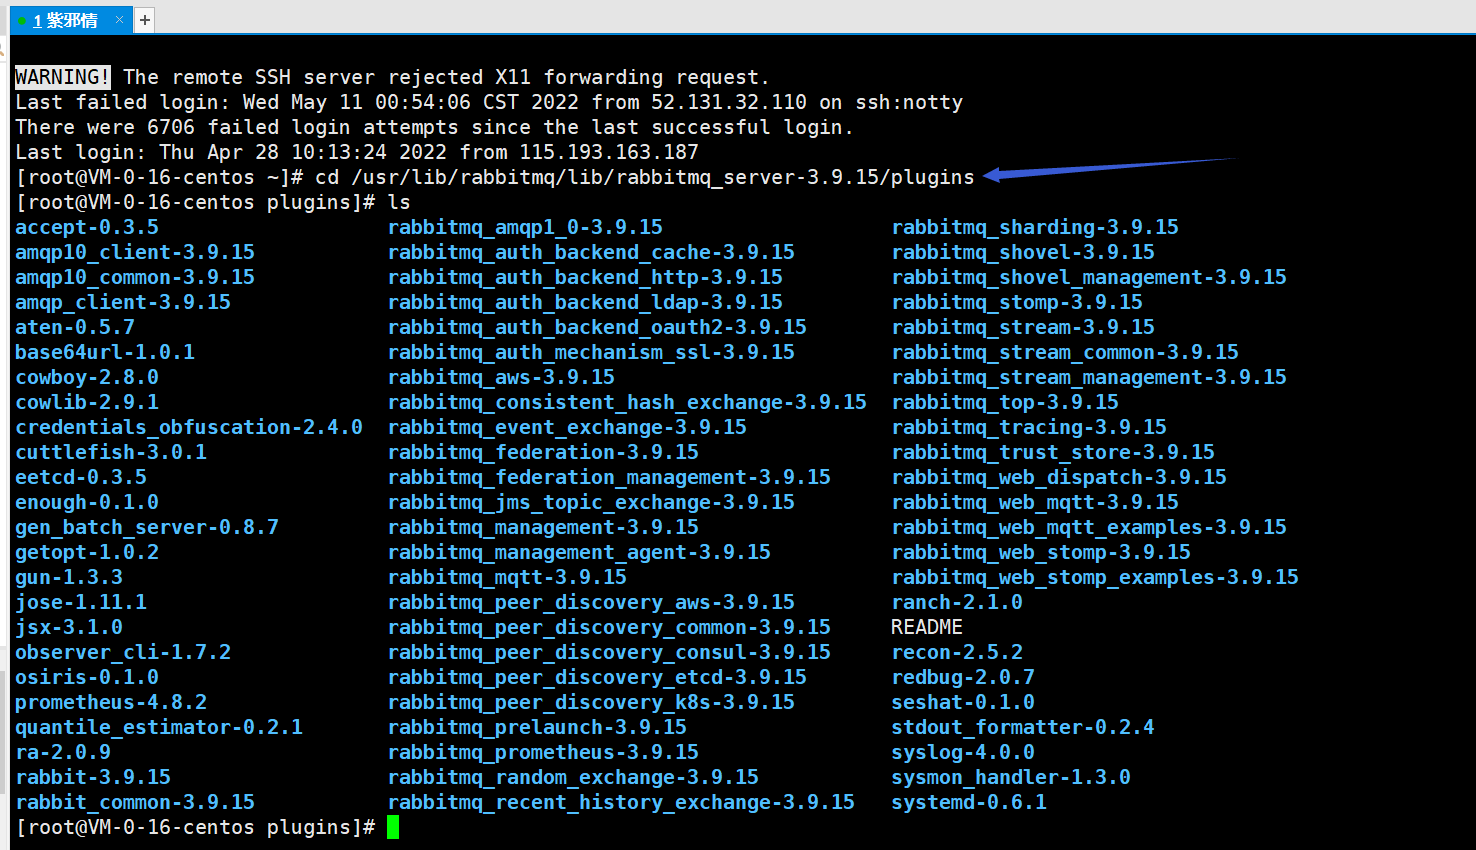
- 进入如下的目录中
|  |  cd /usr/lib/rabbitmq/lib/rabbitmq\_server-3.9.15/plugins # 版本号改成自己的 |
|  |  |
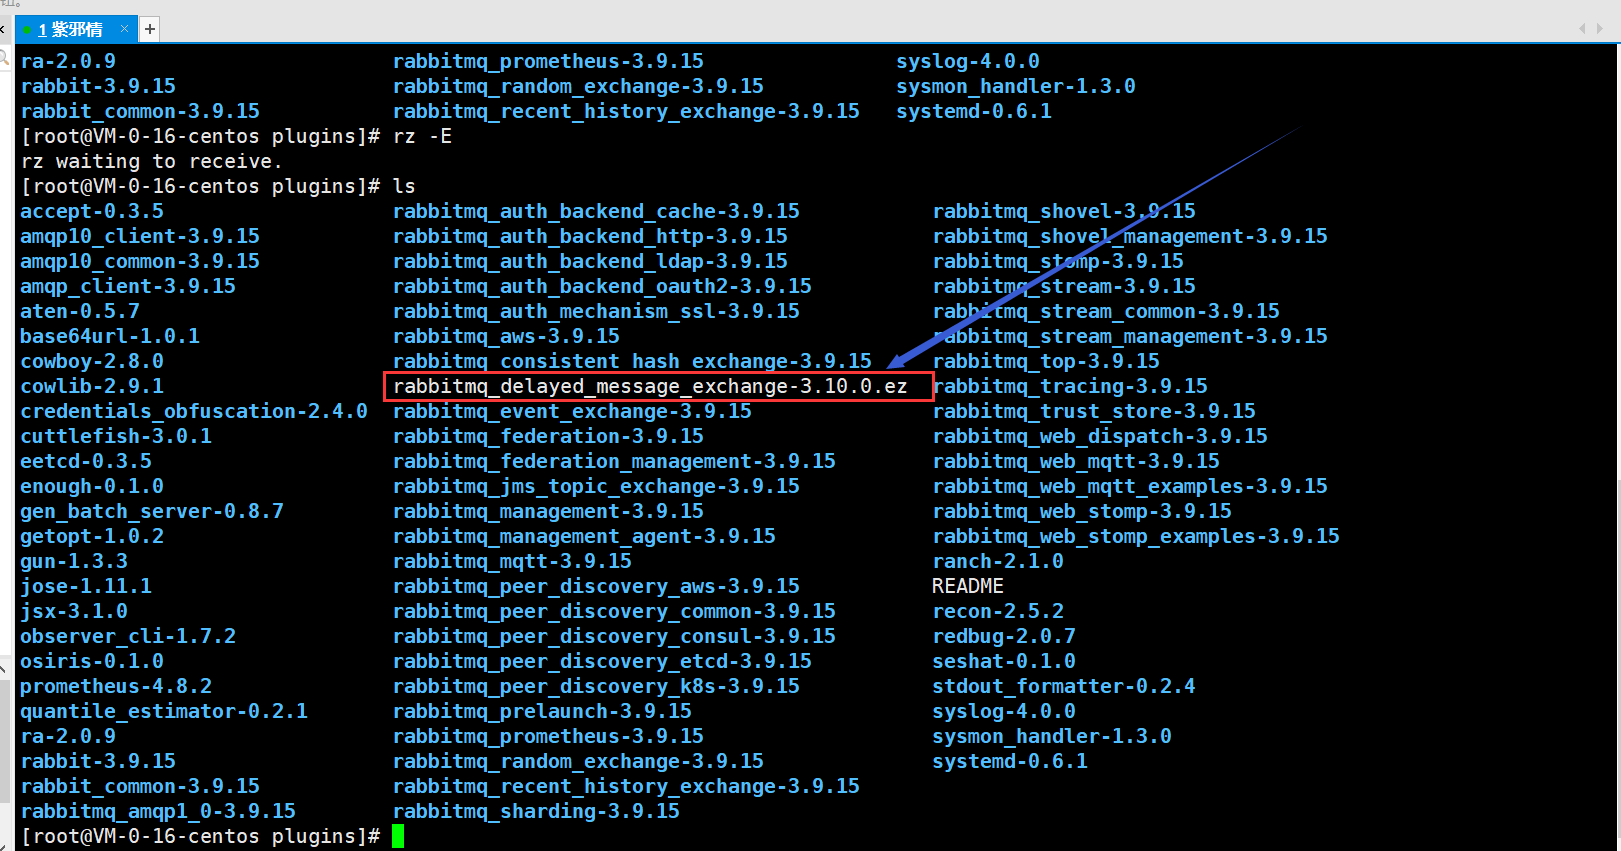
- 把下载的插件上传进去
- 启动插件
|  |  rabbitmq-plugins enable rabbitmq\_delayed\_message\_exchange |
|  |  |

- 重启rabbitMQ
|  |  systemctl restart rabbitmq-server |
|  |  |
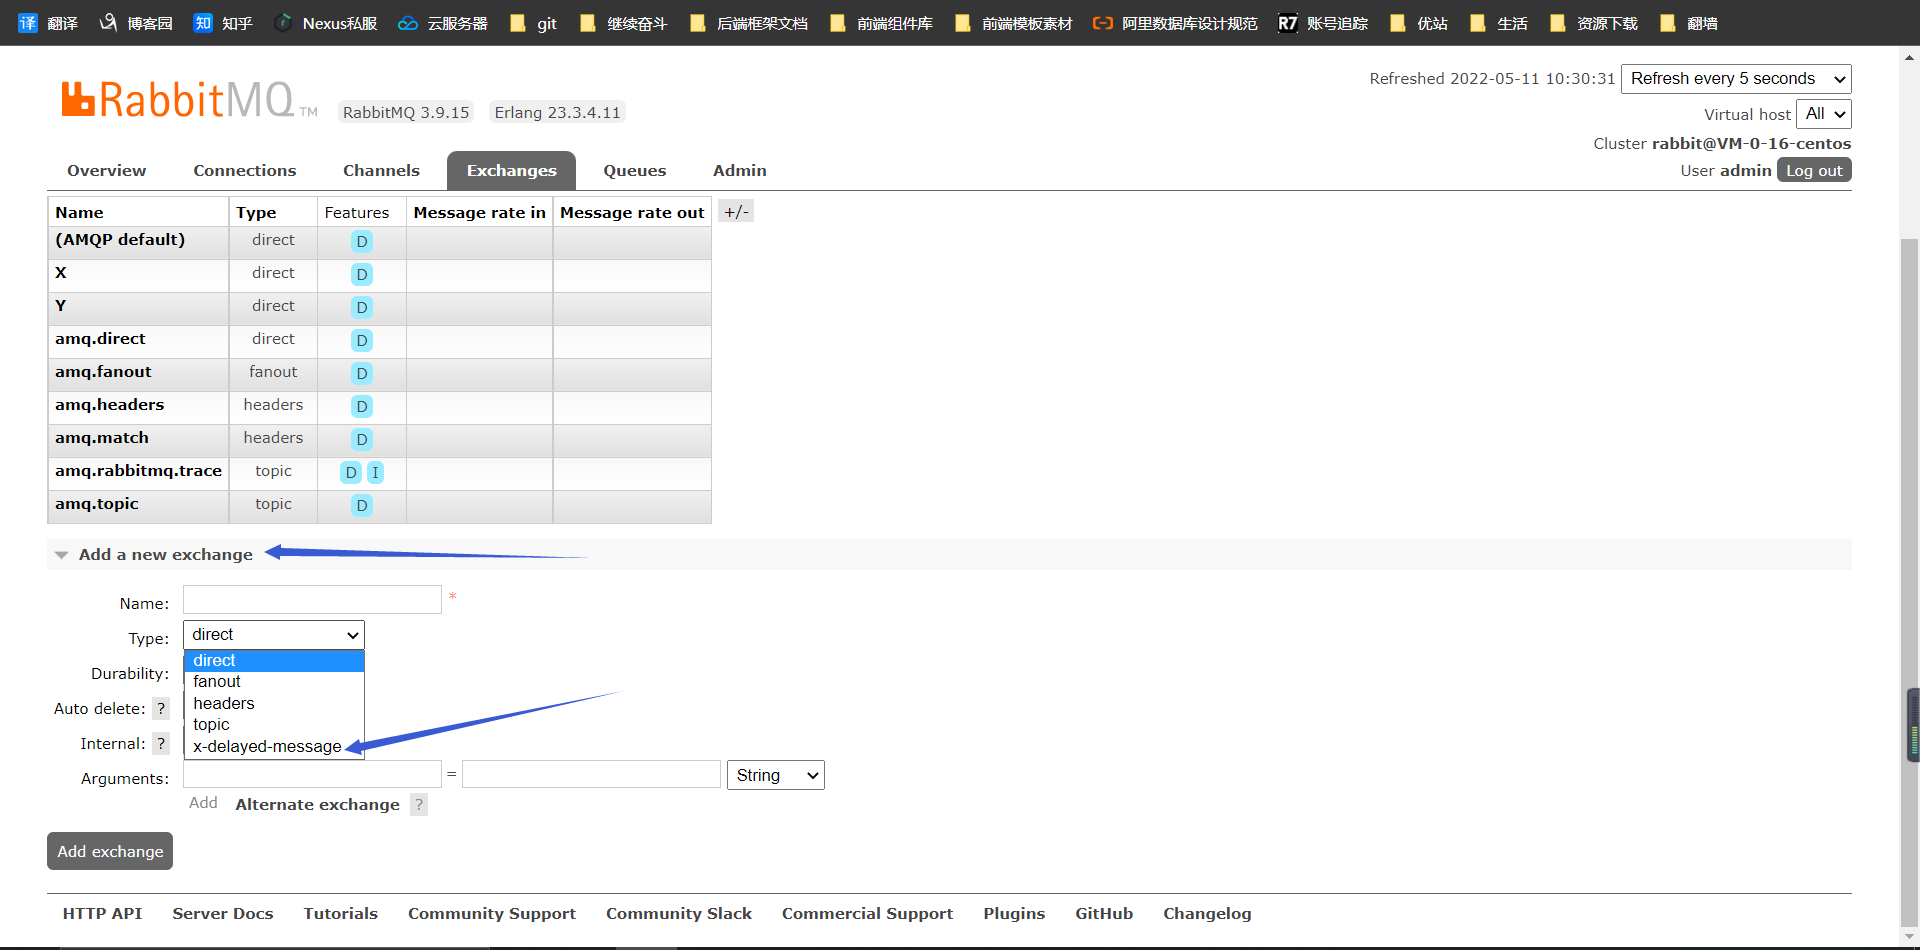
- 然后去web管理界面看exchange,就发现交换机类型多了一个
3.9.3.1、编写配置
- 使用这种插件的方式,那么延迟设置就是在exchange交换机这一方进行设置,和以前在queue队列中进行延迟设置不一样
原来的延迟队列设置
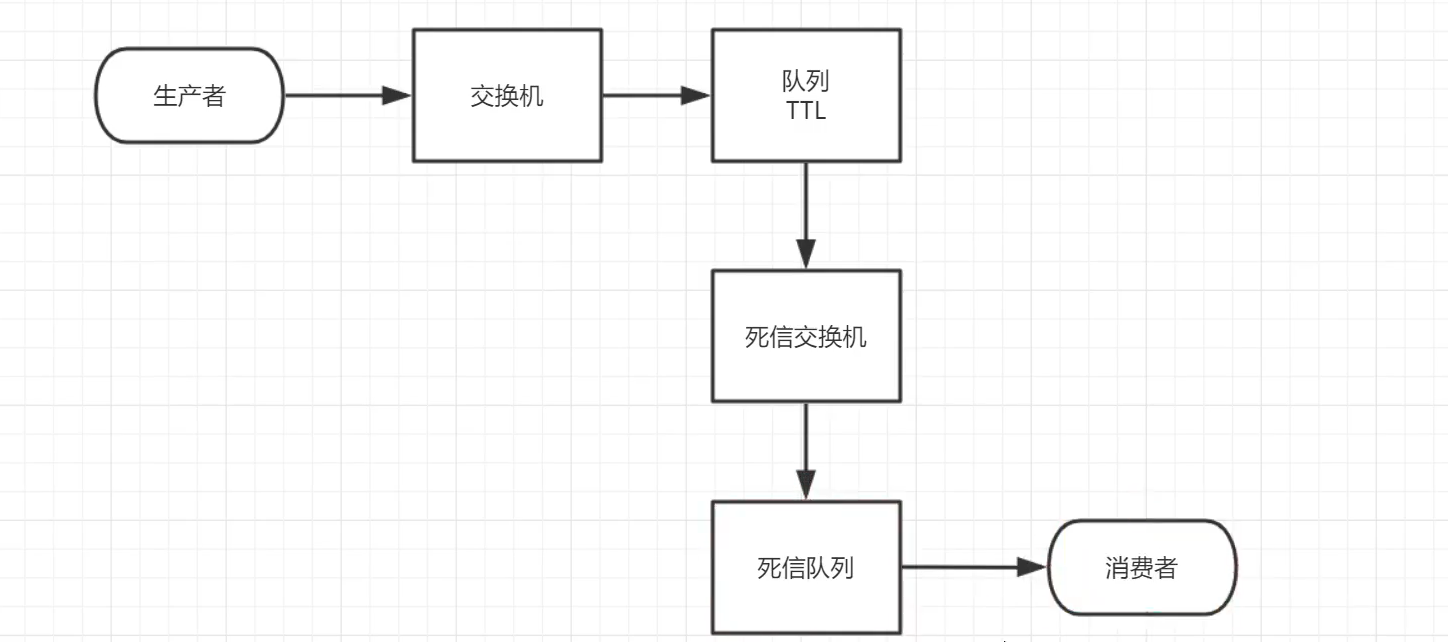
使插件之后的延迟设置

- 使用插件,实现下面的逻辑图

|  | package cn.zixieqing.config; |
|  |  |
|  | import org.springframework.amqp.core.Binding; |
|  | import org.springframework.amqp.core.BindingBuilder; |
|  | import org.springframework.amqp.core.CustomExchange; |
|  | import org.springframework.amqp.core.Queue; |
|  | import org.springframework.beans.factory.annotation.Qualifier; |
|  | import org.springframework.context.annotation.Bean; |
|  | import org.springframework.context.annotation.Configuration; |
|  |  |
|  | import java.util.HashMap; |
|  |  |
|  | @Configuration |
|  | public class DelayedExchanegConfig { |
|  |  |
|  | /** |
|  |  * 交换机名字 |
|  |  */ |
|  | private static final String EXCHANGE\_NAME = "delayed.exchange"; |
|  |  |
|  | /** |
|  |  * 队列名字 |
|  |  */ |
|  | private static final String QUEUE\_NAME = "delayed.queue"; |
|  |  |
|  | /** |
|  |  * 绑定键值 |
|  |  */ |
|  | private static final String EXCHANGE\_BINDING\_QUEUE\_ROUTING\_KEY = "delayed.routingkey"; |
|  |  |
|  |  |
|  | /** |
|  |  * 声明交换机 - 目前这种交换机是没有的,这是插件的,因此:选择自定义交换机 |
|  |  */ |
|  | @Bean |
|  | public CustomExchange delayedExchange() { |
|  |  |
|  |  HashMap params = new HashMap<>(3); |
|  | // 延迟类型 |
|  |  params.put("x-delayed-type", "direct"); |
|  |  |
|  | /* |
|  |  参数1、交换机名字 |
|  |  参数2、交换机类型 - 插件的那个类型 |
|  |  参数3、交换机是否持久化 |
|  |  参数4、交换机是否自动删除 |
|  |  参数5、交换机的其他配置 |
|  |  */ |
|  | return new CustomExchange(EXCHANGE\_NAME, "x-delayed-message", true, false, params); |
|  |  } |
|  |  |
|  | /** |
|  |  * 声明队列 |
|  |  */ |
|  | @Bean |
|  | public Queue delayedQueue() { |
|  | return new Queue(QUEUE\_NAME); |
|  |  } |
|  |  |
|  | /** |
|  |  * 交换机 和 队列 进行绑定 |
|  |  */ |
|  | public Binding exchangeBindingQueue(@Qualifier("delayedExchange") CustomExchange delayedExchange, |
|  | @Qualifier("delayedQueue") Queue delayedQueue) { |
|  |  |
|  | return BindingBuilder |
|  |  .bind(delayedQueue) |
|  |  .to(delayedExchange) |
|  |  .with(EXCHANGE\_BINDING\_QUEUE\_ROUTING\_KEY) |
|  | // noargs()就是构建的意思 和 build()一样 |
|  |  .noargs(); |
|  |  } |
|  | } |
|  |  |
3.9.3.2、生产者
|  | package cn.zixieqing.controller; |
|  |  |
|  | import org.springframework.amqp.rabbit.core.RabbitTemplate; |
|  | import org.springframework.beans.factory.annotation.Autowired; |
|  | import org.springframework.web.bind.annotation.GetMapping; |
|  | import org.springframework.web.bind.annotation.PathVariable; |
|  | import org.springframework.web.bind.annotation.RequestMapping; |
|  | import org.springframework.web.bind.annotation.RestController; |
|  |  |
|  | import java.util.Date; |
|  |  |
|  |  |
|  | @RestController |
|  | @RequestMapping("sendMsg") |
|  | public class DelatedQueueController { |
|  |  |
|  | @Autowired |
|  | private RabbitTemplate rabbitTemplate; |
|  |  |
|  | @GetMapping("/{message}/{ttl}") |
|  | public void getMesg(@PathVariable String message, @PathVariable int ttl) { |
|  |  |
|  |  System.out.println(new Date() + "接收到了消息===>" + message + "===>失效时间为:" + ttl); |
|  |  |
|  | // 发送消息 |
|  |  rabbitTemplate.convertAndSend("delayed.exchange", "delayed.routingkey", data->{ |
|  | // 设置失效时间 |
|  |  data.getMessageProperties().setDelay(10 * 1000); |
|  | return data; |
|  |  }); |
|  |  } |
|  | } |
|  |  |
3.9.3.3、消费者
|  | package cn.zixieqing.consumer; |
|  |  |
|  | import org.springframework.amqp.core.Message; |
|  | import org.springframework.amqp.rabbit.annotation.RabbitListener; |
|  | import org.springframework.stereotype.Component; |
|  |  |
|  | import java.nio.charset.StandardCharsets; |
|  | import java.util.Date; |
|  |  |
|  | @Component |
|  | public class DelayedQueueConsumer { |
|  |  |
|  | @RabbitListener(queues = "delayed.queue") |
|  | public void receiveMessage(Message message) { |
|  |  System.out.println("消费者正在消费消息......"); |
|  | String msg = new String(message.getBody(), StandardCharsets.UTF\_8); |
|  |  System.out.println(new Date() + "消费了消息===>" + message); |
|  |  } |
|  | } |
|  |  |
- 发送两次消息,然后把传的TTL弄成不一样的,那么:TTL值小的消息就会先被消费,然后到了指定时间之后,TTL长的消息再消费
3.10、发布确认 - 续
3.10.1、ConfirmCallback() 和 ReturnCallback()
- 正常的流程应该是下面的样子

- 但是:如果交换机出问题了呢,总之就是交换机没有接收到生产者发布的消息( 如:发消息时,交换机名字搞错了 ),那消息就直接丢了吗?
- 同理:要是队列出问题了呢,总之也就是交换机没有成功地把消息推到队列中( 如:routing key搞错了 ),咋办?
- 而要解决这种问题,就需要使用标题中使用的两个回调,从而:让架构模式变成如下的样子
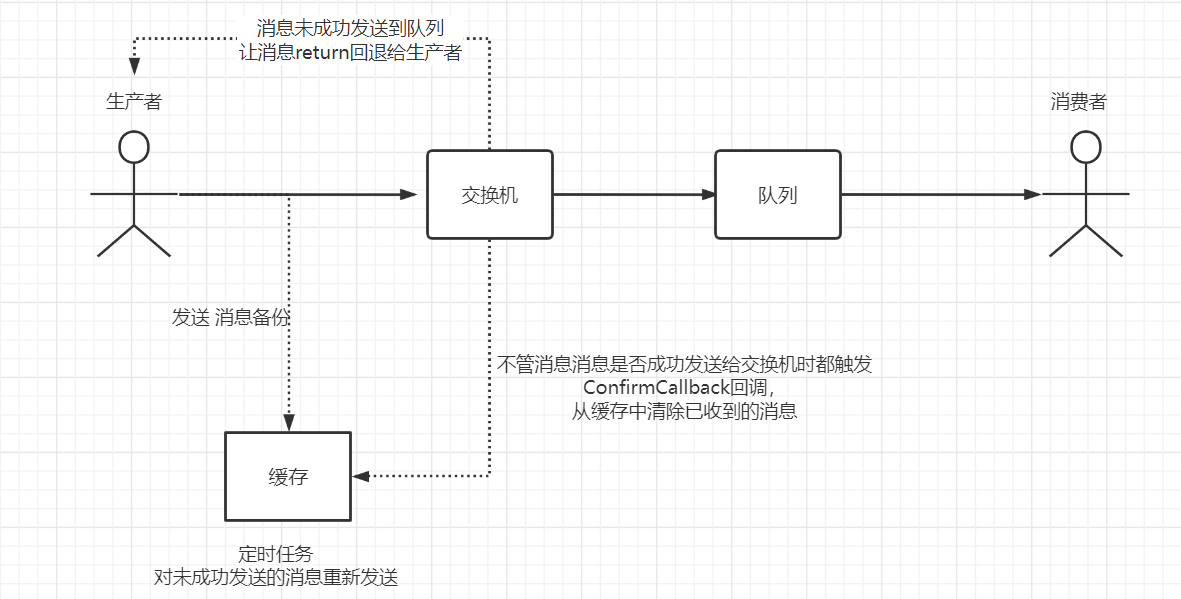
ConfirmCallback() 和 ReturnCallback()的配置
- 在yml文件中添加如下内容
|  | spring: |
|  | rabbitmq: |
|  | # 发布确认类型 |
|  | publisher-confirm-type: correlated |
|  | # 队列未收到消息时,触发returnCallback回调 |
|  | publisher-returns: true |
|  |  |
- 编写ConfirmCallback 和 returnCallback回调接口( 伪代码 ) - 注意点:这两个接口是RabbitTemplate的内部类( 故而:就有大文章 )
|  | @Component |
|  | public class PublisherConfirmAndReturnConfig implements RabbitTemplate.ConfirmCallback ,RabbitTemplate.ReturnCallback { |
|  |  |
|  | @Autowired |
|  | private RabbitTemplate rabbitTemplate; |
|  |  |
|  | /** |
|  |  初始化方法  |
|  |  目的:因为ConfirmCallback 和 ReturnCallback这两个接口是RabbitTemplate的内部类 |
|  |  因此:想要让当前编写的PublisherConfirmAndReturnConfig能够访问到这两个接口 |
|  |  那么:就需要把当前类PublisherConfirmAndReturnConfig的confirmCallback 和 returnCallback注入到RabbitTemplate中去( init的作用 ) |
|  |  */ |
|  | @PostConstruct |
|  | public void init(){ |
|  |  rabbitTemplate.setConfirmCallback(this); |
|  |  rabbitTemplate.setReturnCallback(this); |
|  |  } |
|  |  |
|  | /** |
|  |  参数1、发送消息的ID - correlationData.getID() 和 消息的相关信息 |
|  |  参数2、是否成功发送消息给exchange true成功;false失败 |
|  |  参数3、失败原因 |
|  |  */ |
|  | @Override |
|  | public void confirm(CorrelationData correlationData, boolean ack, String cause) { |
|  | if(ack){ |
|  |  System.out.println("消息已经送达到Exchange"); |
|  |  }else{ |
|  |  System.out.println("消息没有送达到Exchange"); |
|  |  } |
|  |  } |
|  |  |
|  | /** |
|  |  参数1、消息 new String(message.getBody()) |
|  |  参数2、消息退回的状态码 |
|  |  参数3、消息退回的原因 |
|  |  参数4、交换机名字 |
|  |  参数5、路由键 |
|  |  */ |
|  | @Override |
|  | public void returnedMessage(Message message, int replyCode, String replyText, String exchange, String routingKey) { |
|  |  System.out.println("消息没有送达到Queue"); |
|  |  } |
|  | } |
|  |  |
- 生产者调用的方法是:rabbitTemplate.convertAndSend(String exchange, String routingKey, Object message, CorrelationData correlationData)
- 多了一个CorrelationData 参数,这个参数携带的就是消息相关信息
3.11、备份交换机
-
这个玩意儿也是为了解决前面发布确认中队列出问题的方案
-
注意:这种方式优先级比前面的 ReturnCallback回退策略要高( 演示:跳过 - 可以采用将这二者都配置好,然后进行测试,结果是备份交换机的方式会优先执行,而前面的回退策略的方式并不会执行 )
-
采用备份交换机时的架构图
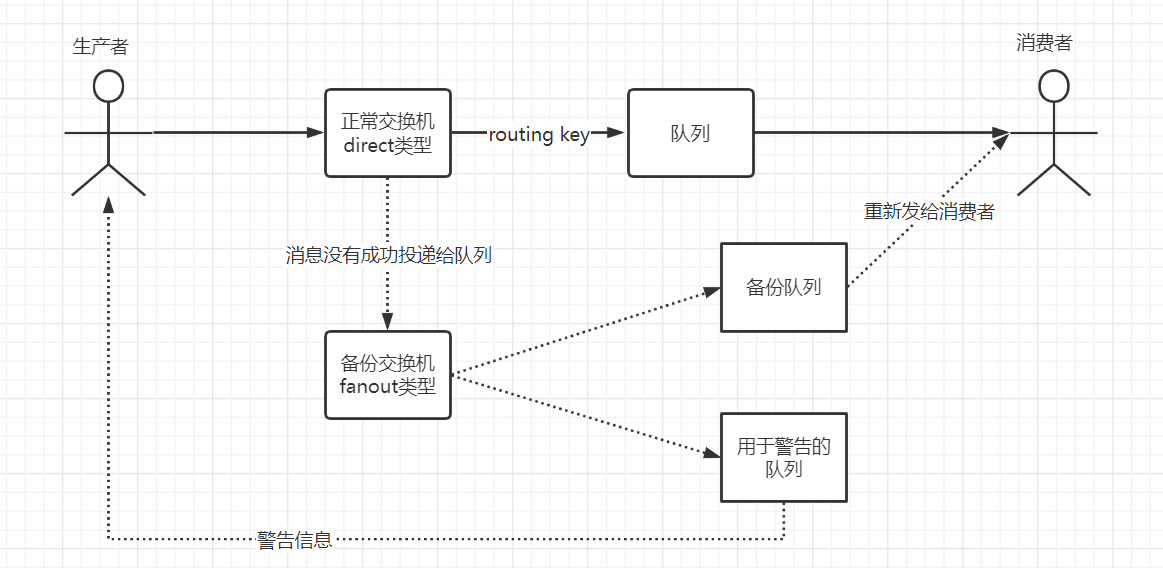
上图架构的伪代码配置编写
|  | package cn.zixieqing.config; |
|  |  |
|  | import org.springframework.amqp.core.*; |
|  | import org.springframework.beans.factory.annotation.Qualifier; |
|  | import org.springframework.context.annotation.Bean; |
|  | import org.springframework.context.annotation.Configuration; |
|  |  |
|  | @Configuration |
|  | public class AlternateExchangeConfig { |
|  |  |
|  | /** |
|  |  * 正常交换机名字 |
|  |  */ |
|  | private static final String NORMAL\_EXCHANGE\_NAME = "normal\_exchange"; |
|  |  |
|  | /** |
|  |  * 正常队列 |
|  |  */ |
|  | private static final String NORMAL\_QUEUE\_NAME = "normal\_queue"; |
|  |  |
|  | /** |
|  |  * 备份交换机名字 |
|  |  */ |
|  | private static final String ALTERNATE\_EXCHANGE\_NAME = "alternate\_exchange"; |
|  |  |
|  | /** |
|  |  * 备份队列名字 |
|  |  */ |
|  | private static final String ALTERNATE\_QUEUE\_NAME = "alternate\_queue"; |
|  |  |
|  | /** |
|  |  * 用于警告的队列名字 |
|  |  */ |
|  | private static final String WARNING\_QUEUE\_NAME = "warning\_queue"; |
|  |  |
|  | /** |
|  |  * 声明正常交换机 但是:需要做一件事情 - 消息没投递到正常队列时,需要让其走备份交换机 |
|  |  */ |
|  | @Bean |
|  | public DirectExchange confirmExchange() { |
|  |  |
|  | return ExchangeBuilder |
|  |  .directExchange(NORMAL\_EXCHANGE\_NAME) |
|  |  .durable(true) |
|  | // 绑定备份交换机 |
|  |  .withArgument("alternate-exchange", ALTERNATE\_EXCHANGE\_NAME) |
|  |  .build(); |
|  |  } |
|  |  |
|  | /** |
|  |  * 声明确认队列 |
|  |  */ |
|  | @Bean |
|  | public Queue confirmQueue() { |
|  | return new Queue(NORMAL\_QUEUE\_NAME); |
|  |  } |
|  |  |
|  | /** |
|  |  * 确认交换机( 正常交换机 ) 和 确认队列进行绑定 |
|  |  */ |
|  | @Bean |
|  | public Binding confirmExchangeBindingConfirmQueue(@Qualifier("confirmExchange") DirectExchange confirmExchange, |
|  | @Qualifier("confirmQueue") Queue confirmQueue) { |
|  | return BindingBuilder |
|  |  .bind(confirmQueue) |
|  |  .to(confirmExchange) |
|  |  .with("routingkey"); |
|  |  } |
|  |  |
|  | /** |
|  |  * 声明备份交换机 |
|  |  */ |
|  | @Bean |
|  | public FanoutExchange alternateExchange() { |
|  | return new FanoutExchange(ALTERNATE\_EXCHANGE\_NAME); |
|  |  } |
|  |  |
|  | /** |
|  |  * 声明备份队列 |
|  |  */ |
|  | @Bean |
|  | public Queue alternateQueue() { |
|  | return QueueBuilder |
|  |  .durable(ALTERNATE\_QUEUE\_NAME) |
|  |  .build(); |
|  |  } |
|  |  |
|  | /** |
|  |  * 声明警告队列 |
|  |  */ |
|  | @Bean |
|  | public Queue warningQueue() { |
|  | return new Queue(WARNING\_QUEUE\_NAME); |
|  |  } |
|  |  |
|  | /** |
|  |  * 备份交换机 和 备份队列进行绑定 |
|  |  */ |
|  | @Bean |
|  | public Binding alternateExchangeBindingAlternateQueue(@Qualifier("alternateQueue") Queue alternateQueue, |
|  | @Qualifier("alternateExchange") FanoutExchange alternateExchange) { |
|  | return BindingBuilder |
|  |  .bind(alternateQueue) |
|  |  .to(alternateExchange); |
|  |  } |
|  |  |
|  | /** |
|  |  * 备份交换机 和 警告队列进行绑定 |
|  |  */ |
|  | @Bean |
|  | public Binding alternateExchangeBindingWarningQueue(@Qualifier("warningQueue") Queue warningQueue, |
|  | @Qualifier("alternateExchange") FanoutExchange alternateExchange) { |
|  | return BindingBuilder |
|  |  .bind(warningQueue) |
|  |  .to(alternateExchange); |
|  |  } |
|  | } |
|  |  |
- 后续的操作就是差不多的,生产者发送消息,消费者消费消息,然后里面再做一些业务的细节处理就可以了
3.12、优先级队列
-
这就是为了让MQ队列中的某个 / 某些消息能够优先被消费
-
使用场景:搞内幕,让某个人 / 某些人一定能够抢到什么商品
-
想要实现优先级队列,需要满足如下条件:
-
1、队列本身设置优先级( 在声明队列是进行参数配置 )
/** * 基础型配置 */ Map params = new HashMap(); params.put("x-max-priority", 10); // 默认区间:(0, 255) 但是若用这个区间,则会浪费CPU和内层消耗,因此:改为(0, 10)即可 channel.queueDeclare("hello", true, false, false, params); /** * SpringBoot中的配置 */ @Bean public Queue alternateQueue() { // 空间大小: ( map存储的元素个数 / 0.75 ) + 1 HashMap params = new HashMap<>(3); params.put("x-max-priority", 10); return QueueBuilder .durable(ALTERNATE_QUEUE_NAME).withArguments(params) .build(); } -
-
2、让消息有优先级
- ```
/** * 基础型配置 - 生产者调用basicPublisher()时配置的消息properties */ AMQP.BasicProperties properties = new AMQP.BasicProperties() .builder() .priority(5) .build(); /** * SpringBoot中的配置 */ // 发送消息 rabbitTemplate.convertAndSend("normal.exchange", "normal.routingkey", data->{ // 消息设置优先级 - 注意:这个数值不能比前面队列设置的那个优先级数值大,即:这里的消息优先级范围就是前面队列中设置的(0, 10) data.getMessageProperties().setPriority(5); return data; });
-
-
注意点:设置了优先级之后,需要做到如下条件:
- 需要让消息全部都发到队列之后,才可以进行消费,原因:消息进入了队列,是会重新根据优先级大小进行排队,从而让优先级数值越大越在前面

- 需要让消息全部都发到队列之后,才可以进行消费,原因:消息进入了队列,是会重新根据优先级大小进行排队,从而让优先级数值越大越在前面
3.13、惰性队列
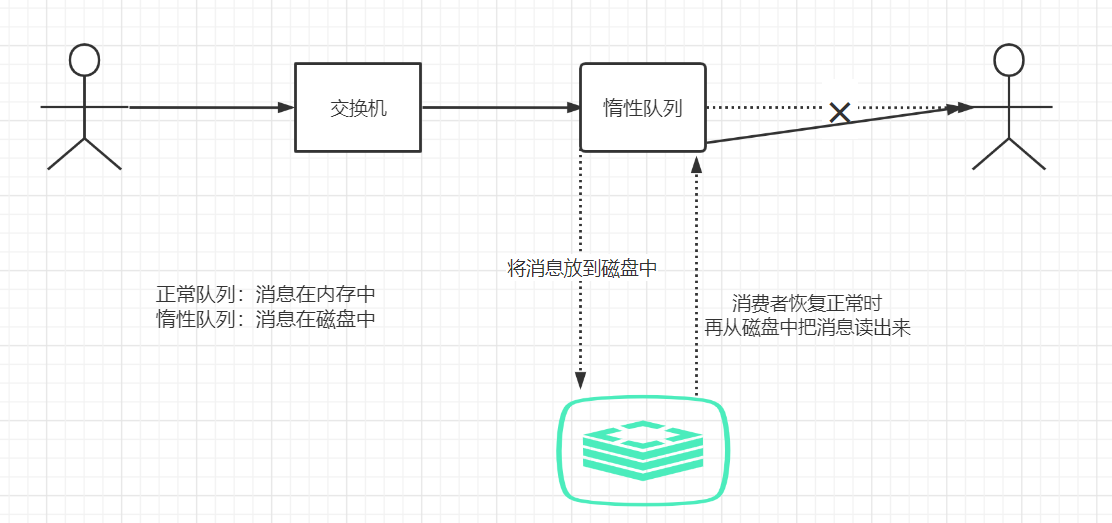
-
这玩意儿指的就是让消息存放在磁盘中
-
正常情况下是如下的样子

- 但是:如果此时发送的消息是成千上万条,并且消费者出故障了( 下线、宕机、维护从而关闭 ),那么这些成千上万的消息就会堆积在MQ中,怎么办?就需要像下面这么搞
设置惰性队列的配置
|  |  |
|  | /** |
|  |  * 基础型配置 |
|  |  */ |
|  |  Map params = new HashMap(); |
|  |  params.put("x-queue-mode", "lazy"); |
|  |  channel.queueDeclare("hello", true, false, false, params); |
|  |  |
|  |  |
|  | /** |
|  |  * SpringBoot中的配置 |
|  |  */ |
|  | @Bean |
|  | public Queue alternateQueue() { |
|  | // 空间大小: ( map存储的元素个数 / 0.75 ) + 1 |
|  |  HashMap params = new HashMap<>(3); |
|  |  params.put("x-queue-mode", "lazy"); |
|  | return QueueBuilder |
|  |  .durable(ALQUEUE\_NAME).withArguments(params) |
|  |  .build(); |
|  |  } |
|  |  |
- 经过如上配置之后,那么内存中记录的就是指向磁盘的引用地址,而真实的数据是在磁盘中,下一次消费者恢复之后,就可以从磁盘中读取出来,然后再发给消费者( 缺点:得先读取,然后发送,这性能很慢,但是:处理场景就是消费者挂彩了,不再消费消息时存储数据的情景 )
作者:紫邪情欢迎任何形式的转载,但请务必注明出处。限于本人水平,如果文章和代码有表述不当之处,还请不吝赐教。
转载请注明:xuhss » RabbitMQ 3.9( 续 )