Python微信订餐小程序课程视频
https://edu.csdn.net/course/detail/36074
Python实战量化交易理财系统
https://edu.csdn.net/course/detail/35475
本文内容
- Spring AOP含义和目标
- AOP相关概念
- 声明式AOP快速入门
- 编程式创建代理对象
Spring AOP含义和目标
OOP: Object-oriented Programming 面向对象编程,大家再熟悉不过了
AOP:Aspect-oriented Programming 面向切面编程
面向切面编程通过提供另一种思考程序结构的方式来补充面向对象编程。OOP 中模块化的关键单元是类,而 AOP 中模块化的单元是切面。
Spring 的关键组件之一是 AOP 框架。Spring IoC 容器不依赖 AOP,AOP 对 Spring IoC 的补充提供了非常强大的中间件解决方案。主要用于下面2方面:
- 提供声明式服务。最重要的此类服务是声明式事务管理。
- 让用户实现自定义切面,用 AOP 补充他们对 OOP 的使用。
Spring AOP 的能力和目标
Spring AOP 是用纯 Java 实现的。不需要特殊的编译过程。 Spring AOP 不需要控制类加载器层次结构,因此适用于 servlet 容器或应用程序服务器。
Spring AOP 当前仅支持方法执行连接点(建议在 Spring bean 上执行方法)。字段拦截未实现。
Spring AOP 的 AOP 方法不同于大多数其他 AOP 框架。尽管 Spring AOP 非常强,其目的不是提供最完整的 AOP 实现,相反,其目的是提供 AOP 实现和 Spring IoC 之间的紧密集成,以帮助解决企业应用程序中的常见问题。因此,Spring Framework 的 AOP 功能通常与 Spring IoC 容器结合使用。切面是通过使用普通的 bean 定义语法来配置的(尽管这允许强大的“自动代理”功能),这是与其他 AOP 实现的关键区别。
Spring AOP 从不努力与 AspectJ 竞争以提供全面的 AOP 解决方案。Spring AOP 等基于代理的框架和 AspectJ 等成熟框架都很有价值,它们是互补的,而不是竞争的。Spring 将 Spring AOP 和 IoC 与 AspectJ 无缝集成,以在一致的基于 Spring 的应用程序架构中实现 AOP 的所有使用。此集成不会影响 Spring AOP API 或 AOP Alliance API。 Spring AOP 保持向后兼容。
AOP相关概念
先了解一下核心 AOP 概念和术语,方便后面深入使用。
切面 Aspect
跨多个类的关注点的模块化。事务管理是企业 Java 应用程序中横切关注点的一个很好的例子。
连接点 Join point
程序执行过程中的一个点,例如方法的执行或异常的处理。在 Spring AOP 中,一个连接点总是代表一个方法执行。
通知 Advice
切面在特定连接点采取的操作。不同类型如前置通知,环绕通知等。 Spring将通知建模为拦截器,并在连接点周围维护一系列拦截器。
切点 Pointcut
匹配连接点的谓词。 Advice 与切入点表达式相关联,并在与切入点匹配的任何连接点处运行(例如执行具有特定名称的方法)。切入点表达式匹配的连接点的概念是 AOP 的核心,Spring 默认使用 AspectJ 切入点表达式语言。
引介 Introduction
在类上声明其他方法或字段。 Spring AOP 允许向任何被增强的对象引入新接口和相应的实现。例如,可以使用 Introduction 使 bean 实现 IsModified 接口,以简化缓存。
目标对象 Target object
由一个或多个切面增强的对象。
代理 AOP proxy
由 AOP 框架创建的一个对象,用于实现切面逻辑如增强方法执行等。在 Spring Framework 中,AOP 代理是 JDK 动态代理或 CGLIB 代理。
织入 Weaving
将切面与其他应用程序类型或对象链接以创建增强对象。这可以在编译时如使用 AspectJ 编译器、加载时或运行时完成。 Spring AOP 与其他纯 Java AOP 框架一样,在运行时执行编织。
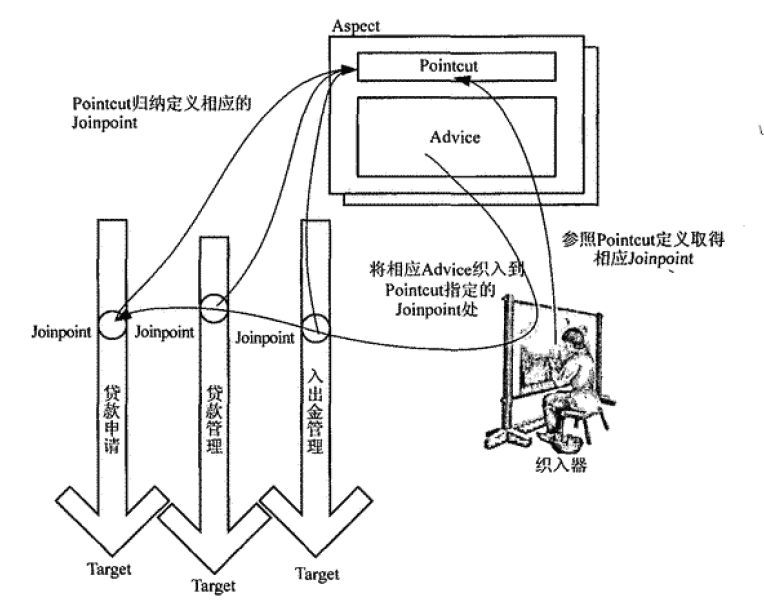
结合网上的一张图理解下。
切入点匹配的连接点的概念是 AOP 的关键,这将它与仅提供拦截的旧技术区分开来。切入点使增强Advice的目标独立于面向对象的层次结构。如可以将提供声明性事务管理的环绕通知应用到一组跨越多个对象(例如服务层中的所有业务操作)的方法。

快速入门
通过注解,声明式的Spring AOP 的使用比较简单,主要步骤如下:
- 通过 @EnableAspectJAutoProxy 启用自动生成代理;
- 通过@Aspect 定义切面并注入到Spring容器中;
- 切面中可以通过@Pointcut定义切点;
- 切面通过@Before等通知注解来定义通知
- @Around 环绕通知
- @Before 前置通知
- @After 最终通知
- @AfterReturning 返回通知
- @AfterThrowing 异常抛出后通知
- 从容器中获取bean使用
以非入侵的方式记录类方法开始执行的日志为例,完整看一个AOP的例子。
- 引入
aspectjweaver依赖
<dependency>
    <groupId>org.aspectjgroupId>
    <artifactId>aspectjweaverartifactId>
dependency>
- 启用 @AspectJ 注解支持
@Configuration
@ComponentScan
@EnableAspectJAutoProxy()
public class AppConfig {}
- 定义目标对象
@Service
public class UserService {
    public void add(String name) {
        System.out.println("UserService add " + name);
    }
}
- 声明切面、切点和通知
/**
 * 切面定义
 * 包含切点 通知 引入等
 *
 * @author zfd
 * @version v1.0
 * @date 2022/1/29 13:33
 * @关于我 请关注公众号 螃蟹的Java笔记 获取更多技术系列
 */
@Component
@Aspect // 切面
public class MyAspect {

    /**
 * 声明切入点 这里表达式指:拦截UserService类所有方法执行
 */
    @Pointcut("execution(* com.crab.spring.aop.demo01.UserService.*(..))")
    public void pc(){}

    /**
 * 前置通知,指定切入点
 * @param joinPoint
 */
    @Before("pc()")
    public void before(JoinPoint joinPoint) {
        MethodSignature signature = (MethodSignature) joinPoint.getSignature();
        System.out.println("我是前置通知!开始执行方法:" + signature.getMethod().getName()); // 方法执行前记录日志
    }
}
- 执行目标方法
public static void main(String[] args) {
        AnnotationConfigApplicationContext context =
                new AnnotationConfigApplicationContext(AppConfig.class);
        IService bean = context.getBean(IService.class);
        System.out.println("bean的类型:" + bean.getClass());
        bean.add("xxx");
        context.close();
}
- 观察输出结果
bean的类型:class com.sun.proxy.$Proxy19
我是前置通知!开始执行方法:add
UserService add xxx
从结果看成功拦截了,代理对象是通过JDK动态代理生成的。
- 类比不采用AOP的方式
上面的效果类似于下面的硬编码的写法
@Service
public class UserService {
    public void add(String name) {
        System.out.println("我是前置通知!开始执行方法:" + "add");
        System.out.println("UserService add " + name);
    }
}
编程式创建代理
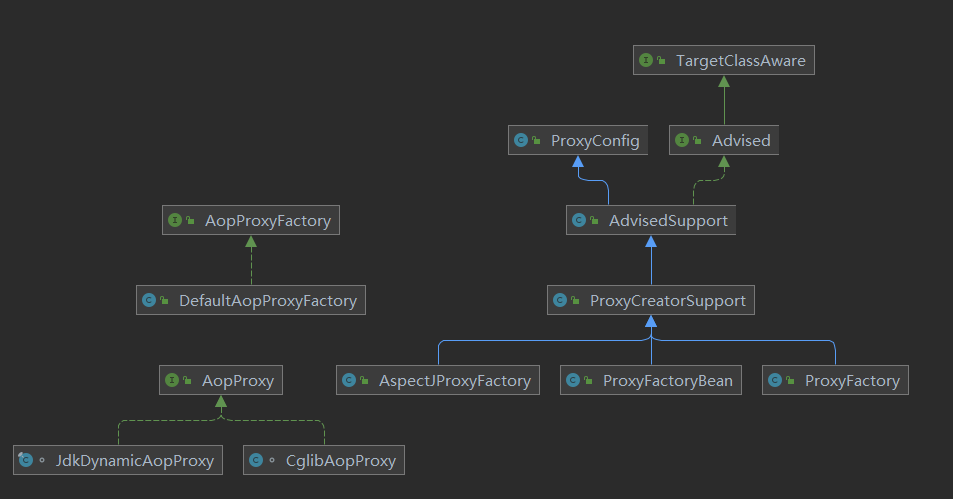
上面的快速入门式通过注解声明式自动创建代理的,好处是简单方便,缺点是使用者不清楚的创建过程和细节。为了深入了解AOP中代理式如何创建,我们看下编程式如何创建代理对象,主要类图如下。

设计的接口或是基类是代理配置类AdvisedSupport、创建代理的工厂类AopProxyFactory和AopProxy ,总共4种手动创建代理对象的方式。
方式1:AdvisedSupport + AopProxyFactory 方式
这种方式最原始最基础的,其它方式也是在此基础上做封装和简化创建的。创建的代理对象主要考虑3个方面:
- 目标对象
- 代理方式的配置
- 如何创建代理对象
直接上案例。
/**
 * 方式1
 * 使用 AdvisedSupport + AopProxyFactory
 */
@Test
public void test1() {
    // 1、目标对象
    UserService target = new UserService();
    // 2 代理配置信息
    AdvisedSupport advisedSupport = new AdvisedSupport();
    advisedSupport.setTarget(target); // 目标对象
    advisedSupport.addInterface(IService.class);// 代理的接口
    advisedSupport.setProxyTargetClass(true);// 、强制cglib代理
    advisedSupport.addAdvice(new MethodBeforeAdvice() {
        @Override
        public void before(Method method, Object[] args, Object target) throws Throwable {
            System.out.println("前置通知,开始执行方法: " + method.getName());
        }
    });

    // 3 创建代理对象的工厂
    DefaultAopProxyFactory proxyFactory = new DefaultAopProxyFactory();
    AopProxy aopProxy = proxyFactory.createAopProxy(advisedSupport);

    // 4 获取代理对象
    Object proxy = aopProxy.getProxy();

    // 5 查看代理的信息
    System.out.println("代理对象的类型:"+proxy.getClass());
    System.out.println("代理对象的父类:"+proxy.getClass().getSuperclass());
    System.out.println("代理对象实现的接口如下:");
    for (Class itf : proxy.getClass().getInterfaces()) {
        System.out.println(itf);
    }

}
代码注释比较清晰,来看下输出结果。
代理对象的类型:class com.crab.spring.aop.demo01.UserService$$EnhancerBySpringCGLIB$$87584fdb
代理对象的父类:class com.crab.spring.aop.demo01.UserService
代理对象实现的接口如下:
interface com.crab.spring.aop.demo01.IService
interface org.springframework.aop.SpringProxy
interface org.springframework.aop.framework.Advised
interface org.springframework.cglib.proxy.Factory
结果看:
- 强制采用了CGLIB代理类的方式
- 默认实现了3个额外的接口SpringProxy、 Advised、Factory,后面2篇AOP源码解析会分析如何来的。
方式2:ProxyFactory
原始的方式需要同时操作代理的配置和代理工厂创建类,相对还是比较繁杂的,ProxyFactory 中引用了AopProxyFactory,一定程度简化了创建过程。直接上案例。
/**
 * 方式2
 * 使用 ProxyFactory 简化, ProxyFactory中组合了AopProxyFactory
 */
@Test
public void test2() {
    // 1、目标对象
    UserService target = new UserService();
    // 2 创建代理对象的工厂,同时代理配置信息
    ProxyFactory proxyFactory = new ProxyFactory();
    proxyFactory.setTarget(target);// 目标对象
    proxyFactory.addInterface(IService.class);// 实现接口
    // 添加通知
    proxyFactory.addAdvice(new MethodBeforeAdvice() {
        @Override
        public void before(Method method, Object[] args, Object target) throws Throwable {
            System.out.println("前置通知,开始执行方法: " + method.getName());
        }
    });
    // 3 获取代理对象
    Object proxy = proxyFactory.getProxy();

    // 5 调用方法
    IService service = (IService) proxy;
    service.hello("xx");
}
代理信息的配置可以直接通过ProxyFactory设置。看下结果。
前置通知,开始执行方法: hello
hello xx
方式3:AspectJProxyFactory
AspectJProxyFactory 可以结合@Aspect的声明的切面来创建代理对象的。理解这种方式对理解@Aspect声明式使用AOP的方式很有帮助,详细见我们的单独的源码分析的文章。
直接上案例。
切面定义,含切点和通知。
/**
 * @author zfd
 * @version v1.0
 * @date 2022/2/6 17:08
 * @关于我 请关注公众号 螃蟹的Java笔记 获取更多技术系列
 */
@Aspect
public class MyAspect {

    /**
 * 声明切入点 这里表达式指:拦截UserService类所有方法执行
 */
    @Pointcut("execution(* com.crab.spring.aop.demo01.UserService.*(..))")
    public void pc(){}

    /**
 * 前置通知,指定切入点
 * @param joinPoint
 */
    @Before("pc()")
    public void before(JoinPoint joinPoint) {
        MethodSignature signature = (MethodSignature) joinPoint.getSignature();
        System.out.println("我是前置通知!开始执行方法:" + signature.getMethod().getName());
    }
}
使用如下
/**
 * 方式3 使用AspectProxyFactory结合@Aspect切面方式
 */
@Test
public void test3(){
    // 1、目标对象
    UserService target = new UserService();
    // 2 创建代理对象的工厂,同时代理配置信息
    AspectJProxyFactory proxyFactory = new AspectJProxyFactory();
    proxyFactory.setTarget(target);
    proxyFactory.setInterfaces(IService.class);
    // 设置切面 含通知和切点
    proxyFactory.addAspect(MyAspect.class);

    // 3 创建代理对象
    IService proxy = proxyFactory.getProxy();

    // 4 执行目标方法
    proxy.hello("xx");
}
结果如下
前置通知: execution(void com.crab.spring.aop.demo02.IService.hello(String))
hello xx
方式4:ProxyFactoryBean
ProxyFactoryBean用来在spring环境中给指定的bean创建代理对象,用到的不是太多,了解即可。直接上案例。
不同于前面的方式,这种方式的目标对象和通知的设置方式是通过指定容器中的bean名称来设置的。
package com.crab.spring.aop.demo01;

import org.springframework.aop.MethodBeforeAdvice;
import org.springframework.aop.framework.ProxyFactoryBean;
import org.springframework.context.annotation.Bean;
import org.springframework.context.annotation.Configuration;

import java.lang.reflect.Method;

/**
 * ProxyFactoryBean 方式创建代理
 * @author zfd
 * @version v1.0
 * @date 2022/2/6 17:20
 * @关于我 请关注公众号 螃蟹的Java笔记 获取更多技术系列
 */
@Configuration
public class AopProxyFactoryBeanConfig {

    // 1 注册目标对象
    @Bean("userService")
    public UserService userService() {
        return new UserService();
    }

    // 2 注册通知
    @Bean("beforeAdvice")
    public MethodBeforeAdvice beforeAdvice() {
        return new MethodBeforeAdvice() {
            @Override
            public void before(Method method, Object[] args, Object target) throws Throwable {
                System.out.println("前置通知: " + method);
            }
        };
    }

    // 3 注册ProxyFactoryBean
    @Bean("userServiceProxy")
    public ProxyFactoryBean userServiceProxy() {
        ProxyFactoryBean proxyFactoryBean = new ProxyFactoryBean();
        // 设置目标对象的bean名称
        proxyFactoryBean.setTargetName("userService");
        // 设置拦截器的bean名称
        proxyFactoryBean.setInterceptorNames("beforeAdvice");
        // 代理方式
// proxyFactoryBean.setProxyTargetClass(true);
        return proxyFactoryBean;
    }

}
测试程序和结果
    /**
 * 方式4 使用ProxyFactoryBean
 */
    @Test
    public void test04() {
        AnnotationConfigApplicationContext context =
                new AnnotationConfigApplicationContext(AopProxyFactoryBeanConfig.class);

        // 面向接口,支持Jdk或是CGLIB
        IService userService = (IService) context.getBean("userServiceProxy");

        // 面向类,只支持CGLIB, proxyFactoryBean.setProxyTargetClass(true)
// UserService userService = context.getBean("userServiceProxy", UserService.class);
        userService.hello("xxxx");

    }
// 结果
前置通知: public abstract void com.crab.spring.aop.demo01.IService.hello(java.lang.String)
hello xxxx
总结
本文主要是介绍了Spring AOP 的相关概念、声明式AOP的入门使用,以及编程式创建代理的4种方式。
知识分享,转载请注明出处。学无先后,达者为先!
转载请注明:xuhss » Spring系列22:Spring AOP 概念与快速入门篇