Python微信订餐小程序课程视频
https://edu.csdn.net/course/detail/36074
Python实战量化交易理财系统
https://edu.csdn.net/course/detail/35475
温故而知新,本文为一时兴起写出,如有错误还请指正
本文后台基于SpringBoot2.5.6编写,前端基于Vue2 + axios和微信小程序JS版分别编写进行联调测试,用于理解前后端分离式开发的交互流程,如果没用过axios可以点我看之前的帖子
如果你没有学过SpringBoot也不要紧,把他看做成SpringMVC即可,写法完全一致(其实我不说你也发现不了)
本文主要讲前后端交互流程,力求帮助新人快速入门前后端分离式开发,不会讲关于环境搭建部分的内容
SpringMVC接收参数的方式
在文章开头快速的过一遍SpringMVC接收参数的几种方式,一定要记住这几种方式,看不懂或不理解都没关系,后续会结合前端代码过一遍,这里就不过多解释了,直接上代码
1.【正常接收参数】
/**
 * 正常接收参数
 * 注意:本Controller为了演示同时写了多个路径相同的GetMapping,不要直接复制,启动会报错
 */
@RestController
public class IndexController {

    /** 通过变量接收参数 */
    @GetMapping("/index")
    public String index(String username, String password) {
        System.out.println(username);
        System.out.println(password);
        return "index";
    }

    /** 通过实体类接收参数 */
    @GetMapping("/index")
    public String index(UserEntity userEntity) {
        System.out.println(userEntity.getUsername());
        System.out.println(userEntity.getPassword());
        return "index";
    }

    /** 通过Map集合接收参数 */
    @GetMapping("/index")
    public String index(Map param) {
        System.out.println(param.get("username"));
        System.out.println(param.get("password"));
        return "index";
    }

    /** 通过基于HTTP协议的Servlet请求对象中获取参数 */
    @GetMapping("/index")
    public String index(HttpServletRequest req) {
        System.out.println(req.getParameter("username"));
        System.out.println(req.getParameter("password"));
        return "index";
    }

    /** 变量接收参数还可以使用@RequestParam完成额外操作 */
    @GetMapping("/index")
    public String index(@RequestParam(value = "username", required = true, defaultValue = "zhang") String username) {
        System.out.println(username);
        return "index";
    }

}
2.【路径占位接收参数】
/**
 * 路径占位接收参数,参数作为请求路径的一部分,使用{}作为占位符
 */
@RestController
public class IndexController {

    /** 路径占位接收参数,名称相同 */
    @GetMapping("/user/{id}")
    public String index(@PathVariable Integer id) {
        System.out.println(id);
        return "index";
    }

    /** 路径占位接收参数,名称不同 */
    @GetMapping("/user/{id}")
    public String index(@PathVariable("id") Long userId) {
        System.out.println(userId);
        return "index";
    }

}
3.【请求体接收参数】
/**
 * 如果请求参数在请求体中,需要使用@RequestBody取出请求体中的值
 */
@RestController
public class IndexController {

    /** 使用实体类接收参数 */
    @GetMapping("/index")
    public String index(@RequestBody UserEntity userEntity) {
        System.out.println(userEntity.getUsername());
        System.out.println(userEntity.getPassword());
        return "index";
    }

    /** 使用Map集合接收参数 */
    @GetMapping("/index")
    public String index(@RequestBody Map param) {
        System.out.println(param.get("username"));
        System.out.println(param.get("password"));
        return "index";
    }

    /** 变量接收参数 */
    @GetMapping("/index")
    public String index(@RequestBody String username) {
        System.out.println(username);
        return "index";
    }

}
细心的人应该留意到了,最后使用变量接收参数的时候只接收了username这一个值,并没有接收password,作为扩展在这里解释一下,不看也可以,看了不理解也没关系,知道这个事儿就够了,以后接触多了就理解了
如果请求参数放在了请求体中,只有参数列表第一个变量能接收到值,这里需要站在Servlet的角度来看:
/** 通过基于HTTP协议的Servlet请求对象获取请求体内容 */
@GetMapping("/index")
public String index(HttpServletRequest req) {
    ServletInputStream inputStream = req.getInputStream();
    return "index";
}
可以看到请求体内容是存到了InputStream输入流对象中,想要知道请求体中的内容是什么必须读流中的数据,读取到数据后会将值给第一个变量,而流中的数据读取一次之后就没了,当第二个变量读流时发现流已经被关闭了,自然就接收不到
前后端分离式交互流程
SpringMVC回顾到此为止,只需要记住那三种方式即可,在前后端交互之前先在Controller中写个测试接口
@RestController
public class IndexController {

    @GetMapping("/index")
    public Map index() {
 // 创建map集合对象,添加一些假数据并返回给前端
 HashMap result = new HashMap<>();
 result.put("user", "zhang");
 result.put("name", "hanzhe");
 result.put("arr", new int[]{1, 2, 3, 4, 5, 6});
 // 返回数据给前端
 return result;
 }

}
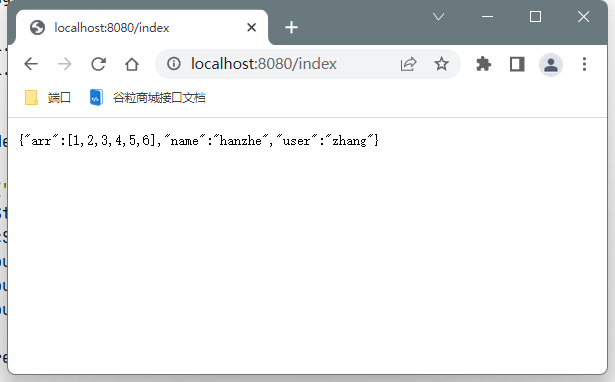
这个接口对应的是GET类型的请求,这里直接在浏览器地址栏访问测试一下:
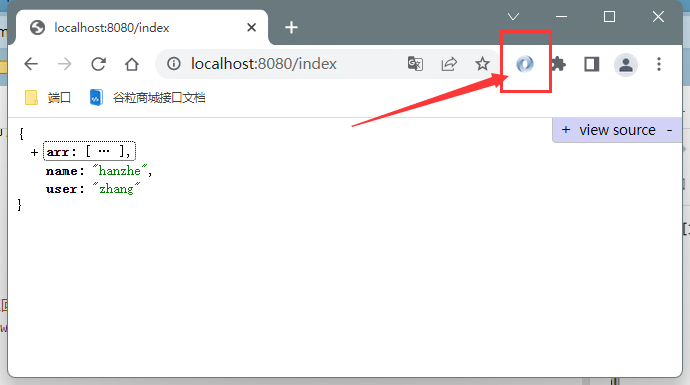
这里推荐一个Chrome浏览器的插件JSONView,它可以对浏览器显示的JSON数据进行格式化显示,推荐的同时也提个醒,安装需谨慎,如果JSON数据量太大的话页面会很卡
跨域请求
之前已经写好一个GET请求的测试接口了,这里就在前端写代码访问一下试试看
VUE请求代码
<template>

    <el-button-group>
        <el-button type="primary" size="small" @click="request1">发起普通请求el-button>
    el-button-group>
template>

<script>
export default {
 methods: {
 request1() {
 // 通过axios发起一个GET请求
 this.axios.get("http://localhost:8080/index").then(res => {
 // 打印接口返回的结果
 console.log("res", res);
 });
 }
 }
};
script>
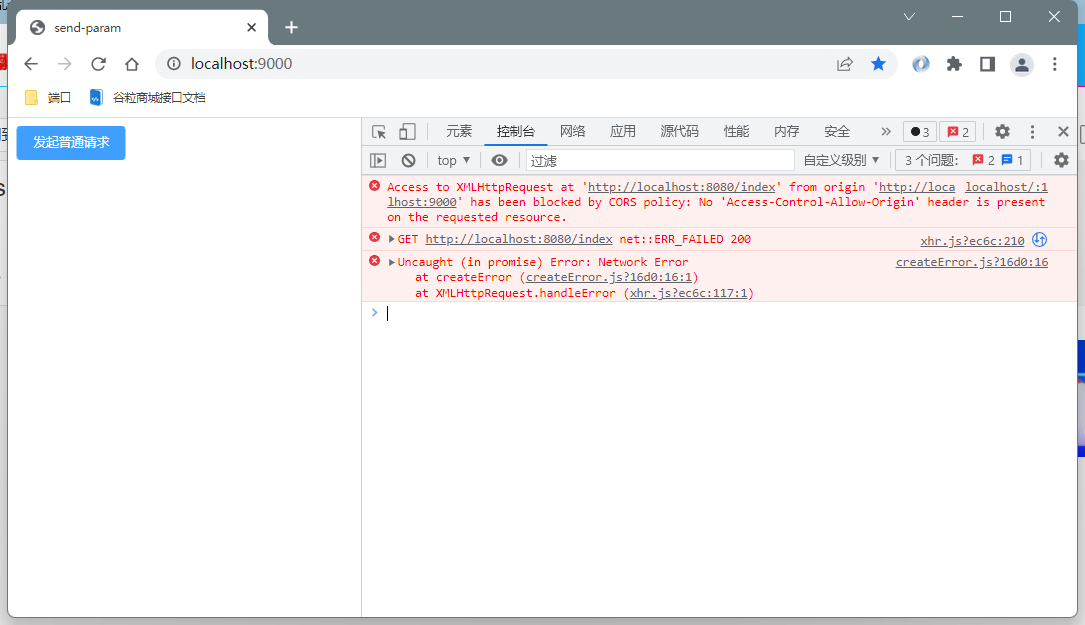
代码已经写完了,接下来打开页面试一下能不能调通:
可以看到请求代码报错了,查看报错信息找到重点关键词CORS,表示该请求属于跨域请求
认识跨域请求
什么是跨域请求?跨域请求主要体现在跨域两个字上,当发起请求的客户端和接收请求的服务端他们的【协议、域名、端口号】有任意一项不一致的情况都属于跨域请求,拿刚刚访问的地址举例,VUE页面运行在9000端口上,后台接口运行在8080端口上,端口号没有对上所以该请求为跨域请求
处理跨域请求
如果在调试的时候仔细一点就会发现,虽然前端提示请求报错了,但是后端还是接收到请求了,那为什么会报错呢?是因为后端返回数据后,浏览器接收到响应结果发现该请求跨域,然后给我们提示错误信息,也就是说问题在浏览器这里
怎样才能让浏览器允许该请求呢?我们需要在后端动点手脚,在返回结果的时候设置允许前端访问即可
首先配置一个过滤器,配置过滤器有很多种实现的方法,我这里是实现Filter接口
@Component
public class CorsFilter implements Filter {

    @Override
    public void doFilter(ServletRequest servletRequest, ServletResponse servletResponse, FilterChain filterChain) throws IOException, ServletException {
        // 将response响应转换为基于HTTP协议的响应对象
        HttpServletResponse resp = (HttpServletResponse) servletResponse;
        // 这个方法是必须调用的,不做解释
        filterChain.doFilter(servletRequest, resp);
    }

    @Override
    public void init(FilterConfig filterConfig) throws ServletException { }
    @Override
    public void destroy() { }

}
过滤器创建完成了,回来看前端提示的报错信息为Access-Control-Allow-Origin,意思是允许访问的地址中并不包含当前VUE的地址,那么我们就在响应结果时将VUE的地址追加上
@Override
public void doFilter(ServletRequest servletRequest, ServletResponse servletResponse, FilterChain filterChain) throws IOException, ServletException {
    // 将response响应转换为基于HTTP协议的响应对象
    HttpServletResponse resp = (HttpServletResponse) servletResponse;
    // 在允许请求的地址列表中添加VUE的地址
    resp.addHeader("Access-Control-Allow-Origin", "http://localhost:9000");
    // 这个方法是必须调用的,不做解释
    filterChain.doFilter(servletRequest, resp);
}
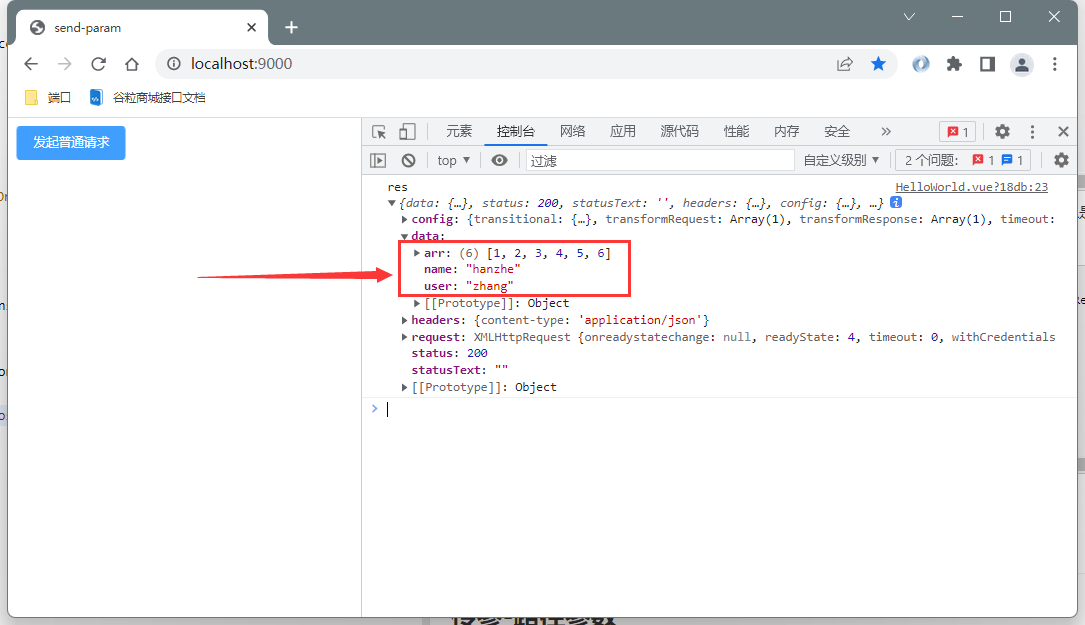
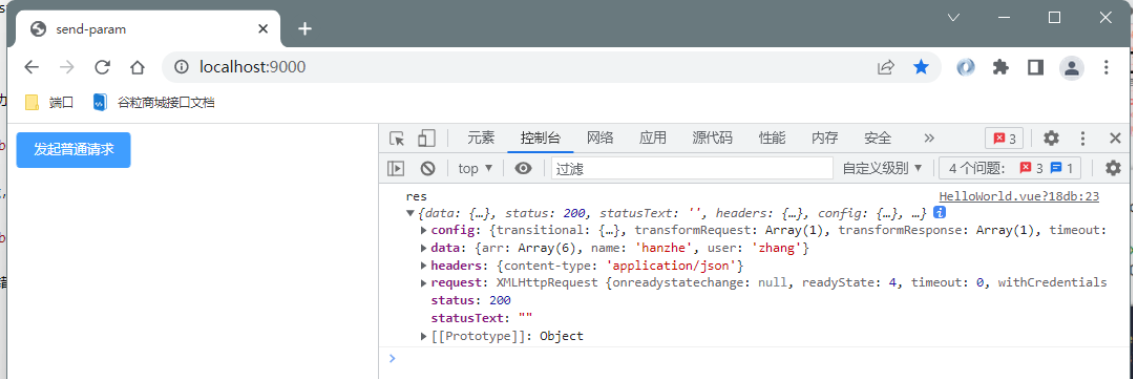
添加完成后重启项目后台就会发现请求已经成功并且拿到了返回值
再次进行测试,将后台的GetMapping修改为PostMapping,修改前端请求代码后重新发起请求进行测试
可以看到POST请求还是提示跨域请求,对应的错误信息则是Access-Control-Allow-Headers,也就是说请求头中包含了不被允许的信息,这里图省事儿用*通配符把所有请求头都放行
@Override
public void doFilter(ServletRequest servletRequest, ServletResponse servletResponse, FilterChain filterChain) throws IOException, ServletException {
    // 将response响应转换为基于HTTP协议的响应对象
    HttpServletResponse resp = (HttpServletResponse) servletResponse;
    // 后台接口除了VUE访问之外微信小程序也会访问,这里使用通配符替换
    resp.addHeader("Access-Control-Allow-Origin", "*");
    // 这里图省事也允许所有请求头访问
    resp.addHeader("Access-Control-Allow-Headers", "*");
    // 这个方法是必须调用的,不做解释
    filterChain.doFilter(servletRequest, resp);
}
这样处理之后,请求就可以正常访问啦
传参-路径占位参数
路径占位参数,就是将参数作为请求路径的一部分,例如你现在正在看的这篇博客使用的就是路径占位传参
这种传参方法很简单,就不细讲了,可以效仿他这种方法写个测试案例
后台接口的编写
@RestController
public class IndexController {
    // 路径中包含user和blogId两个占位参数
    @GetMapping("/{user}/p/{blogId}.html")
    public Map index(@PathVariable String user, @PathVariable Long blogId) {
 // 将接收的参数返回给前端
 HashMap result = new HashMap<>();
 result.put("user", user);
 result.put("blogId", blogId);

 return result;
 }
}
VUE请求代码
request1() {
    this.axios.get("http://localhost:8080/hanzhe/p/11223344.html", this.config).then(res => {
        console.log("res", res);
    });
}
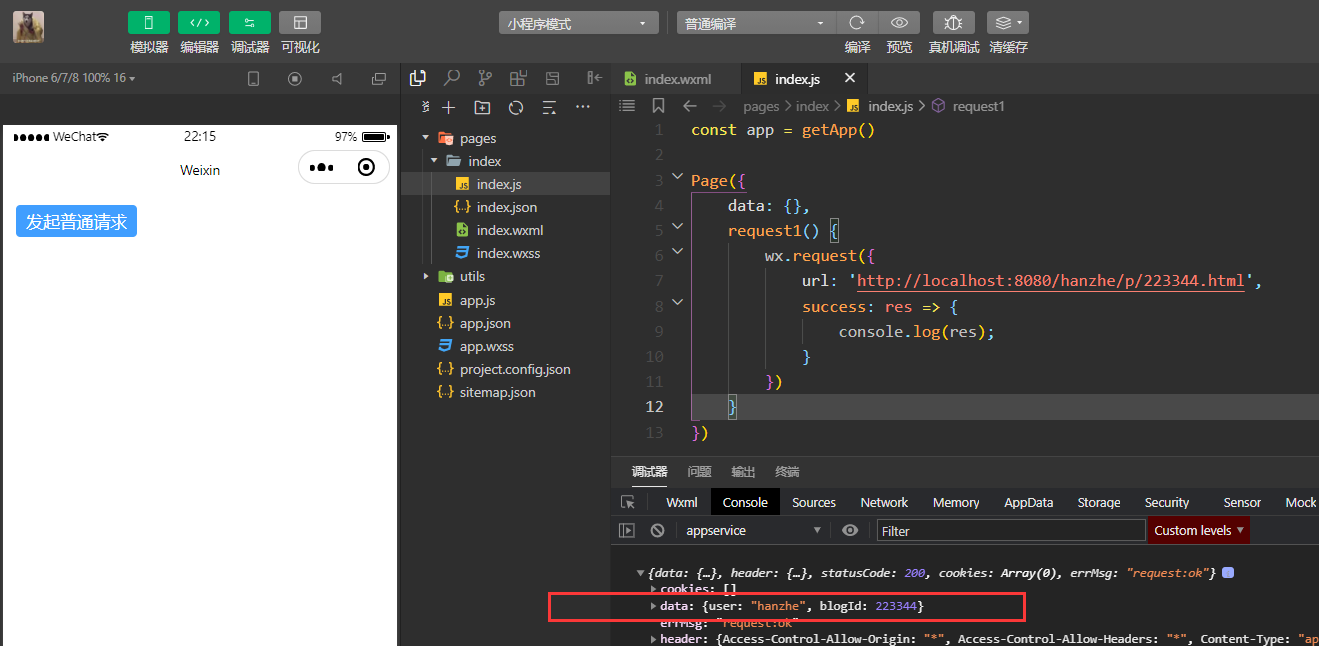
小程序请求代码
request1() {
    wx.request({
        // url:请求的目标地址
        url: 'http://localhost:8080/hanzhe/p/223344.html',
        // success:请求成功后执行的方法
        success: res => {
            console.log(res);
        }
    })
}
传参-路径参数
这里需要注意区分【路径占位传参】和【路径传参】两个概念,不要记混
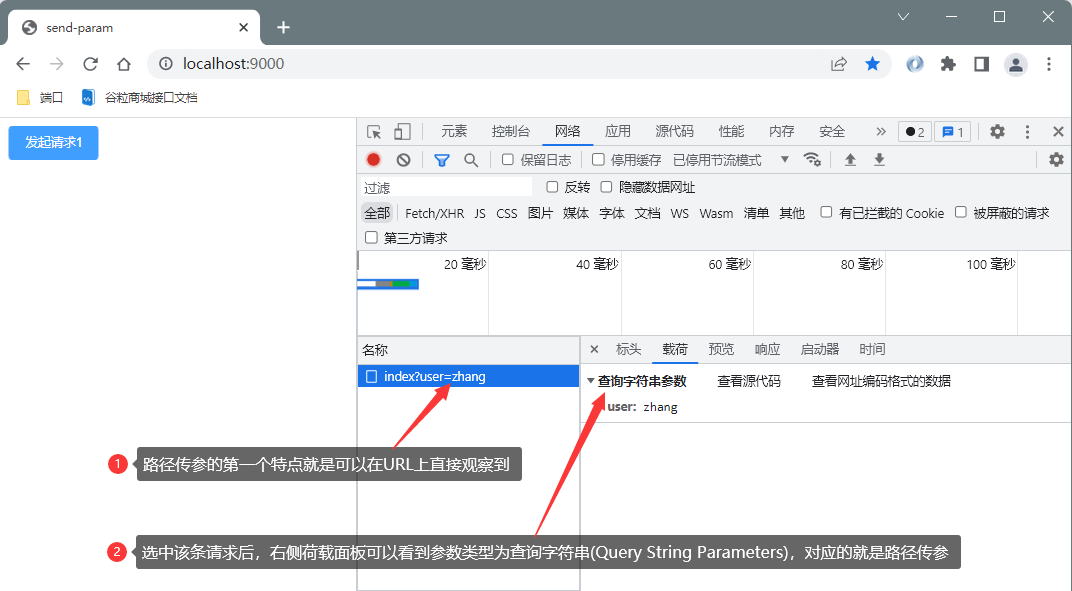
什么是路径传参?发起一个请求http://localhost:8080/index?a=1&b=2,在路径?后面的都属于路径传参,路径传参就是将参数以明文方式拼接在请求地址后面
路径传参使用【正常接收参数】中的实例代码即可接收到值
后台接口的编写
@RestController
public class IndexController {
    @GetMapping("/index")
    public Map index(String user, String name) {
 // 将接收的参数返回给前端
 HashMap result = new HashMap<>();
 result.put("user", user);
 result.put("name", name);

 return result;
 }
}
VUE代码
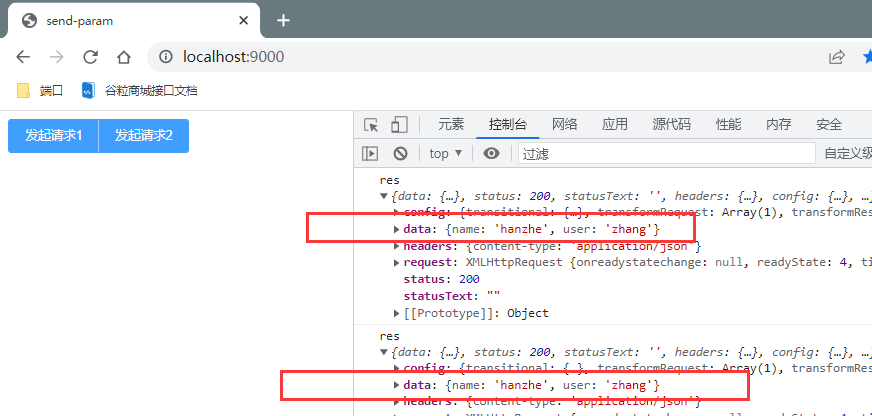
除了自己手动拼接请求参数之外,axios在config中提供了params属性,也可以实现该功能
// 正常拼接
request1() {
    this.axios.get("http://localhost:8080/index?user=zhang&name=hanzhe").then(res => {
        console.log("res", res);
    });
},
// 使用config中的params属性进行路径传参
request2() {
    let config = {
        params: {
            user: "zhang",
            name: "hanzhe"
        }
    }
    this.axios.get("http://localhost:8080/index", config).then(res => {
        console.log("res", res);
    });
}
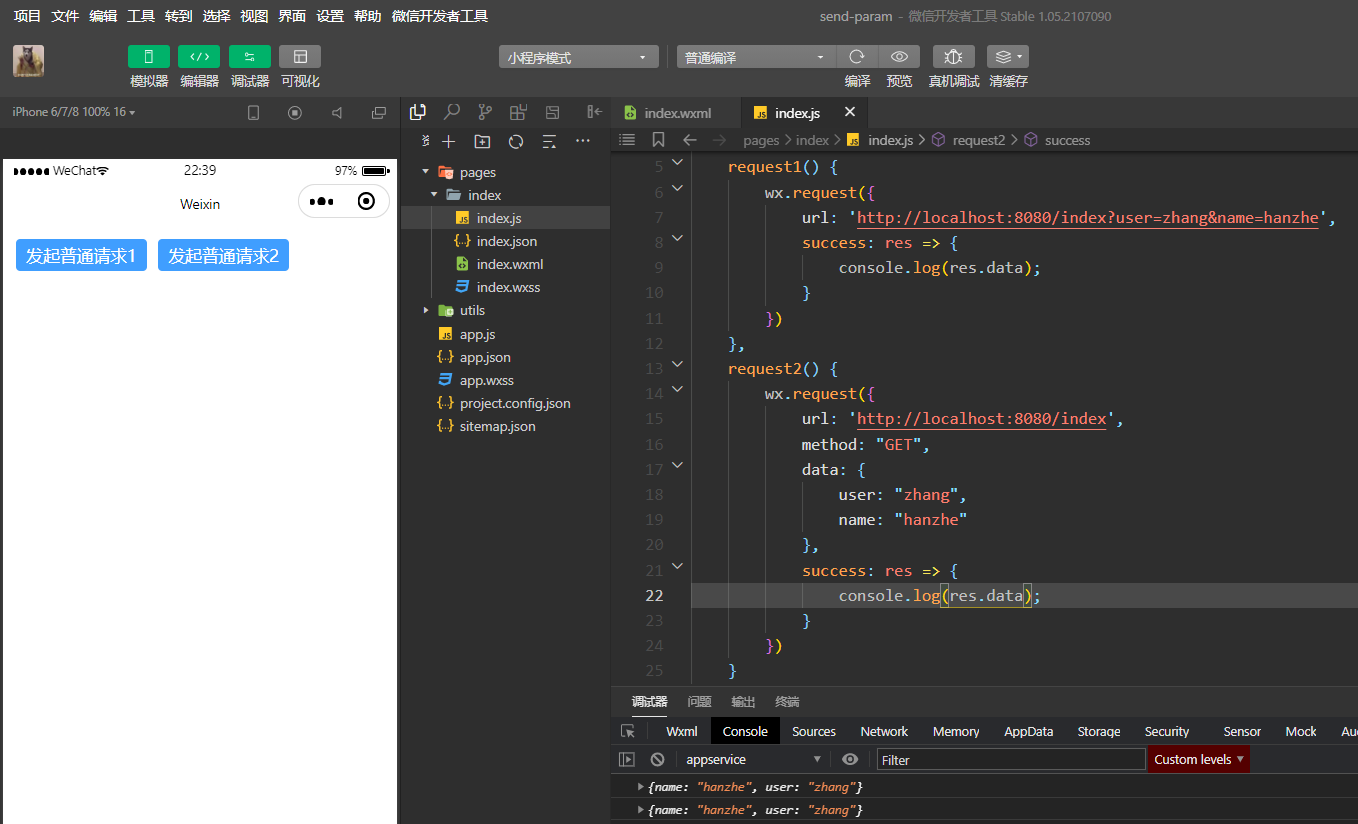
小程序代码
// 正常拼接
request1() {
    wx.request({
        url: 'http://localhost:8080/index?user=zhang&name=hanzhe',
        success: res => {
            console.log(res);
        }
    })
},
// 将请求类型设置为GET,wx识别后会将data转换为路径传参
request2() {
    wx.request({
        url: 'http://localhost:8080/index',
        method: "GET",
        data: {
            user: "zhang",
            name: "hanzhe"
        },
        success: res => {
            console.log(res);
        }
    })
}
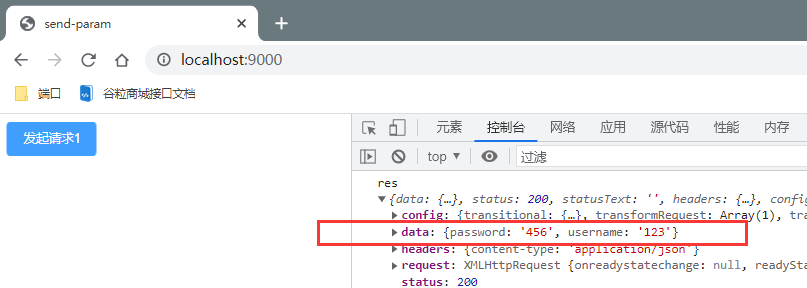
传参-表单类型参数
表单类型参数,就是通过form表单提交的参数,通常用在例如HTML、JSP页面的form标签上,但如果是前后端分离的话就不能使用form表单提交了,这里可以手动创建表单对象进行传值
需要注意,GET请求一般只用于路径传参,其他类型传参需要使用POST或其他类型的请求
表单类型参数也是【正常接收参数】中的实例代码接收值
后台接口的编写
@RestController
public class IndexController {
    @PostMapping("/index")
    public Map index(String username, String password) {
 // 将接收的参数返回给前端
 HashMap result = new HashMap<>();
 result.put("username", username);
 result.put("password", password);

 return result;
 }
}
VUE代码
request1() {
    // 构建表单对象,向表单中追加参数
    let data = new FormData();
    data.append("username", "123");
    data.append("password", "456");
    // 发起请求
    this.axios.post("http://localhost:8080/index", data).then(res => {
        console.log("res", res);
    });
},
小程序代码
小程序删除了FormData对象,不能发起表单类型参数的请求,如果非要写的话可以试着使用wx.uploadFile实现,这里就不尝试了
传参-请求体参数
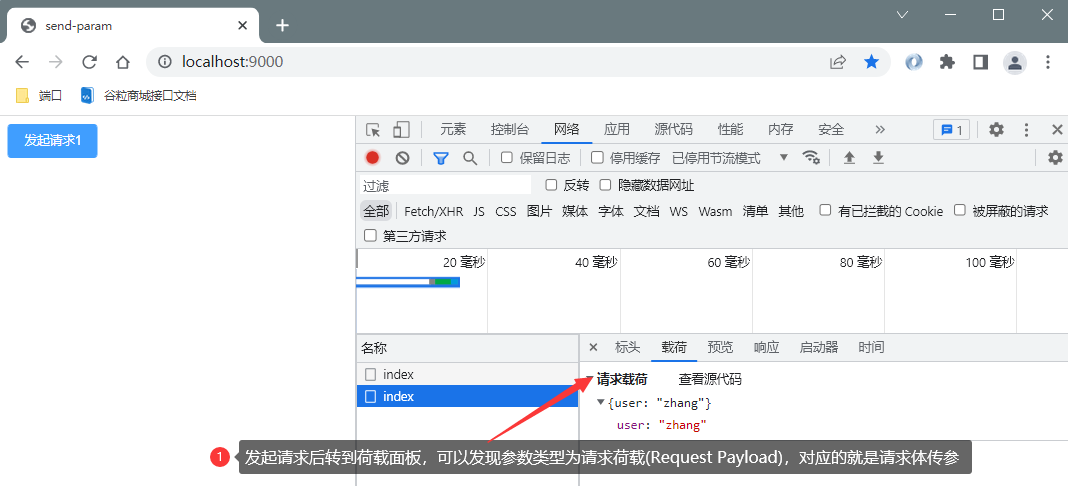
请求体传参,是在发起请求时将参数放在请求体中
表单类型参数需要使用上面【请求体接收参数】中的实例代码接收值
后台接口的编写
@RestController
public class IndexController {
    @PostMapping("/index")
    public Map index(@RequestBody UserEntity entity) {
 // 将接收的参数返回给前端
 HashMap result = new HashMap<>();
 result.put("username", entity.getUsername());
 result.put("password", entity.getPassword());

 return result;
 }
}
VUE代码
axios如果发起的为POST类型请求,默认会将参数放在请求体中,这里直接写即可
request1() {
    // 创建date对象存储参数
    let data = {
        username: "哈哈哈哈",
        password: "嘿嘿嘿嘿"
    }
    // 发起请求
    this.axios.post("http://localhost:8080/index", data).then(res => {
        console.log("res", res);
    });
},
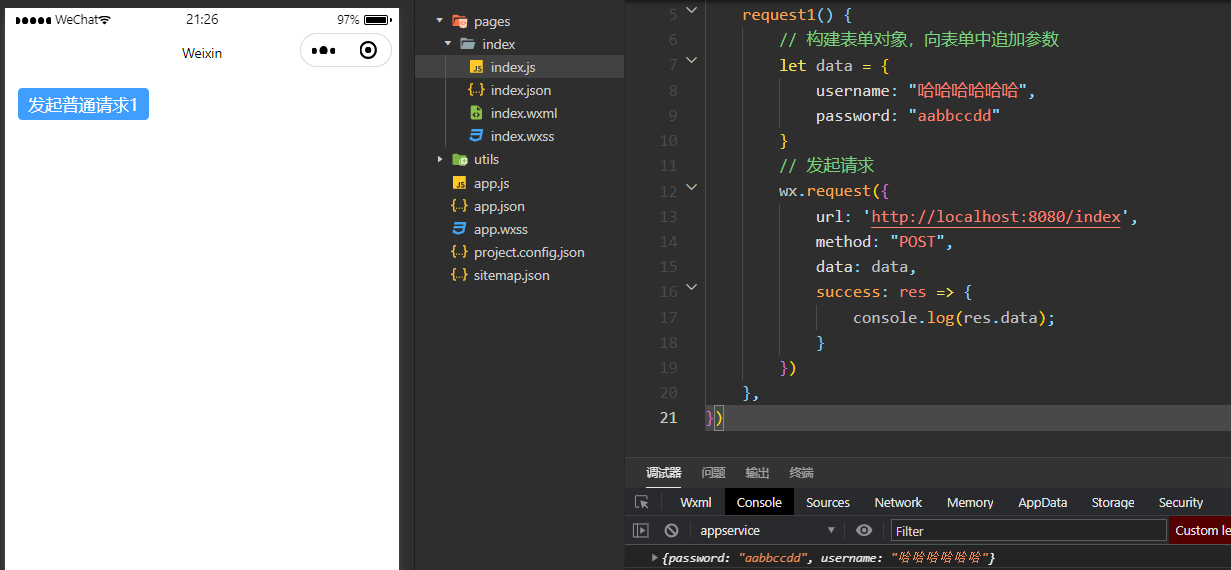
小程序代码
小程序代码也是一样的,当发起的时POST类型的请求时,默认会把参数放在请求体中
request1() {
    // 构建表单对象,向表单中追加参数
    let data = {
        username: "哈哈哈哈哈哈",
        password: "aabbccdd"
    }
    // 发起请求
    wx.request({
        url: 'http://localhost:8080/index',
        method: "POST",
        data: data,
        success: res => {
            console.log(res.data);
        }
    })
},
小技巧:如何区分传参类型
在实际开发中大概率不用写前端代码,只负责编写后台接口,但怎样才能知道前端请求是什么类型参数?
关于这点可以通过浏览器开发者工具的【网络】面板可以看出来,网络面板打开时会录制网页发起的所有请求
路径占位传参就不解释了,没啥好说的,这里介绍一下路径传参、表单传参和请求体传参
路径传参
编写好路径传参的请求代码后切换到网络面板,点击发起请求:
请求体传参
编写好请求体传参的请求代码后切换到网络面板,点击发起请求:
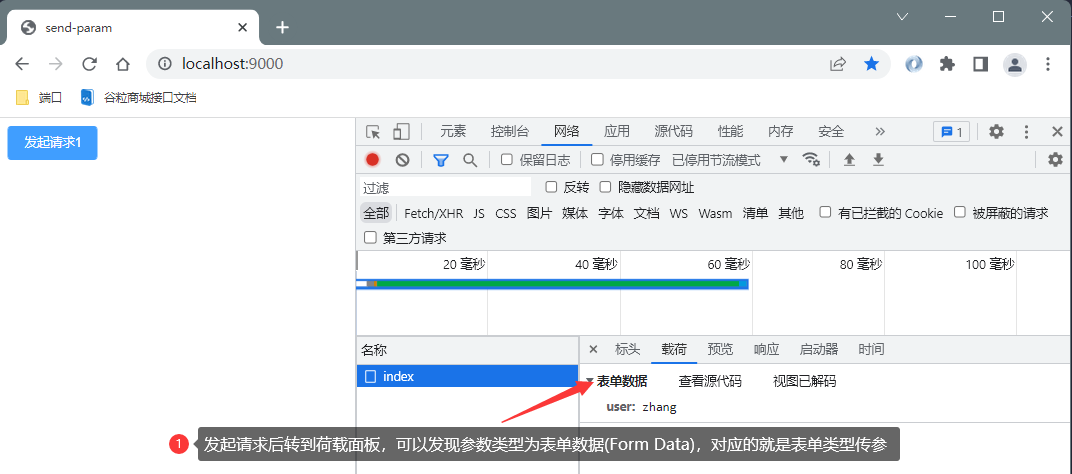
表单类型传参
编写好表单类型传参的请求代码后切换到网络面板,点击发起请求:
封装统一响应工具类
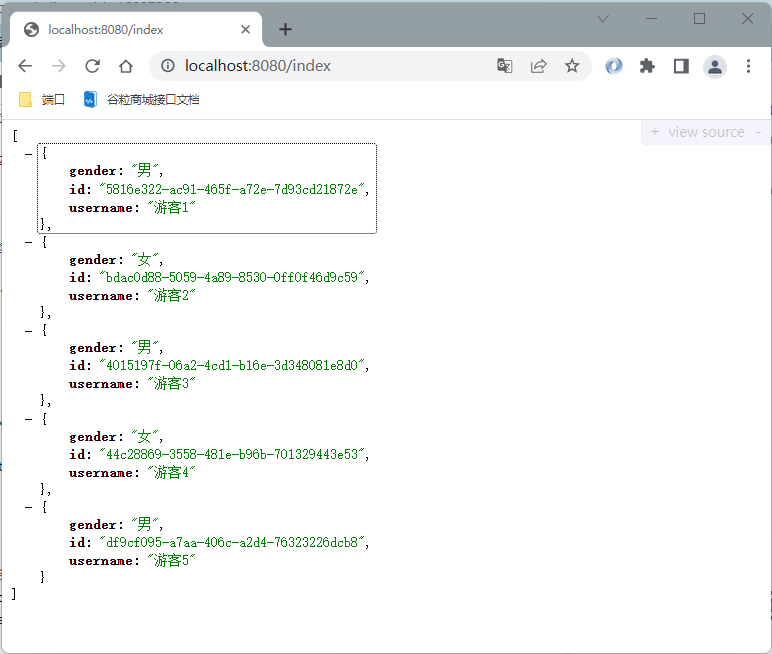
掌握了前后端交互的流程就可以正常开发网站了,这里推荐后端返回一套规定好的模板数据,否则某些情况可能会比较难处理,例如这个查询用户列表的接口:
@RestController
public class IndexController {
    @RequestMapping("/index")
    public List> index() {
 // 查询用户列表
 List> userList = this.selectList();
 // 将用户列表数据返回给前端
 return userList;
 }

 // 模拟dao层的查询代码,返回一个集合列表,集合中每个元素对应一条用户信息
 public List> selectList() {
 ArrayList> list = new ArrayList<>();
 for (int i = 1; i <= 5; i++) {
 HashMap map = new HashMap<>();
 map.put("id", UUID.randomUUID().toString());
 map.put("username", "游客" + i);
 map.put("gender", i % 2 == 1 ? "男" : "女");
 list.add(map);
 }
 return list;
 }
}
该接口乍一看没毛病,拿到用户列表数据后返回给前端用于渲染,合情合理,可是如果后端业务逻辑有BUG可能会导致前端接收到的结果为空,这种情况下前端就需要判断,如果接收到的值为空,就提示请求出错,问题貌似已经解决,但是如果表中本来就没有任何数据的话有应该怎么处理
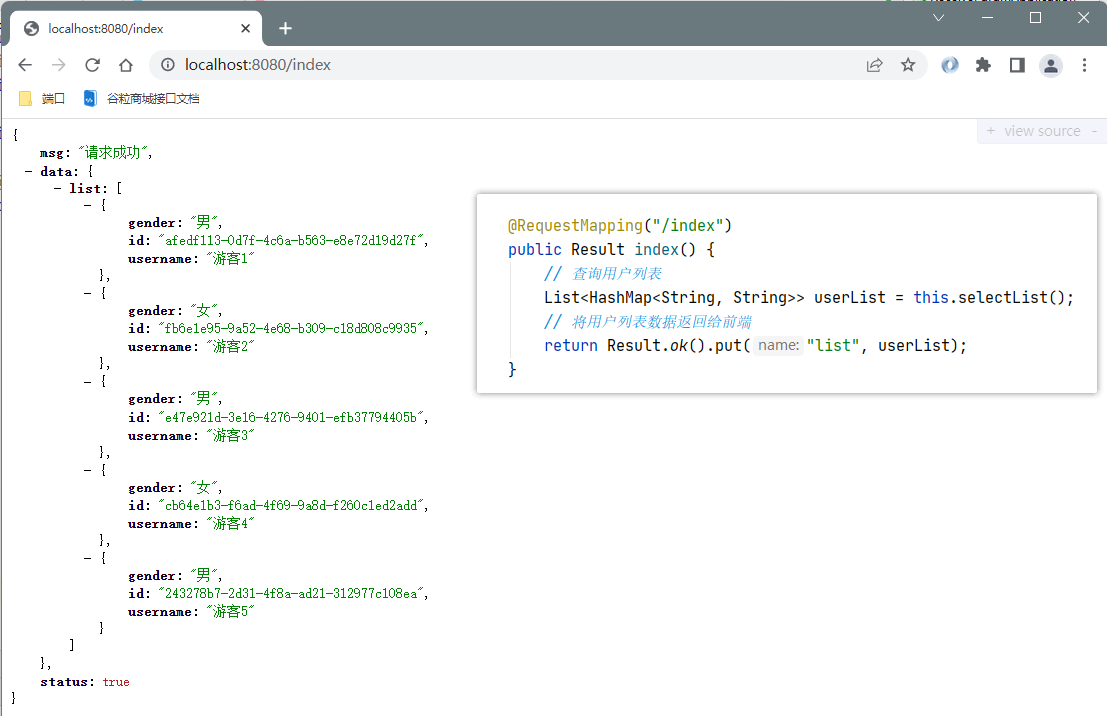
上述的就是最常见的一种比较头疼的情况,所以针对这种情况最好指定一套标准的返回模板进行处理
制定响应工具类
根据刚刚的举例来看,返回结果中应该有一个标识来判断该请求是否执行成功,如果执行失败的话还应该返回失败原因,响应给前端的数据会被转换为JSON数据,使用Map集合来返回最合适不过了
import java.util.HashMap;
import java.util.Map;

public class Result extends HashMap {

 /**
 * 私有化构造方法,不让外界直接创建对象
 * @param status true为请求成功,false为请求失败
 * @param msg 返回给前端的消息
 */
 private Result(boolean status, String msg) {
 // 规定无论请求成功还是失败,这两个参数都必须携带
 super.put("status", status);
 super.put("msg", msg);
 }

 /**
 * 静态方法,如果请求成功就调用ok
 */
 public static Result ok() {
 return new Result(true, "请求成功");
 }

 /**
 * 静态方法,如果请求失败就调用fail,需要提供失败信息
 */
 public static Result fail(String msg) {
 return new Result(false, msg);
 }

 /**
 * 规定所有返回前端的数据都放在data中
 * @param name 对象名
 * @param obj 返回的对象
 */
 public Result put(String name, Object obj) {
 // 如果集合中不包含data,就创建个Map集合添加进去
 if (!this.containsKey("data")) {
 super.put("data", new HashMap());
 }
 // 获取data对应的map集合,往里面添加数据
 Map data = (Map) this.get("data");
 data.put(name, obj);
 return this;
 }

}
扩展:ApiPost接口调试工具
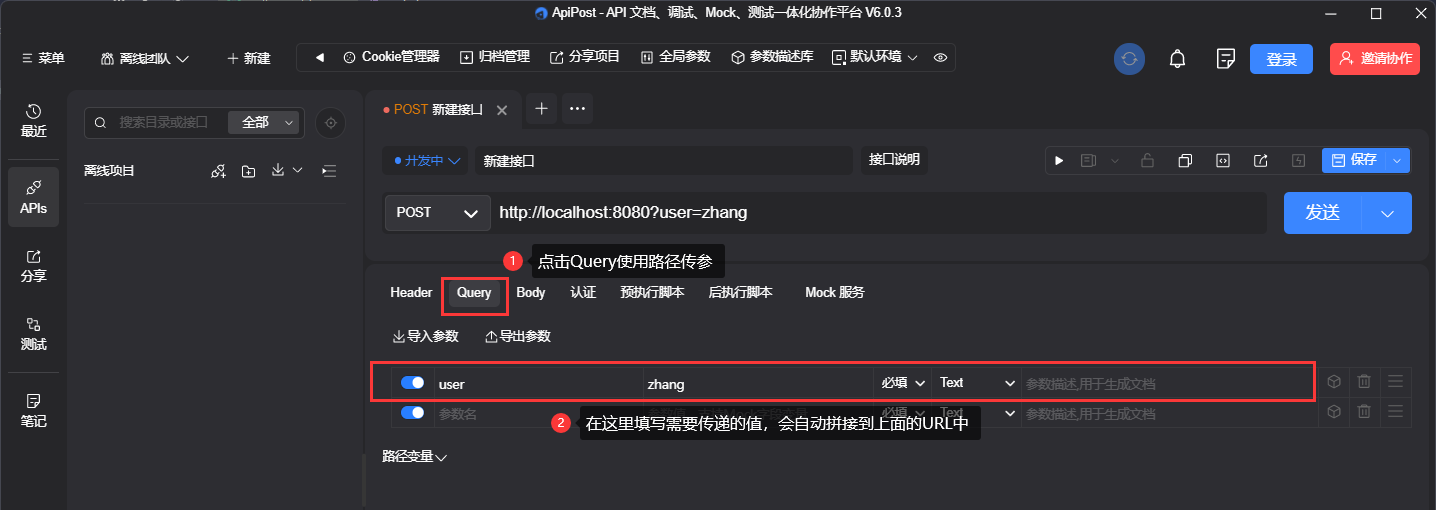
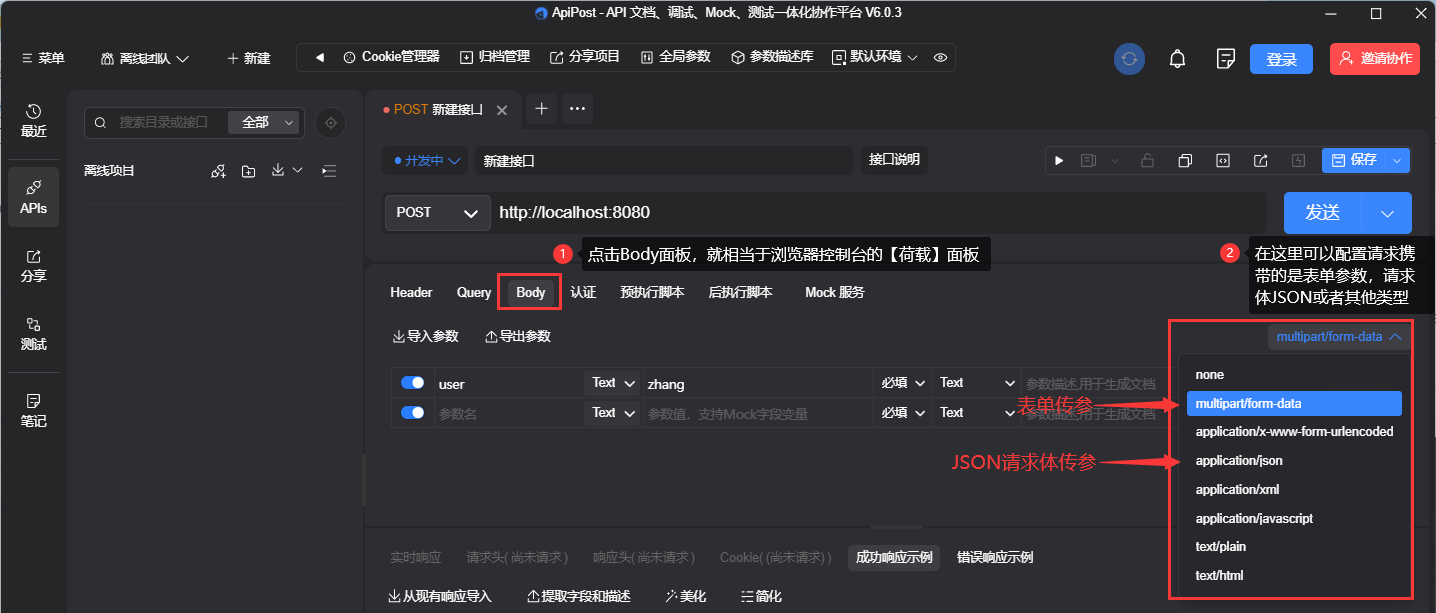
在后台接口编写完成后,一般情况下我们都需要进行测试,GET请求还好,浏览器直接就访问呢了,如果是POST请求还要去写前端代码就很烦,这里介绍一款接口调试工具ApiPost
你可能没听过ApiPost,但是你大概率听说过Postman,他们的用法几乎一致,且ApiPost是国人开发的免费的接口调试工具,界面中文很友好
这里也可以看出来,form表单传参其实也算在了请求体里面,只不过使用的是multipart/form-data类型的参数而已,而之前提到的请求体传参对应的就是application/json
-
__EOF__
Java小学生丶 - 本文链接: https://blog.csdn.net/hanzhe/p/16037322.html
转载请注明:xuhss » SpringMVC前后端分离交互传参详细教程
