文章目录
显示
动态实时拉取疫情数据
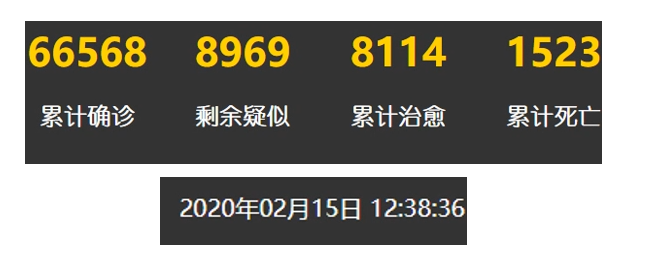
统计数据及时间
一.调整css样式

调整css
.num{
    width: 25%;
    float: left;
    display: flex;
    align-items: center;
    justify-content: center;
    color: gold;
    font-size: 20px;
    /* margin-top: 20px; */
}

.txt{
    width: 25%;
    float: left;
    font-family: "幼圆";
    display: flex;
    align-items: center;
    justify-content: center;

}

.txt h2{
margin: 0;
}
调整html
<!DOCTYPE html>
<html>
    <head>
        <meta charset="utf-8">
        <title>疫情监控</title>
        <link href="../static/css/main.css" rel="stylesheet"/>
        <style>

        </style>
    </head>
    <body>
        <div id="title">全国疫情实时数据追踪</div>
        <div id="time">我是时间</div>
        <div id="l1">我是左1</div>
        <div id="l2">我是左2</div>
        <div id="c1">
            <div class="num"><h1>123</h1></div>
            <div class="num"><h1>123</h1></div>
            <div class="num"><h1>123</h1></div>
            <div class="num"><h1>123</h1></div>
            <div class="txt"><h2>累计确诊</h2></div>
            <div class="txt"><h2>剩余疑似</h2></div>
            <div class="txt"><h2>累计治愈</h2></div>
            <div class="txt"><h2>累计死亡</h2></div>
        </div>
        <div id="c2">我是中2</div>
        <div id="r1">我是右1</div>
        <div id="r2">我是右2</div>
    </body>
</html>
调整c1样式的背景和颜色:
#c1{
    position: absolute;
    width: 40%;
    height: 30%;
    top: 10%;
    left: 30%;
    color: white;
}
修改时间time的样式
#time{
    position: absolute;
    height: 10%;
    right: 2%;
    top: 5%;
    color: #FFFFFF;
    font-size: 20px;
}
二.写页面web后台来获取数据
2.1获取时间数据
引入jquery
<!DOCTYPE html>
<html>
    <head>
        <meta charset="utf-8">
        <title>疫情监控</title>
        <script src="../static/js/jquery.js"></script>
编写ajax脚本
        <script>
            function gettime(){
                $.ajax({
                    url:"/time",
                    timeout:10000,//超时时间设置为10秒;
                    success:function(data){
                        $("#time").html(data)
                    },
                    error:function(xhr,type,errorThrown){

                    }
                });
            }
            setInterval(gettime, 1000)
        </script>
编写工具类获取服务器时间 utils.py
import  time

def get_time():
    time_str = time.strftime("%Y{}%m{}%d{} %X")
    return  time_str.format("年","月","日")
    pass

if __name__ == "__main__":
print(get_time())app.py编写ajax对应的后台接口代码:
import utils
@app.route('/time')
def get_time():
    return utils.get_time()
修改主页面为 main.html
@app.route('/')
def hello_world():
    return render_template("main.html")
2.2从数据库获取腾讯疫情数据
丰富utils.py
import pymysql

def get_conn():
    # 创建连接
    conn = pymysql.connect(host="35.241.84.84",
                           user='root',
                           password='123qweasdzxc',
                           db='cov')
    # 创建游标
    cursor = conn.cursor()
    return conn, cursor

def close_conn(conn, cursor):
    if cursor:
        cursor.close()
    if conn:
        conn.close()

def query(sql, *args):
    """
    :封装通用查询
    """
    conn, cursor = get_conn()
    cursor.execute(sql, args)
    res = cursor.fetchall()
    close_conn(conn, cursor)
    return res

def get_c1_data():
    """
    :return 返回大屏div id=c1 的数据
    """
    # 因为会更新多次数据,取时间戳最新的那组数据
    sql = "select sum(confirm)," \
    "(select suspect from history order by ds desc limit 1)," \
    "sum(heal)," \
    "sum(dead)" \
    "from details" \
    " where update_time=(select update_time from details order by update_time desc limit 1) "
    res = query(sql)
    return res[0]
测试get_c1_data()的返回结果
if __name__ == "__main__":
    print(get_c1_data())
结果如下图所示:
[外链图片转存失败,源站可能有防盗链机制,建议将图片保存下来直接上传(img-63uUCCou-1616337368528)(C:\Users\hbq\AppData\Roaming\Typora\typora-user-images\image-20210321214920255.png)]
app.py定义一个后端接口返回json
@app.route('/c1')
def get_c1_data():
    data = utils.get_c1_data()
    confirm_num = data[0].to_eng_string()
    heal_num = data[2].to_eng_string()
    dead_num = data[3].to_eng_string()
    return jsonify({"confirm" : confirm_num, "suspect" : data[1], "heal" : heal_num,"dead" : dead_num})
main.html添加ajax局部获取数据
            function get_c1_data(){
                $.ajax({
                        url:"c1",
                        success:function(data){
                            $(".num h1").eq(0).text(data.confirm);
                            $(".num h1").eq(1).text(data.suspect);
                            $(".num h1").eq(2).text(data.heal);
                            $(".num h1").eq(3).text(data.dead);
                        },
                        error:function(xhr,type,errorThrown){

                        }
                })
            }
            setInterval(get_c1_data, 1000)
运行后台服务

转载请注明:xuhss » Python Flask定时调度疫情大数据爬取全栈项目实战使用-12 动态实时拉取统计数据及时间